• Skip to main content

I can make metal stamped jewelry

Stamped Metal Necklace

October 26, 2022 by decey Leave a Comment

Stamped Metal and Leather Necklace One

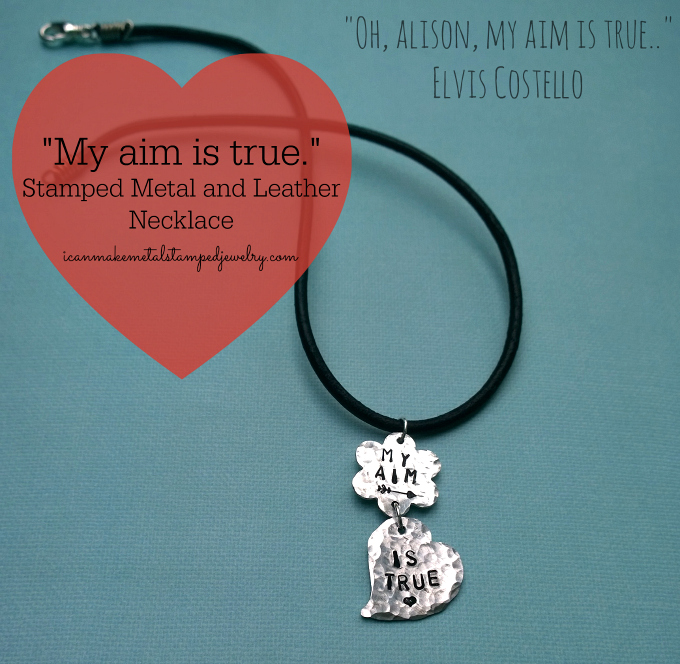
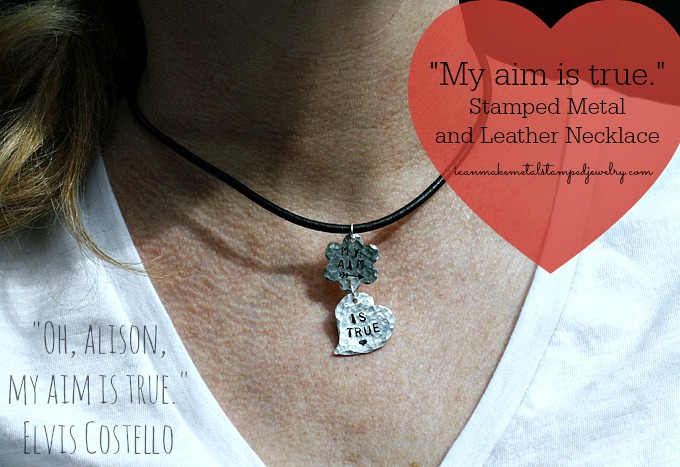
This week’s DIY is a stamped metal necklace on a leather cord. You’ll learn how to stamp, ink, make a two part pendant and turn leather cord into a necklace with 20 gauge plated craft wire.  We love leather cord for guys and gals to give your jewelry a more casual, laid back appeal.

My sister-in-law Alison was visiting us this weekend for her birthday. I had just *received the new arrow and heart stamps from Beaducation along with their fabulous new beginner’s metal stamp kit and an array of blanks and this design came together from there. One of the best things about hand stamped jewelry is that you can easily share a personalized message using images, numbers and letters. Aluminum blanks are soft and very easy to stamp, I like them best hammered to give them texture and make them look more like precious metal. This is a very easy design to execute and Beaducation has everything you need in their beginner’s kit. In fact, I’ll be giving this kit away on Wednesday, so make sure you come back to enter for the chance to win! (US Residents only.)

You will need:

Beaducation aluminum blanks in flower and heart
2 4.5mm jump rings
Black leather cord
20 gauge silver plated copper wire
Lobster clasp
OR Black leather finished necklace
Beaducation Stamping on Metal Starter Kit: Includes bench block, economy stamps in 1/8″ size, 1.5mm hole punch pliers, Sharpie marker, printed instructions, video tutorial CD, copper sheet, ball chain necklace, copper blanks, stamping tape, pro polish pads
Heart Arrow Stamp
Tiny Fat Lined Heart Stamp
1 pound brass stamping hammer
Chasing hammer
Black acrylic paint dabber
Round nose pliers
Chain nose pliers
Flush cutters
Paper towel
1-4

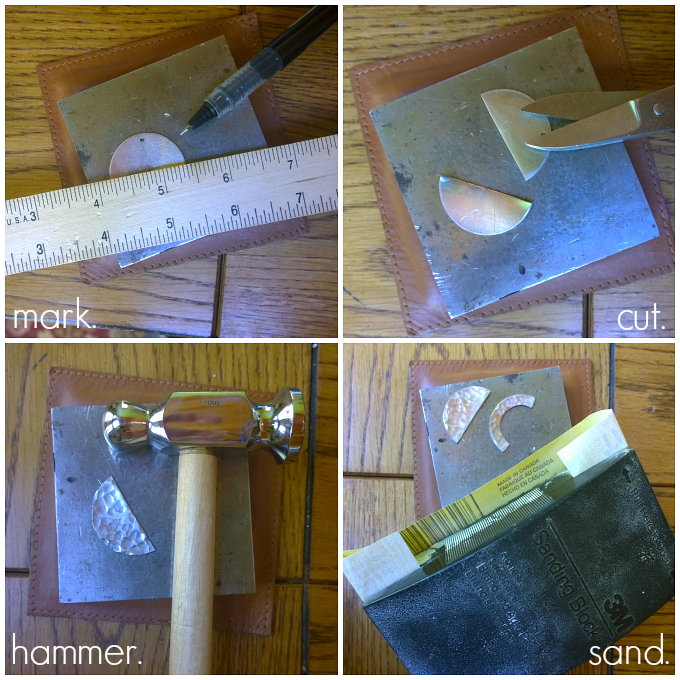
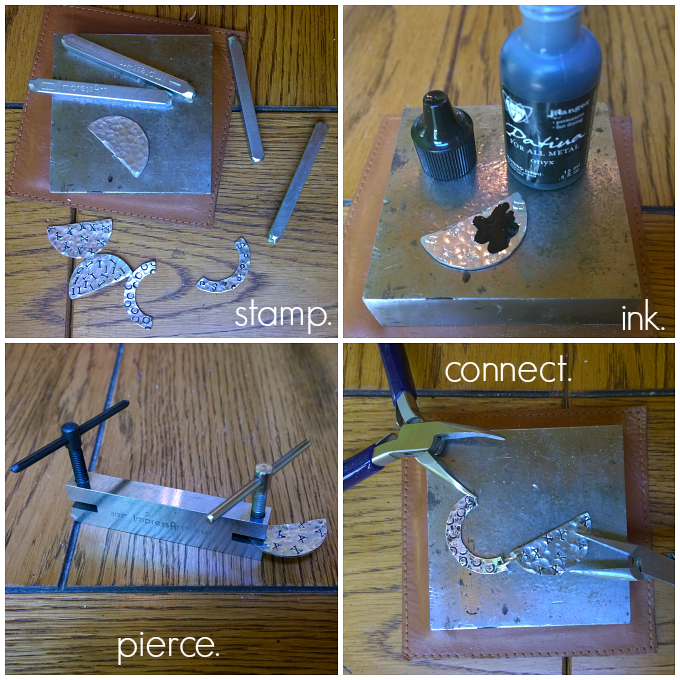
Step one: Use round end of chasing hammer to hammer texture on surface of both blanks. Step two: Stamp MY AIM and arrow on flower blank as shown. Step three: Stamp IS TRUE and heart on heart blank as shown. Step four: Use pliers to pierce a hole at the top and bottom petal of flower and top of the larger side of the heart blank as shown.
5-8

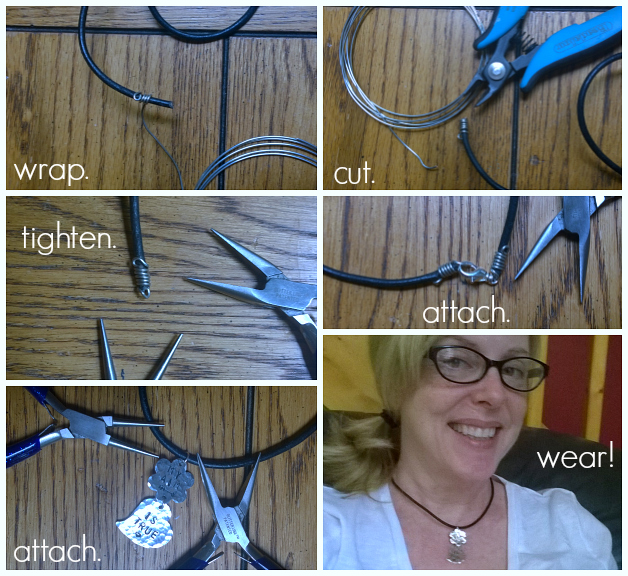
Step five: Dab paint into stamped areas of blanks. Wipe off excess with paper towel. Step six: Connect the two blanks with a jump ring. Attach a second jump ring to the top hold in the flower blank. Step seven: Cut leather to desired length. Step eight: Use round nose pliers to create a small loop in the end of your wire coil.
9-13

Step nine: Wrap wire around leather, working up from turned loop. You will need to leave about 1/4″ of leather on the tail and will coil approximately 5 times. Make sure you wrap this tightly and take your time so it’s neatly coiled. Step ten: Cut the end from wire when you have almost reach the end of the leather. Use cutters to remove excess leather. Step eleven: Grasp the final coil and turn it up to create a loop using your chain nose pliers. Adjust the loop, making sure it’s flush to the top of the leather end with your round nose pliers. Use the chain nose pliers to gently compress the coils together to remove any gaps. Do this on both sides of your leather. Step twelve: Gently open one end loop to attach a clasp. Step thirteen: Attach the pendant to the front of the leather using pliers. Step thirteen: Wear!
My Aim is True LS No Burst

What song lyrics would you use for this stamped metal necklace? Let us know in the comments! Don’t forget to come back on Wednesday for the GIVEAWAY!

Cheers,
Margot and Avalon

(*FTC DISCLOSURE: Blogger was provided product for this post and the giveaway, all opinions and instructions are 100%  her own.)

*DIY Project Policy: Our tutorials are meant for your creative inspiration. Feel free to make and gift or wear these designs. Please make sure that you give credit to us as the designer if you make and share these designs on your blog or social sites. Please do not make and sell copies of our designs or sell them as kits. Please do not teach these designs as classes for profit. This is how we make our living and we ask that you respect our creativity and the time it takes to design, photograph and write these free tutorials. You may use a single photograph from each project online in blog round-ups or blog posts ONLY if you include a direct link back to our tutorial. Any use of these designs for retail sale for profit online in places like Etsy or eBay or in retail bricks and mortar, flea markets or outdoor fairs is not permitted. Thank you!
Filed Under: Uncategorized Tagged With: DIY hand stamped jewelry, DIY jewelry, DIY metal stamped necklace, DIY Necklace, easy metal stamping projects, get started metal stamping, hand stamped jewelry, how to make metal stamped jewelry, Stamped Metal Necklace

DIY Metal Stamped Silverware Garden Markers

August 25, 2022 by decey Leave a Comment

Metal Stamped Spoons Text

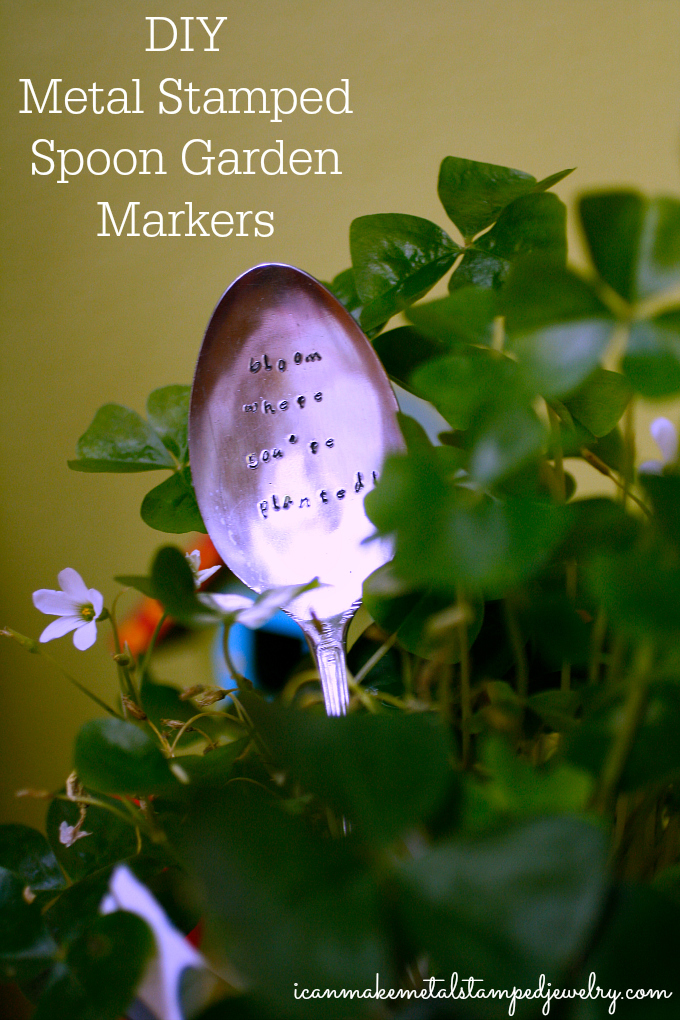
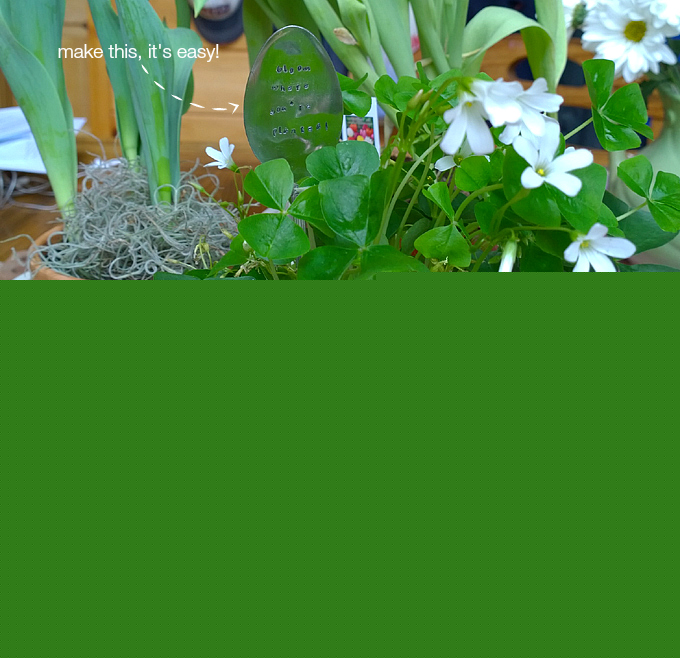
We’ve seen a lot of metal stamped silverware trending over the past year on the web. It’s such fun, we had to try it ourselves. Check back Friday for a round-up post. Great news, ImpressArt recently debuted a new line of premium metal stamps with a lifetime guarantee for use with harder metals like stainless steel. We used our regular ImpressArt stamps, but if you plan on making a garden full of these, the premium stamps will withstand the punishment. Over time, regular and especially economy stamps will show signs of wear if used on hard metals like the stainless steel in silverware. We scored our spoons for a quarter at a local thrift shop, which makes this a fun upcycled project. Here’s how you can stamp your own spoons (or forks and knives!)

Metal Stamped Spoon Garden Marker Text

*You will need:

Thrift shop spoon
ImpressArt Lowercase Stamp Set, 3mm, Bridgette stamps lower case or ImpressArt Newsprint Lowercase Alphabet Metal Stamps- New Case stamps lower case
5 pound sledge hammer
ImpressArt 2 by 2-Inch Steel Block
Basement Floor or other Concrete Slab
ImpressArt Stamp Straight Tape
Folk Art Enamel Acrylic Paint, Licorice
Cotton swab
Paper towel

Metal Stamped Spoon Steps copy

Step one: It’s much easier to stamp the spoons if they’re flattened. You can use a regular hammer, but they end up looking pretty rustic (meaning lumpy) that way. My hubby used a sledgehammer in our basement, it took a few hits to take the spoon from round to flat, but using a towel to protect it left the surface smooth when finished. Step two: I stamped “bloom where you’re planted” on the spoon, so I started just below the center with the word you’re.  (The punctuation marks are both in the Bridgette lower case set.) Tape the spoon down, start stamping in the center of each word and work your way out and then up and down.  You’ll need to move the tape for each word. You need a very firm grip on your stamps to prevent them from skipping. Hit each letter 2-3 times in a row (usually we recommend one good hit but stainless is much harder than regular metal blanks.) Step three: Here’s what the spoon should look like when you finish stamping. Step four: Use black enamel paint to help the letters stand out. The impressions won’t be very deep, so the paint won’t pop as much as it does on other blanks. Use cotton swab to dig paint into letters. Let it sit for about 3o seconds. Wipe off the excess paint with a paper towel.

Metal Stamped Spoon Garden Marker Close Up T

That’s it! Make a garden full of Metal Stamped Silverware!  These make wonderful Mother’s Day and Wedding gifts and you can use this same technique to make jewelry. Stay tuned for more ideas with this technique in the future and come back Friday for a big metal stamped silverware round-up!

Cheers,
Margot and Avalon

*(FTC DISCLOSURE: There are affiliate links in this post.  If you click on a link and make a purchase, we get a small percentage of the sale.)

Filed Under: Uncategorized Tagged With: DIY crafts, DIY garden markers, DIY metal stamped silverware, get started metal stamping, metal stamped garden markers, metal stamped old silverware, metal stamped silverware, metal stamped spoons, metal stamping basics

DIY Candy Stash Necklace

August 12, 2022 by decey Leave a Comment

DIY Candy Stash Three

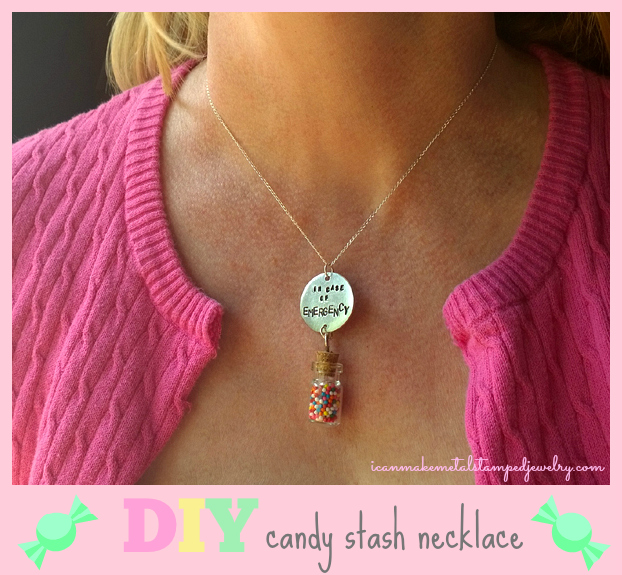
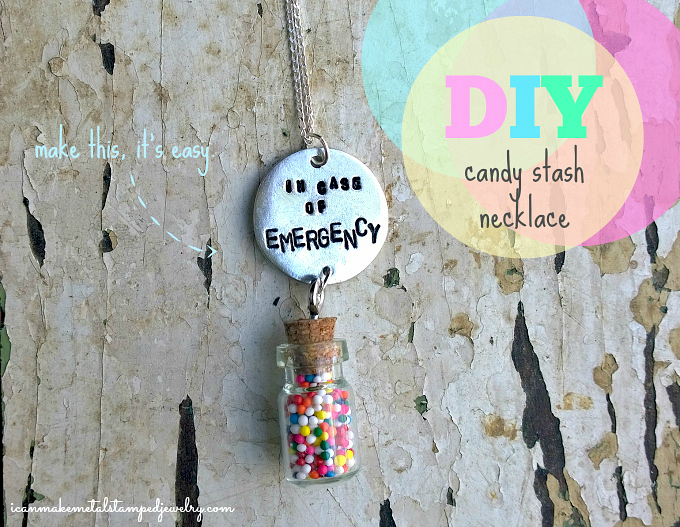
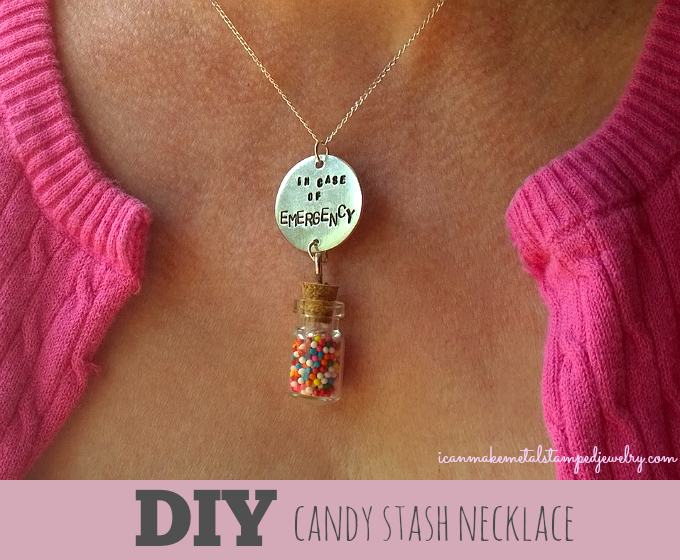
Sometimes you need a little sugar rush. When that emergency strikes, this DIY Candy Stash Necklace will fix you right up! Or, you could just wear it because it’s cute. Like you, cutie pie! Fill your tiny vial with whatever you might need in an emergency, glitter, glue, aspirin, sequins…vodka. What ev er.

You will need:
Mini Glass Vials with Screws
2 6mm Jump Rings
Sterling Silver Fine Cable Chain Necklace
Candy sprinkles
ImpressArt Pewter Stamping Blank River Stone
Letter Punch Set 1/16 Inch
Letter Stamp Punch Set 1/8″
ImpressArt Steel Stamping Block
ImpressArt Brass Stamping Hammer
Impress Art Stamp Straight Tape
ImpressArt 2-Hole Punch
Chain nose pliers
Aleene’s Max Tacky Adhesive
Folk Art Enamel Acrylic Paint, Licorice
Small Funnel
Cotton swab and paper towel

Amazon.com Widgets

Steps 1-4

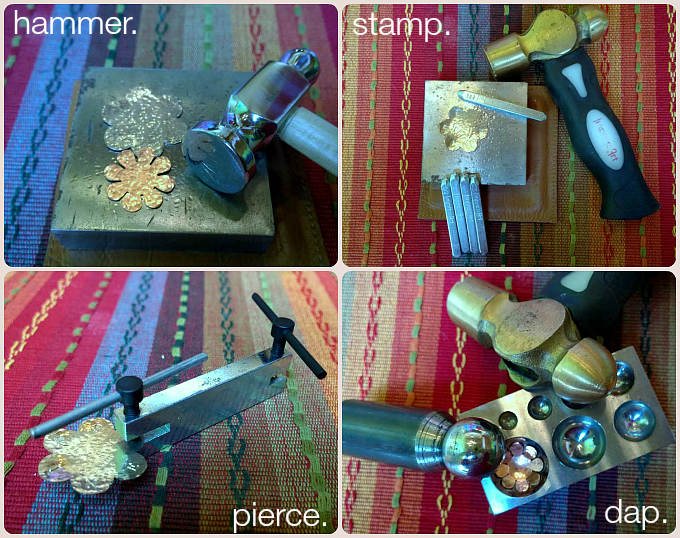
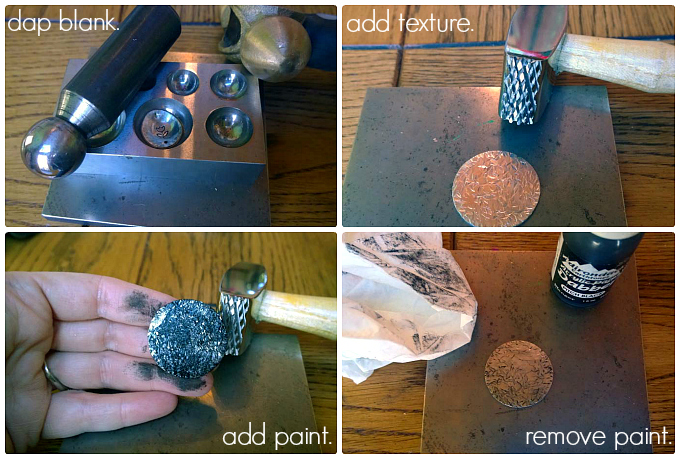
Step one: Stamp “in case of EMERGENCY” on your blank. Start in the center with “of” and work to top and bottom. I used smaller lower case fonts for “in case of” and then did the word “EMERGENCY” in all caps with a cattywompus placement. Step two: Swipe black enamel paint across front of blank with a cotton swab. Let sit for 30 seconds, then wipe off with a soft cloth or paper towel. Step three: Use smaller side of 2-hole punch to pierce a hole in the center bottom of stamped blank. Step four: Use funnel to pour candy sprinkles into vial.

Steps 5-8

Step five: Wipe a small amount of adhesive around bottom half of cork. Use pliers to hold cork securely as you place it into vial. Step six: Place a small amount of adhesive on end of screw. Use chain nose pliers to grip loop at top of screw and slowly screw it into the top of the cork. Step seven: Connect the jar to the stamped charm and add a jump ring to top of charm. Step eight: Add chain.

DIY Candy Stash Beauty Shot Text E

That’s it! You can make this DIY Candy Stash Necklace in well under thirty minutes, just make sure you let the adhesive dry before you wear it out on the town. Oh, and don’t break this unless there’s a real emergency, or you’ll have to make another.

DIY Candy Stash Necklace HRP

What will you stash in yours? Let us know in the comments!

Cheers,
Margot and Avalon

*DIY Project Policy: Our tutorials are meant for your creative inspiration. Feel free to make and gift or wear these designs. Please make sure that you give credit to us as the designer if you make and share these designs on your blog or social sites. Please do not make and sell copies of our designs or sell them as kits. Please do not teach these designs as classes for profit. This is how we make our living and we ask that you respect our creativity and the time it takes to design, photograph and write these free tutorials. You may use a single photograph from each project online if you include a direct link back to our tutorial. Any use of these designs for retail sale for profit online in places like Etsy or eBay or in retail bricks and mortar, flea markets or outdoor fairs is not permitted. Thank you!

(This post contains affiliate links. If you click on a link and make a purchase, we get a small percentage of the sale. That’s how we maintain our candy stash.)

*DIY Project Policy: Our tutorials are meant for your creative inspiration. Feel free to make and gift or wear these designs. Please make sure that you give credit to us as the designer if you make and share these designs on your blog or social sites. Please do not make and sell copies of our designs or sell them as kits. Please do not teach these designs as classes for profit. This is how we make our living and we ask that you respect our creativity and the time it takes to design, photograph and write these free tutorials. You may use a single photograph from each project online in blog round-ups or blog posts ONLY if you include a direct link back to our tutorial. Any use of these designs for retail sale for profit online in places like Etsy or eBay or in retail bricks and mortar, flea markets or outdoor fairs is not permitted. Thank you!

Filed Under: Uncategorized Tagged With: candy sprinkles necklace, candy themed jewelry, DIY metal stamped jewelry, DIY metal stamped pendant, fun jewelry, quick and easy jewelry, whimsical jewelry

DIY Naughty Nice Earrings

June 5, 2022 by decey Leave a Comment

Naughty or Nice Earrings1

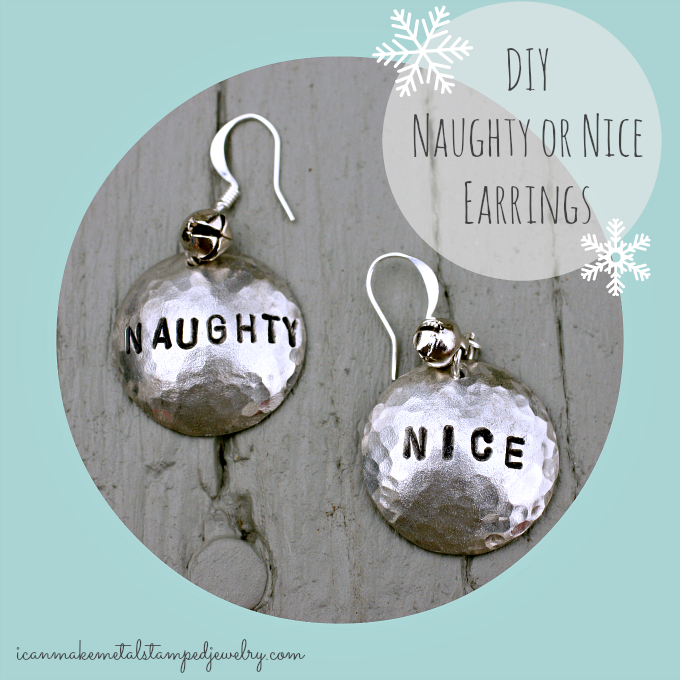
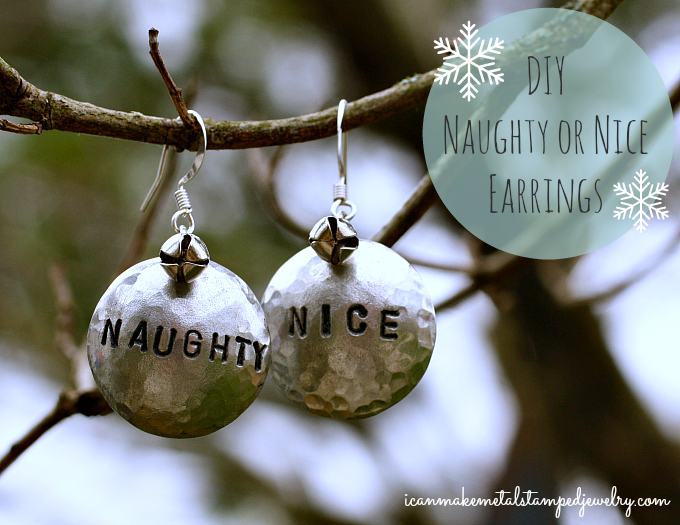
Have you been naughty or nice? Or perhaps a little bit of both? No matter, we’ve got you covered! These DIY Naughty Nice Earrings are so easy to make and perfect for the holiday season. Whip up a pair for yourself and perhaps some of the folks on your naughty nice list! Get the instructions below! (Our posts contain affiliate links, if you click on a link and make a purchase we get a small percentage of the sale. Ho, ho, ho!)

What you need:

2 ImpressArt- Pewter Stamping Blanks, Circle, 15/16.
2 Dapped and Spring Ear Wire
2 6mm Jump Ring
2 Tiny Jingle Bells
3mm Uppercase Sans Serif Font Set
ImpressArt Brass Stamping Hammer
ImpressArt Steel Stamping Block
Impress Art Stamp Straight Tape
ImpressArt Face Chasing Hammer
Dapping Set Block
Folk Art Enamel Acrylic Paint, Licorice
2 pairs Chain Nose Pliers
Paper Towel
Cotton Swab

Amazon.com Widgets

Amazon.com Widgets

How to make:

1-4

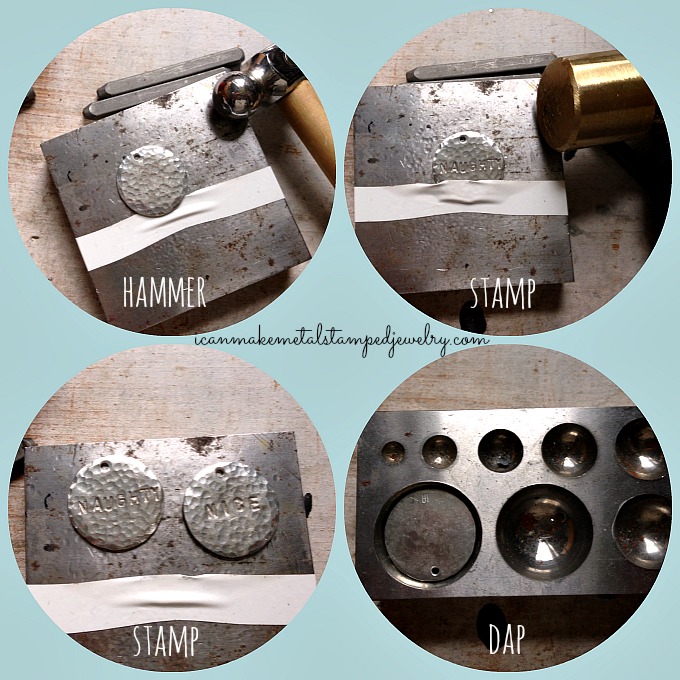
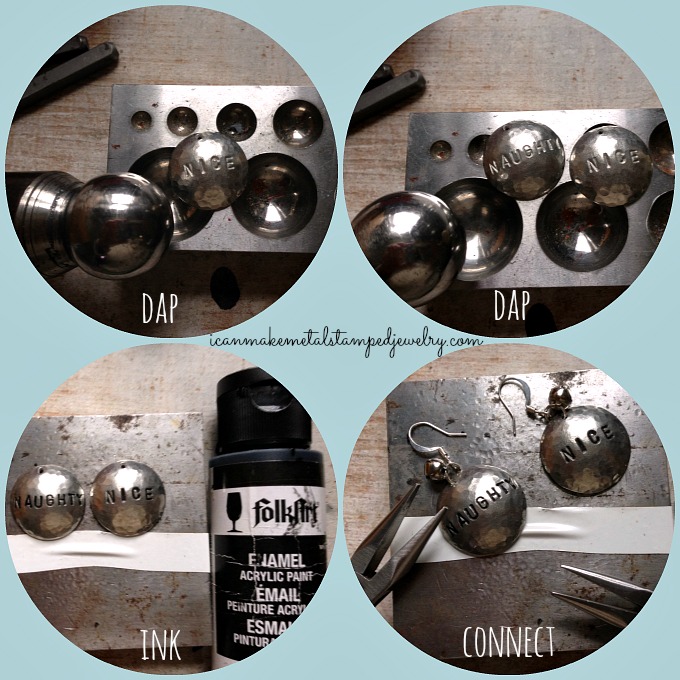
Step one: Use round end of a ball peen hammer to add texture to the surface of your blanks. Step two: Stamp NAUGHTY on one blank. Stamp Straight tape secures the blanks and provides an edge so you can stamp across the center. The word NAUGHTY just fits, so start stamping in the center and move out to make sure you get it all on the blank! Step three: Stamp NICE on the second blank. Step four: Place blank bottom side up in dapping block, make sure the blank fits the block so you get a nice dome.

5-8

Step five: Place corresponding punch into block and hammer with brass hammer. Move the punch around as you hit to make an even dome. Step six: Repeat the dapping process with the second blank. Step seven: Use a cotton swab to apply paint to surface of blanks. Allow to sit for 30 seconds. Wipe off excess with paper towel. Step eight: Slide blank, bell and earring wire on jump ring and connect with chain nose pliers. Be sure to close your rings with tension so they’re secure. Repeat for second earring.

Naughty or Nice LS2

Jingle, jingle, you naughty little minx! Or nice minx. Whichever!

If you make a pair of DIY Naughty Nice Earrings, we’d love to see them! Leave a link in the comments.

Cheers,
Margot and Avalon

*DIY Project Policy: Our tutorials are meant for your creative inspiration. Feel free to make and gift or wear these designs. Please make sure that you give credit to us as the designer if you make and share these designs on your blog or social sites. Please do not make and sell copies of our designs or sell them as kits. Please do not teach these designs as classes for profit. This is how we make our living and we ask that you respect our creativity and the time it takes to design, photograph and write these free tutorials. You may use a single photograph from each project online in blog round-ups or blog posts ONLY if you include a direct link back to our tutorial. Any use of these designs for retail sale for profit online in places like Etsy or eBay or in retail bricks and mortar, flea markets or outdoor fairs is not permitted. Thank you!
Filed Under: Uncategorized Tagged With: Christmas jewelry, DIY hand stamped jewelry, DIY jewelry, easy hand stamped jewelry, easy metal stamping, hand stamped earring DIY, holiday earrings, holiday jewelry, metal stamped jewelry

Happily Ever After Necklace

May 28, 2022 by decey Leave a Comment

Happily Purple Text Three

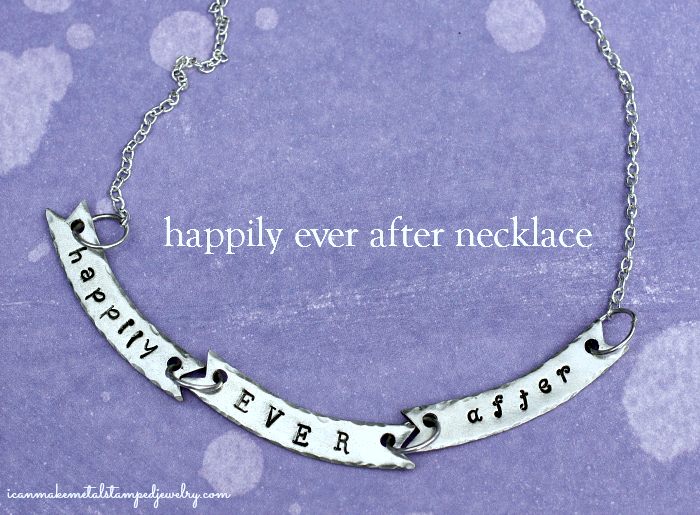
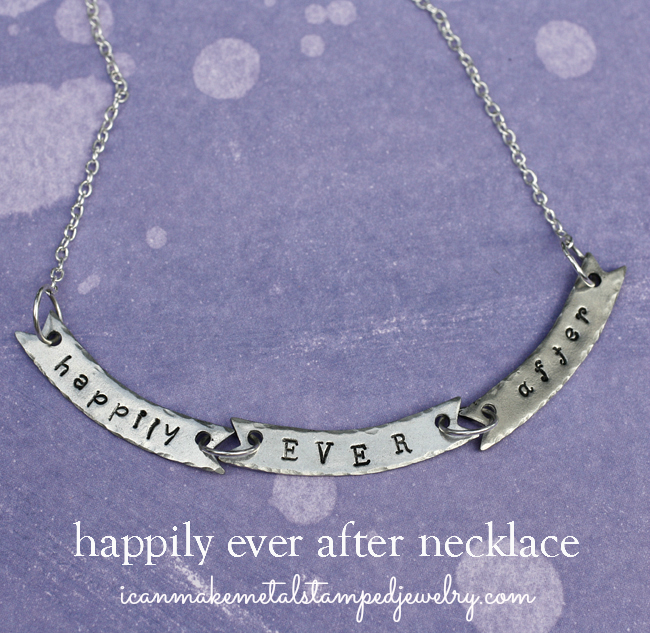
I work part time as the Creative and PR Director for ImpressArt. They are the world’s leading manufacturer of supplies for metal stamped jewelry making. Of course, having access to so much super awesome metal stamping stuff is a blast for a jewelry designer like myself. I consult with them sometimes on new products and I kept nagging them about doing a banner blank. I’m a writer, I liked the idea of a banner that you could use to write a story with metal stamped elements. I LOVE these blanks and I’m seriously smitten with this necklace. After all, who doesn’t want to live happily ever after?

*Here’s what you need to make a DIY Happily Ever After Necklace of your own (FYI-the following links are affiliate links):

3 ImpressArt SoftStrike Pewter Banner Blanks
4 10-MM Jump Ring Silver Plated
2 6-MM Jump Ring Silver Plated
Chain Small Silver Plated
Toggle Clasp Small Silver Plated
ImpressArt Juniper Lowercase Alphabet Metal Stamps Set
ImpressArt Uppercase Stamp Set Newsprint
ImpressArt Lowercase Stamp Set Jeanie
Impressart 1/2 Lb Brass Metal Stamping Hammer, Protects Your Steel Stamps and Other Tools, Great for Stamping Blanks, Lighter Version
ImpressArt Steel Stamping Block
Impress Art Stamp Straight Tape
Chain Nose Pliers (2 pairs or one pair and one pair Bent Chain Nose Pliers)
Semi-Flush Cutter
Cotton Swab
Paper Towel

Amazon.com Widgets

Amazon.com Widgets

1-2

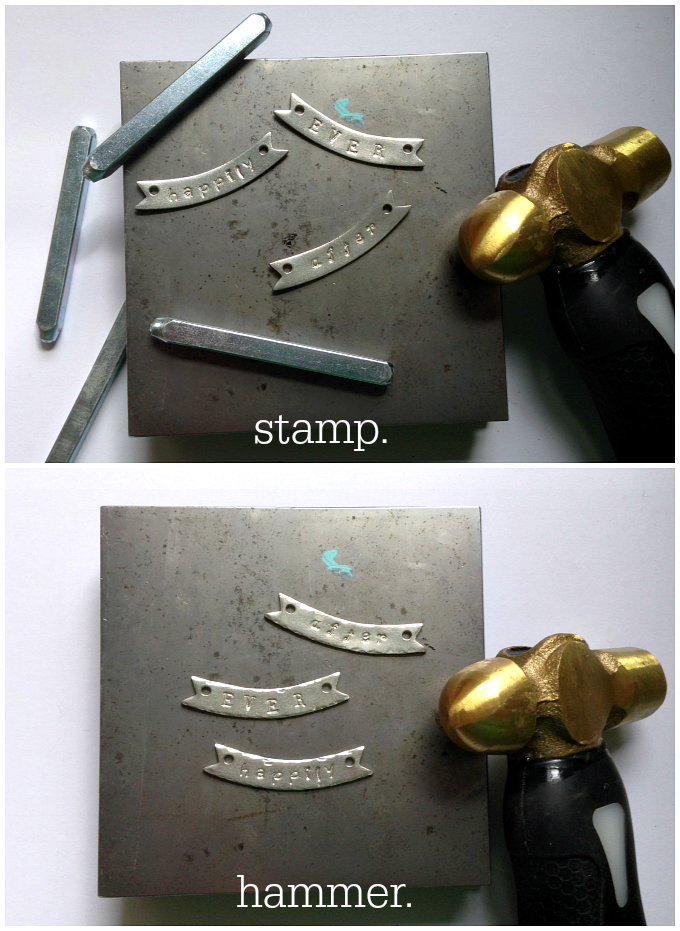
Step one: Using the three fonts, stamp the words happily, ever and after on the three blanks. I used Juniper for happily, Newsprint for ever and Jeanie for after. Step two: Use the round end of your hammer to gently tap around the edges of your blanks adding texture.

3-4

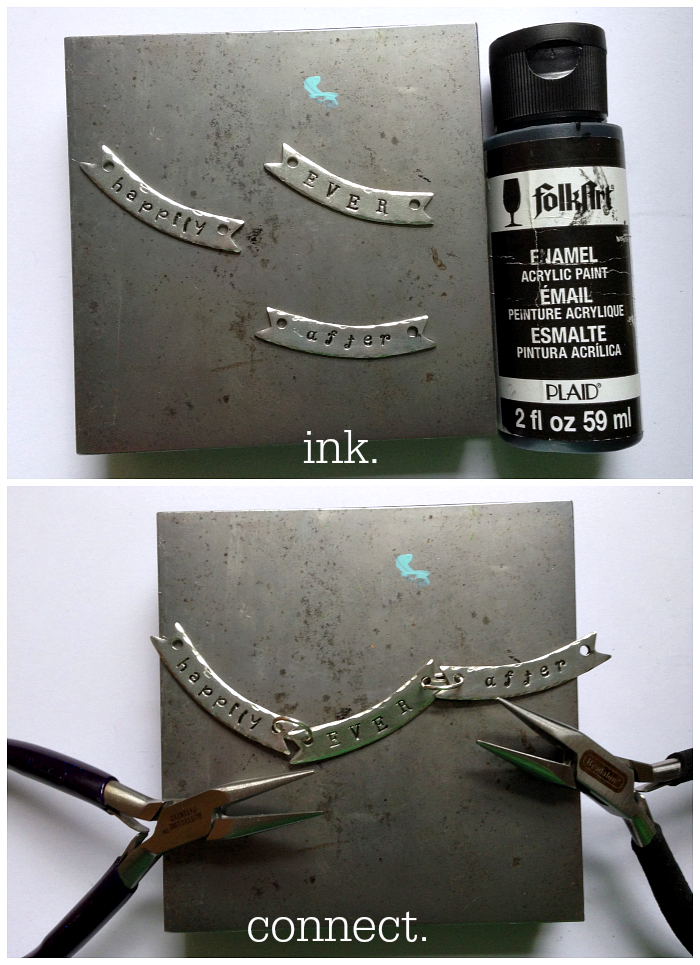
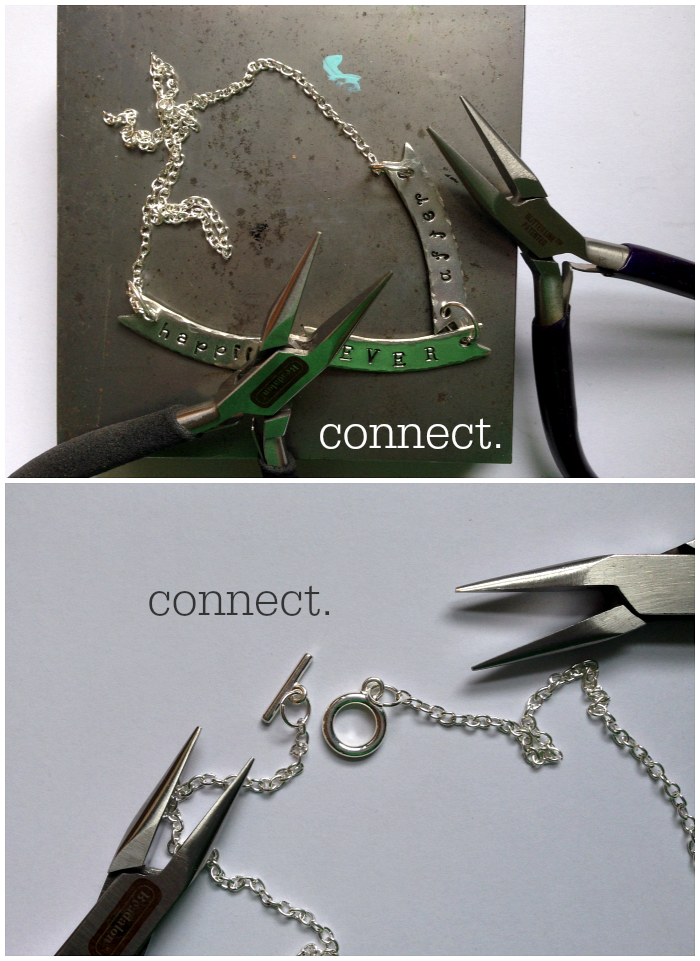
Step three: Apply a thin layer of paint to the surface of each stamp using a cotton swab. Let this sit for 30 seconds. Wipe off with a paper towel. Step four: Use your chain nose pliers to connect the blanks together with the large jump rings.

5-6

Step five: Connect the banners to the chain on both sides using the larger jump rings and your chain nose pliers. Step six: Attach the clasp to the other end of your chains using the smaller jump rings.

Happily Text Good

That’s it! Stamp it up and enjoy your DIY Happily Ever After Necklace. Simple and simply charming, yes? You can use these banners to make all sorts of wonderful story book themed jewelry. What would you do with these? Let us know in the comments!

Cheers,
Margot and Avalon

(FTC DISCLOSURE: *This post contains affiliate links, if you click on a link and make a purchase we get a small percentage of the sale. The blogger is employed by ImpressArt, but this is her personal blog. All opinions are 100% her own!)

Filed Under: Uncategorized Tagged With: DIY Necklace, easy metal stamped jewelry, happily ever after necklace, metal stamped jewelry, metal stamped necklace, storybook jewelry, storybook necklace

  • « Go to Previous Page
  • Page 1
  • Interim pages omitted …
  • Page 8
  • Page 9
  • Page 10
  • Page 11
  • Page 12
  • Interim pages omitted …
  • Page 15
  • Go to Next Page »

Copyright © 2026 · Aspire Theme on Genesis Framework · WordPress · Log in