Tag: metal stamping basics

  • 30 Minute Craft: DIY metal stamped initial pendants

    Initial Pendants Wood Three copy

    Miss Avalon made these pretty pendants and we LOVE them!  You only need a few metal stamps and a few minutes to make these DIY metal stamped initial pendants.  It doesn’t get much easier than that!  We’ve used a dandelion stamp to add interest to the edges and extra large stamps for the initials.  You can opt to add texture or leave the blank smooth, that’s totally up to you.

    What you need:
    ImpressArt Pewter Stamping Blanks
    Ball Chain Necklace with Clasp
    Beadalon 10-MM Jump Ring
    1/4” 6mm Metal Punch Stamp Lowercase
    1/4” 6mm Metal Punch Stamps Uppercase
    Ergo-Angle Metal Stamping Hammer
    ImpressArt Chasing Hammer
    ImpressArt 2 by 2-Inch Steel Block
    ImpressArt Chain Nose Pliers
    ImpressArt Bent Nose Pliers
    ImpressArt Stamp Straight Tape
    Folk Art Enamel Acrylic Paint, Licorice

    Metal Stamped Initial Pendants Steps

    One: Use rounded end of chasing hammer to add texture on surface of blank.  Two: Use dandelion stamp to stamp texture along edges of blank.  This is organic and freeform, don’t worry about it being “perfect.” Three: Stamp letter in center of blank. Four: Swipe paint or marker across surface of blank and wipe from surface. Color will rest in the stamped areas.

    Step Five

    Five: Attach charms to chain using a jump ring and chain nose pliers.

    Metal Stamped Initial Pendants Text Two

    That’s it, in four simple steps and under 30 minutes you can make your own easy DIY Metal Stamped Initial Pendants!

    Cheers,
    Avalon and Margot

  • DIY Metal Stamping on WBIR Channel 10

    WBIR Channel 10 News

    I appear on our local NBC affiliate in DIY craft segments every month.  Yesterday, I got a chance to share my passion for all things metal stamping!  Yup, I shared the basics of DIY metal stamping on WBIR Channel 10 here in Knoxville. We had a great time and Moira Kaye really seemed to enjoy it.  My patient husband drove me there, helped me set up and break down and took some great pictures while I was taping.  He’s the best metal stamper in the family by far, but he prefers staying out of the spotlight!

    The more I stamp and talk with folks about it, the more I fall in love with it. There is something so satisfying about smacking a hammer on a stamp and making a piece of jewelry in seconds.  It’s easy and fun.  Once you start, it really is addicting in the best possible way.  Check out our metal stamping on WBIR Channel 10 segment below. I share some quick tips and tricks for making a quick and easy initial pendant using ImpressArt metal stamps, SoftStrike blanks, StampStraight tape and the ImpressArt brass hammer.  Good times!

    Cheers,
    Margot and Avalon

  • DIY Metal Stamped Washi Tape Pendant

    Spring Forward One

    Capture that happy springtime feeling with a DIY metal stamped washi tape pendant. Or remind yourself to keep moving, even when you feel like standing still. Either way, you’ll look pretty doing it!  You can find these balsa wood tags in the scrapbook aisles at the craft stores. Add some matching beads and a custom stamped pendant to bring it all together. Learn how to stamp along a curved edge and…what not to do when stamping a word that uses the same letter multiple times. Derp. I got the miniature tape set with tiny tape dispenser at our local Target, but I’ve included a link to some other options below. I have to admit that I’m developing a mini-obsession with washi tape.

    You will need:
    Wood Tag
    ImpressArt, Washer Stamping Blanks, Aluminum, 1 1/2″- 24 pc.
    4mm Beads in pastel colors
    10-MM Jump Ring Nickel Free Silver Plate
    3 Ball Tipped Head Pins
    Ball Chain Necklace 18 Inch With Clasp
    ImpressArt Metal Stamping Kit- Newsprint Lowercase
    ImpressArt Stamp Straight Tape
    ImpressArt Chasing Hammer
    Folk Art Enamel Acrylic Paint, Licorice
    Paper towel or cloth

    Spring Forward Pendant

    Step one: Stick washi tape in strips across front of tag. The top strip is super thin, but if you burnish it with your fingernail it will stay. I swear! If you want, you can seal this with some decoupage medium. Step two: Use small scissors or a craft knife to trim excess tape flush to edge of pendant. I put tape on both sides, you can do the same or opt to leave the back plain. Step three: Tape blank down to bench block with StampStraight tape, this helps secure it while you stamp. Use the round end of your ball pein hammer to add texture. Map out the placement of your letters. If you start in the center, it helps line them up evenly. There is a space between the words, make sure you leave it open. I have a diagram below, so check that out for help! The key is to turn the bench block as you work so the space you are stamping is directly facing you. Hold the stamp flush and in the center of the blank. Hit one time with the brass hammer. Move over to the next letter. Because this blank is circular the stamps are turned slightly each time, kind of like a clock! Start at 6 with the letter f and you’ll end at 2 and 10 with s and d. Step four: Swipe acrylic paint or permanent marker across letters, wipe off with a paper towel. Step five: Make some coiled dangles using matching beads. Connect the beads, stamped washer and washi tape pendant together with a jump ring. Attach it to a ball chain. Oh and…the letter “r” appears in this pendant three times, only I kept skipping it and stamping Spring Foward. Derp. Me spell pretty. Try to remember to use all of the letters in your words. Yes, I make mistakes too.

    Hammer and Stamp Details

    Here’s a guide to help you stamp on the washer. Hope it helps!

    That’s it,  pretty, simple, flirty, fun and with a little practice stamping (and spelling,) easy!  Now you can make a DIY Metal Stamped Washi Tape pendant of your own!

    We’d love to see your metal stamped creations.  We’re going to be doing regular stamping round-ups so if you have a DIY metal stamping project you want us to share, let us know!  You can email us or leave a link in the comments.

    Cheers,
    Margot and Avalon

    *DIY Project Policy: Our tutorials are meant for your creative inspiration. Feel free to make and gift or wear these designs. Please make sure that you give credit to us as the designer if you make and share these designs on your blog or social sites. Please do not make and sell copies of our designs or sell them as kits. Please do not teach these designs as classes for profit. This is how we make our living and we ask that you respect our creativity and the time it takes to design, photograph and write these free tutorials. You may use a single photograph from each project online if you include a direct link back to our tutorial. Any use of these designs for retail sale for profit online in places like Etsy or eBay or in retail bricks and mortar, flea markets or outdoor fairs is not permitted. Thank you!

    StudioPress Theme of the Month

  • 12 Simple DIY Metal Stamped Charms

    12 Simple DIY Metal Stamped Charms

    It’s all about feeling charming and what better way to feel charming than by making pretty DIY metal stamped charms you can wear? If you’re new to metal stamping, these projects are all fabulous for the beginner.  Some are as simple as a single initial!  We love them all and we hope you do too. Make sure you visit these talented bloggers and show them a little love.

    des255_2013

    Stamp and wear your favorite things with this stamped and riveted charm from Beaducation!

    Bliss Metal Stamped Tassel Bracelets Two Text

    Be in style bliss with these stamped charm and tassel bracelets!

    apple charm

    Stamp a lovely teacher’s gift with Jennifer Heynan!

    Stampled-Pendant-Key-Necklace

    Add a single stamped charm to some keys for a gorgeous DIY statement necklace from Handmade in the Heartland.

    pop-rocks-closeup

    Feel like a rock star with stamped star charms and this Pop Rocks necklace from ImpressArt.

    monogram-stamp0

    Stamp your monogram and turn it into lovely jewelry with Rings ‘n Things!

    Hand-Stamped-Necklace-Tutorial-on-EverythingEtsy_thumb

    Make simply stunning stamped initial charms with Everything Etsy!

    des274_2013

    What’s your sign?  Stamp your sun sign with Beaducation!

    two-hearts-display

    We love rock and roll and these stamped guitar pick charms from Jeff Fulkerson for ImpressArt!

    stamped-metal-drink-charms

    Say “cheers” with these stamped drink charms from Today’s Creative Blog.

    Stamped Metal Bottlecap Jewelry

    Give old bottle caps a new life with these metal stamped bottle cap charms from ImpressArt.

    initialnecka

    It doesn’t get easier than these stamped initial pendants from The Idea Room!

    Metal stamping doesn’t have to be complicated and trust us when we tell you it’s tons of fun.  Do you have a favorite  in this DIY Metal Stamped Charms roundup?  Let us know in the comments!


  • Beaducation GIVEAWAY

    Beaducation Giveaway 3

    Hello, stampers!

    If you visited us on Monday, you know about our *Beaducation Giveaway today! We’re seriously excited to offer one lucky US reader their fabulous Metal Stamping Starter kit. It’s got everything you need to get started stamping except a hammer, which you can find on their website or use your own. You can see the kit in the top left corner in the graphic above. Cool, huh? PLUS they’ve tossed in to sample packs of blanks and their most popular 4 sided swivel pendant!)

    If you haven’t checked out Beaducation‘s website yet, we think you’re going to love it! They offer a dazzling array of metal stamps, blanks, tools and lots of great tutorials to help you learn how to make metal stamped, enameled, riveted and soldered jewelry. Plus, everything they make is seriously adorable. (We shared a tutorial for a stamped metal and leather necklace on Monday featuring Beaducation stamps and blanks.)

    Here’s what you get with your kit:

    • Economy Block Uppercase Letter and Number Stamp Set 3/32″ or 1/8″ (depending on inventory)
    • 1.5mm Metal Hole Punch Pliers
    • 2.5″ x 2.5″ Steel Bench Block
    • 3″ x 3″ copper sheet to practice your stamping
    • An assortment of copper blanks
    • 5 copper jump rings
    • 18″ 2mm copper ball chain and clasp
    • 1 Industrial Sharpie pen
    • 2 Pro Polish pads -for shining up your metal blanks
    • Stamp it Straight Tape
    • 8 page instruction booklet

    a Rafflecopter giveaway

    This Beaducation Giveaway is a $56.00 value PLUS the bonus blanks! Follow Beaducation on Facebook and Twitter for two BONUS chances! One of you will get this fabulous kit for FREE! We’ll be selecting a winner on Friday, good luck!  (US Residents Only)

    Cheers,
    Margot and Avalon

    *FTC DISCLOSURE: This post was sponsored by Beaducation, they provided us with a kit to give away to our readers and samples to make a DIY jewelry project. All opinions are 100% our own!

  • 10 Beautiful Metal Stamped Bracelet Projects

    10 Beautiful Metal Stamped Bracelets

    It’s our first DIY Metal Stamping Round-up here at icanmake: Metal Stamped Jewelry and we’re super excited to shine a spotlight on these 10 beautiful metal stamped bracelets from some of our favorite DIY bloggers!  Make sure you visit them all and share a little love, because they’ve made some stellar tutorials to show you all sorts of clever ways to use metal stamping in your jewelry creations.  We’ve got a little of everything from memory wire wraps to charm embellishments to resin and stamped cuffs, which shows the versatility of metal stamping.

    16c6bdd3c4933f92d760617642466b30

    How stunning is this metal stamped “Believe and Let Go” wrapped leather bracelet from I Always Pick the Thimble?

    6055e61e658228192e61e04f4eb9ac61

    Feel like you can conquer anything in this cheeky metal stamped Bad Ass Unicorn cuff from Happy Hour Projects!

    Shine Beauty Two

    Shine in this resin and colorful metal stamped bracelet from ImpressArt.

    hebrewheartpin

    Show the love with this metal stamped Hebrew beloved bracelet from One Artsy Mama.

    oh-baby-stamped-bracelet2

    Give a new mother a well earned gift with this Oh Baby metal stamped bracelet for ImpressArt.

    Stamped-Charm-Bangle-Bracelet-Two

    Feel sparkly in this stamped and crystal embellished charm bangle bracelet for ImpressArt.

    refocus2

    Wear your guiding word for the year with this metal stamped memory wire bracelet from One Artsy Mama.


    6384c425fa5608c67f48ba7744c93b6e

    Give a little love with this hand stamped cuff from Happy Hour Projects.

    jet-adore-display

    Just say “oui” with this metal stamped leather cuff for ImpressArt.

    metalstampcuff13

    Get motivated with this metal stamped cuff from Hands Occupied!

    10 beautiful metal stamped bracelet projects that are sure to get your creative juices flowing!  Do you have a favorite?  Let us know in the comments!  Make sure you visit these talented ladies and show them some love!

    Cheers,
    Margot and Avalon

    Urban Hats Made with the Knook

  • Artist Spotlight: Adrianne Surian

    Artist Spotlight Adrianne Surian

    This week, we’re shining the spotlight on the lovely and talented Adrianne Surian of Happy Hour Projects. Adrianne is a prolific lifestyle blogger with a large and loyal following. She shares easy to DIY tutorials all focused on projects you can make in under an hour, which is terrific for the short attention span crafter. She’s an avid metal stamping enthusiast and her tutorials are fabulous with detailed step by step photos, videos and lots of inspiring new techniques. Adrianne took some time to answer our five easy questions and she shares some great tips for success making metal stamped jewelry and DIY projects!

    1. When did you start making jewelry and why?

    Forever and ever ago – truly. Like, macaroni necklace age. I really began to realize my interest in jewelry around age 8 when I learned to make paper beads, and when I made dozens and dozens of friendship bracelets. I played around with design concepts when I was about 10… not that the average 10-year-old oozes style, of course. I still remember a particularly interesting pair of earrings I made from a pair of miniature rubber frogs I talked my mom into buying me on a science museum trip. I’ve always leaned toward crafty, but jewelry is especially satisfying to make, because you can bring it with you, by wearing it!

    1. What is your favorite source for jewelry making inspiration?

    It’s usually the components themselves! A lot of times, I’ll get my hands on a specific piece – a bead, a charm, a certain shape – and I’ll get an idea to evolve it. Though I’m not going to lie, every time I’m out shopping, I have to take a peek at the new trends!

    1. What advice do you have for folks just starting out?

    Regarding design itself – if you enjoy it, then push your limits. Not every piece has to be perfect, allow yourself a learning curve. And put your own spin on any design that inspires you. You don’t ever have to make exactly what someone else does. Adding your own touch makes your piece truly one of a kind and that much more special.

    If you do enjoy it… well, it’s like any hobby. You will end up with an enormous stash. So get organized early, and keep tabs on what you’ve got. It will save you money when you’re eyeing something fabulous… and can’t remember if you already bought it or not, haha. Not that that has happened, of course… ahem.

    1. What tips or tricks can you share for successful metal stamping?

    If you’re just starting out, then practice, practice, practice. Seriously. Keep with it. You’ll improve. In the early days, I was all over the place. I wrecked a lot of blanks. In fact, I still have them. I save my bad blanks for practice if it’s been a while since I’ve gotten the hammer out! It’s a great way to brush up my spacing and consistency before wasting a new blank – and it shows if it’s been a while since I stamped.

    My other advice for beginners is: you won’t hit your hand. So don’t worry about it! Early on, my hesitation showed in the final product, and it’s because I was worried about exactly that.

    If you’ve conquered the beginners’ hurdles, then my next advice is to step it up. Think outside your letter set. Think textures, shapes, and the other things that metal is, and what it can do. Once I started stamping spoons, I crossed over into a different way of thinking about stamping. The next thing I stamped was a copper sheet roof for a birdhouse. I’m starting to believe that there’s anything that can’t be stamped. Seriously. I will find a way.

    1. Where can our readers find you?

    I blog at Happy Hour Projects. My focus is tutorials and inspiration geared toward beginners, and I’ve been talking about my experience since I was a beginner myself!

    You can visit Adrianne Surian at her website Happy Hour Projects and her social pages. You can find the links below! We’ll be back on Wednesday with more metal stamping inspiration!

    Happy Hour ProjectsWebsite

    Happy Hour Projects Website Stamping Tutorials

    Facebook

    YouTube

    Twitter

    Pinterest

    Instagram

    Cheers,
    Margot and Avalon

  • Hammer Time: Basic Metal Stamping Hammers

    Basic Metal Stamping Hammers

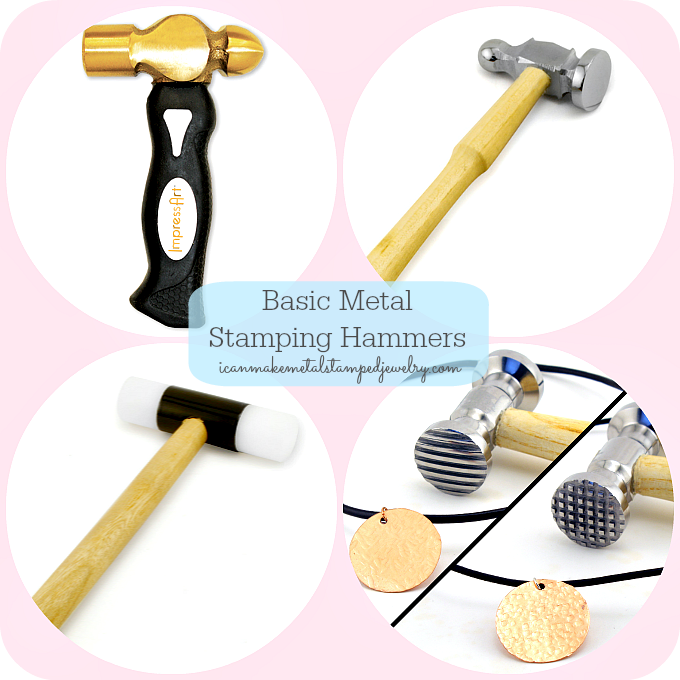
    It’s *Hammer Time! Hooray! Today we’re taking a look at four basic metal stamping hammers that will help you take your stamping to a higher level of professionalism and overall fabulosity. You don’t need all of these to get started, but you’ll be glad you have them!  Trust us, we know about these things. First up, possibly our favorite of the bunch, the one pound brass hammer with the ergonomic handle.

    stamping_hammer.4

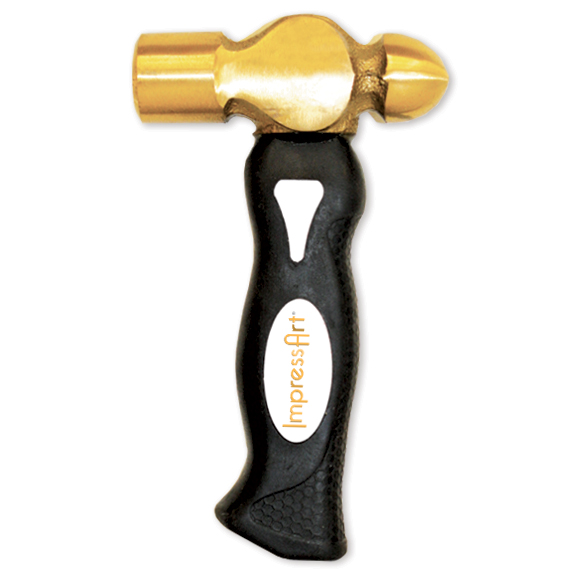
    ImpressArt debuted this fabulous ImpressArt 1 Pound Metal Stamping Hammer two years ago. It’s got a lot going for it in terms of reasons why it’s the best choice for metal stamping.  First of all, the hammer head is made of solid brass. Brass is softer than steel (your household hammer is probably steel.) The softness of the brass allows the impact of your hit to be transferred directly into your metal blank. When you hit with a steel hammer, the energy bounces back up the handle and into the hammer. By stamping on a solid block of steel and using this hammer, all of the energy of every hit goes into your blank creating deep, crisp impressions. Because only one good hit is needed with this hammer it lessons the risk of skipped or ghost impressions. The handle is short, stubby and covered in a soft textured rubber, this makes it easy for smaller and larger hands to get a firm grip and again, helps transfer that stamping energy into your blanks. This hammer also helps prolong the life of your metal stamps, another bonus! If we could hand this to you through the computer screen, you’d immediately feel how yummy it is to grip and how heavy it is, yet completely balanced. Yes, you can start out with a regular steel hammer, but if you want to up your chances of success, try this one. It may take a little practice to get used to the feeling of one pound of brass heading towards your other hand, but we truly believe you will come to love this hammer as much as we do. ImpressArt recently debuted an 8 ounce version of this hammer for use with their new softer stamping blanks. We like the smaller hammer, but personally, this is the one we use most of the time.  TOOL TIP: This hammer requires a little maintenance, you can use a heavy grit sandpaper or a metal grinding wheel to smooth the surface as it becomes dented over time with regular use.

    31bpZEC8AOL

    Last year, ImpressArt upped the ante with their Ergo-Angle Metal Stamping Hammer. This hammer represents the evolution of the original brass hammer, with an angled head designed for ease of use and precision stamping, a replaceable brass head, comfortable grips for varied finger placement, and an ergonomic design to prevent fatigue. The weight, the ease, the softness of the brass are all still there, but upgraded to make it even easier to make a great impression!

    chasing-hammer smaller

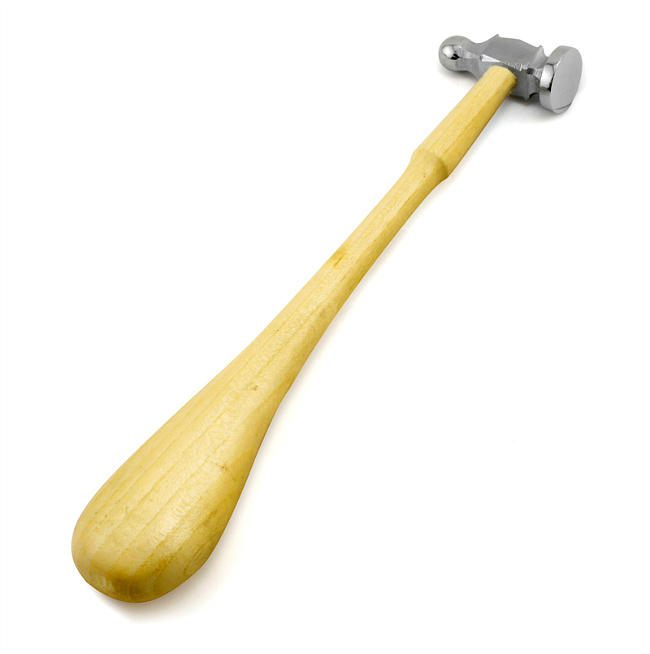
    In case you have not yet met, let us introduce you to the wonderful multi-purpose ImpressArt Face Chasing Hammer. This is a tool useful for metal stampers, wire workers, crafters and jewelry makers. The ball pein hammer has two sides.  The round end is used to add texture to wire or metal by repeatedly striking as you move across the surface of the material. The flat end is used to flatten wire or metal out. The motion of striking your metal creates molecular changes in the material making it harder and less flexible. Too much striking can result in brittleness, so it’s important to not overdo it. This process is called work hardening. We use this tool on a regular basis, it’s fabulous for making earring wires, findings and of course, works great for metal stamping when you want to add texture around the edges of a piece, harden or flatten your blanks.

    text-hammer-2 smaller

    Texture Hammers add a variety of textures to your metal blanks and wires. They come in a variety of surfaces, some even have replaceable heads. By varying the placement of the hammer as you hit, you can create beautiful designer one of a kind pieces. We recommend you create texture first, then stamp into the textured metal. Try using more than one on different areas of your blanks. Add texture to the edges or along portions of the pieces leave some smooth. Hit along the edges to give the blanks a more organic appeal. As with the other hammers, you need to be careful not to overdo things. The process of adding texture is also work hardening your materials.

    nylon-hammer smaller

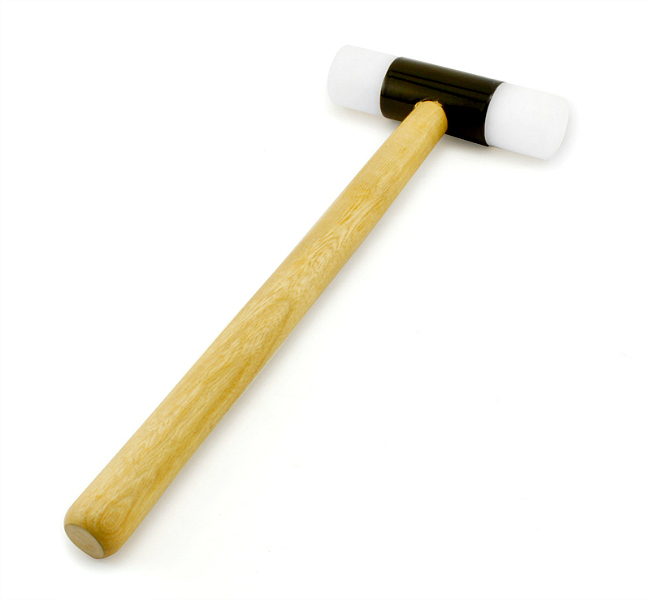
    Finally, we give you the Nylon Hammer. This will protect the material from being scratched or marred while flattening. Thinner and softer materials may start to curve or curl in around the edges while being stamped. Use this hammer with your bench block to flatten them back out. Works great for wire and metal blanks. After all, you don’t want your beautiful stamped metal pieces to get unintended dents or dings or be curved when they’re not supposed to be!

    As with all tools, practice helps you perfect your technique. Don’t be afraid to make “mistakes”, that’s how you learn. Sometimes those mistakes become pathways for new design ideas and fresh techniques. Do you have any of these basic metal stamping hammers in your tool box? If so, do you have a favorite? Let us know in the comments!

    Hammer images courtesy of ImpressArt.

    Cheers,
    Margot and Avalon

    (*FTC DISCLOSURE: Post contains affiliate links. If you click on a link and make a purchase, we get a small percentage of the sale. Blogger works part time for ImpressArt, but all opinions in this post are 100% her own. That is all.)

  • DIY Tassel and Stamped Charm Bracelets

    Bliss Metal Stamped Tassel Bracelets Two Text

    Just in time for warmer weather, pretty beaded bracelets get a kicky update with stamped charms and handmade tassels. Make your own DIY Tassel and Stamped Charm Bracelets in an array of colors and you’ll be in style bliss. We’re loving the Boho appeal here, try changing up the beads, colors and message to suit your own style. Speaking of which, how would you style these? We’d love to know!  Big love to the amazingly talented Ms. Pattie Wilkinson for sending us her fabulous *PattieWack tassel tools!  They make quick and easy work of making gorgeous tassels. 

    You will need:

    ImpressArt, Pewter Stamping Blanks, River Stone, 3/4″
    3-4mm Swarovski Crystal Beads
    4mm gemstone beads
    3-4mm Freshwater Pearls
    Beadalon 19-Strand Bead Stringing Wire, 0.018
    Beadalon Toggle Clasps Small Silver Plated
    2 Tube Crimp, Silver -2x2mm
    3 Beadalon Jump Rings 6mm Silver Plated
    Beadalon 10mm Jump Ring Silver Plated
    German Style Wire, Round, Silver Plated, 24 gauge
    Lion Brand Yarn Bonbons Yarn, Brights
    Folk Art Enamel 2-Ounce Acrylic Paint
    ImpressArt Newsprint Lowercase Alphabet Metal Stamps
    ImpressArt 2 by 2-Inch Steel Block
    ImpressArt Stamp Straight Tape
    Ergo-Angle Metal Stamping Hammer
    Pattiewack Designs Mini Tassel Maker
    ImpressArt Chain Nose Pliers
    ImpressArt Bent Nose Pliers
    ImpressArt Flush Cutters
    Beadalon Beading Scissors

    Tassell Bracelet 1-4

    One: Tape blank to bench block. Stamp ‘bliss’, alternating placement of letters. Design tip: Start with the ‘i’ in the center and work to both sides. Two: Wipe multi-surface paint on blank. Wipe paint from surface. Three: Place beads on board in a pattern, build beads up to numbers on side to fit your wrist. Add the two numbers together to get the finished length in inches. Our bracelet is 7″ including the clasp. Four: Thread wire into crimp bead. Thread wire back through clasp end and back into crimp tube. Hold wires uncrossed to crimp. Check out this video to learn how to crimp correctly!

    Tassell Bracelet 5-8

    Five: Finish bracelet with crimp bead attached to jump ring. Design tip: Make sure bracelet is rounded to allow a little space between your beads, this keeps the bracelet from being too stiff when worn. Six: Attach finished bracelet to bar side of toggle clasp with a second jump ring. This makes it easy for the bar to fit into the circle element of the clasp. Seven: Get your yarn and mini-tassell tool ready! Eight: Wrap the yarn around the second notch on the tassel tool as in photo.

    Tassell Bracelet 9-12

    Nine: Follow instructions for tassel tool.  Instead of using yarn to tie off the top and bottom, we’re using a large jump ring and wire. Thread jump ring into top of tassel. Wrap wire tightly several times around center of tassel.  Cut bottom of tassel with scissors into fringe. Side tassel from tool. Use scissors to even tassel ends. Ten: Finish wrapping tassel tightly with wire, cut off excess. Tuck ends into tassel with chain nose pliers. Eleven: Attach tassel and tool to circle side of toggle using a smaller jump ring as in picture. Twelve: Make more!

    DIY Tassel and Stamped Charm Bracelet LS Text

    That’s it, fun, fast and fabulous DIY Tassel and Stamped Charm Bracelets, make an arm full!

    Cheers,
    Margot and Avalon

    FTC DISCLOSURE: Bloggers were provided with samples for use in this project.  All opinions are 100% their own!

    *DIY Project Policy: Our tutorials are meant for your creative inspiration. Feel free to make and gift or wear these designs. Please make sure that you give credit to us as the designer if you make and share these designs on your blog or social sites. Please do not make and sell copies of our designs or sell them as kits. Please do not teach these designs as classes for profit. This is how we make our living and we ask that you respect our creativity and the time it takes to design, photograph and write these free tutorials. You may use a single photograph from each project online in blog round-ups or blog posts if you include a direct link back to our tutorial. Any use of these designs for retail sale for profit online in places like Etsy or eBay or in retail bricks and mortar, flea markets or outdoor fairs is not permitted. Thank you!

  • DIY Atlas Pendants

    DIY Atlas Pendants

    No matter where you roam, home is where your heart is. Show your love for the place you call home with these DIY Atlas Pendants. We used vintage atlas pages, you can find these at thrift stores, flea markets or yard sales. Or you could print out an image of the place you call home on a map to size. Add a stamped metal charm, tiny paper heart and some decoupage medium and you can wear your heart around your neck any time you feel a little homesick.  (Want to get started metal stamping? We’re GIVING AWAY a kit with everything you need to get started this week!)

    Materials:

    1.5″ acrylic circle pendant
    1/5″ punched atlas page circle
    Red card stock
    Collage Pauge Instant Decoupage Glossy
    Folk Art Enamel Acrylic Paint, Licorice
    Brass Heart Stamping Blank
    Beacon Zip Dry Paper Glue
    Large Circle Punch
    10mm Silver Tone Jump Ring
    Ball Chain with Connector
    1/16″ Metal Stamp Uppercase Letters
    Awl
    ImpressArt Brass Stamping Hammer
    ImpressArt Steel Stamping Block
    Impress Art Stamp Straight Tape
    Toothpick
    Cotton swab
    Paper towel

    Amazon.com Widgets

    Amazon.com Widgets

    Atlas Steps

    Step one: Tape your blank to your bench block. Slide stamps down to top of tape, start in center and stamp to edges. The letter ‘m’ should be in the center because you’re adding a period. Use an awl or punctuation stamp to add the period. Step two: Dab paint into letters. Let paint set for 30-40 seconds. Wipe off excess on surface. Step three: Punch or cut the atlas circle to fit pendant. Fold red card stock and use small scissors to hand cut tiny heart. Step four: Use a toothpick to apply a small dab of paper glue to back of heart. Press heart on to the area of atlas you want to highlight. Allow to dry. Step five: Add a thin layer of decoupage medium to back of pendant and front of atlas paper. Press together, gently pressing out any bubbles with fingertips. Allow to dry, paint a second coat of decoupage medium. Allow this to dry overnight. Step six: Use chain nose pliers to connect stamped pendant to acrylic pendant. Attach to your ball chain.

    Atlas Model Closer Text

    These are simple to make and fun to wear. They make fabulous gifts for students heading off to college! Make a map full of DIY Atlas Pendants for family and friends. We’d love to know where you hang your heart, tell us in the comments.

    Atlas Pendants Take Two

    Cheers,
    Margot and Avalon