(THIS POST CONTAINS AFFILIATE LINKS, IF YOU CLICK ON A LINK AND MAKE A PURCHASE WE GET A SMALL PERCENTAGE OF THE SALE.)
I’ve been working with wire for years, but I’ve never been a huge fan of aluminum wire. It’s so soft and malleable, I just couldn’t see the point…until now. I got a coil of 12 gauge Aluminum Artistic Wire recently and started playing. I was so excited when I discovered that by hammering and stamping, it was possible to work harden the wire enough to make some beautiful jewelry. Aluminum will stay shiny too, and gets even shinier when you hammer it, so that’s another bonus. Plus, it’s very inexpensive so it’s a great place to start playing with wire if you’re a newbie. I made this Stamped Aluminum Wire necklace to wear to a big trade show and I thought it would be fun to share the technique I used with you. Stamping on this wire does take a little practice, because the stamps have to be centered. Make sure you flatten it enough to accommodate the width of the stamp, nothing wider than 1.5 for a full impression, the stamp I used to make the stripes was a little wider than that.
Watch the video for the tutorial and grab the materials below!
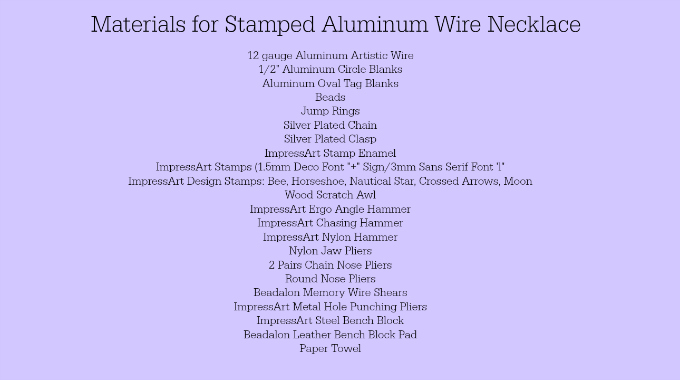
What you need to make this Stamped Aluminum Wire Necklace (these are affiliate links, if you click on a link and make a purchase we get a small percentage of the sale, which is how we pay the rent!):
Artistic Wire Aluminum Craft Wire, 12 Gauge
ImpressArt, Circle, 1/2″, Aluminum Stamping Blanks
ImpressArt, Tag, Oval, w/ Ring, 5/8″, Aluminum Stamping Blanks
Beads (Swarovski Light Rose, 8 MM round beads, Swarovski Crystal, #6480 Spike Pendant 18mm Crystal Golden Shadow
, Swarovski Crystal, #5051 Oval Mini Beads 10mm, Crystal Golden Shadow
Beadalon Jump Ring 6mm Silver Plated
Beadalon Chain, 6m, Small Cable, Silver Plated
Beadalon Lobster Clasp Medium Silver Plated
Beadalon Ball Head Pin Silver Plated
1.5mm + stamp (You can find one in the new 1.5 mm Deco lower case font set from ImpressArt)
3mm Basic Sans Serif Lowercase “l” ImpressArt- Basic Metal Stamp Set, Lowercase, 3mm
ImpressArt Stamp Enamel
ImpressArt Chasing Hammer
ImpressArt Nylon Hammer
Artistic Wire Nylon Jaw Pliers
ImpressArt Ergo-Angle Metal Stamping Hammer
Round Nose Pliers
2 Pairs ImpressArt Chain Nose Pliers
ImpressArt Steel Stamping Block
Beadalon Leather Pad For Block and Anvil
Beadalon Memory Wire Shear
ImpressArt Hole Punch Pliers
Paper Towel
Steps:
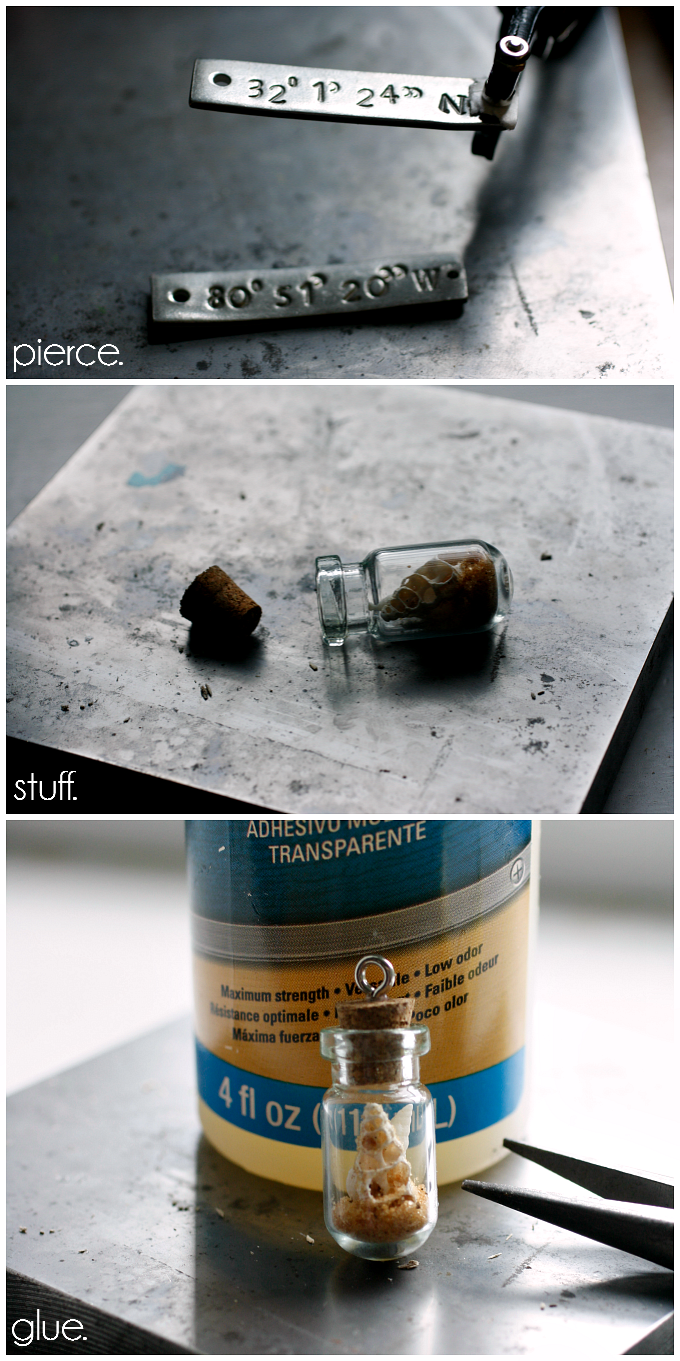
Cut wire segments using memory wire shears or flush cutters, make sure both ends are flush cut. If they’re pointy, your hammered pieces will be scratchy!
Use flat end of chasing hammer to flatten wire enough that it will be able to accept the 1.5mm stamps. Don’t overdo this, if you over hammer you will go from work hardening to making it brittle. Yup, more physics. Use round end to add texture.
Use stamps to add patterns to some of the wires. I used the ‘+’ on some and the ‘l’ on others as stripes, varying it on the diagonal and straight across. Make a variety of lengths of wire pieces, as you can see I even did a double segment for two of them.
Pierce a hole in both ends of the wire with the metal hole punching pliers. Make sure the pliers are centered before you punch!
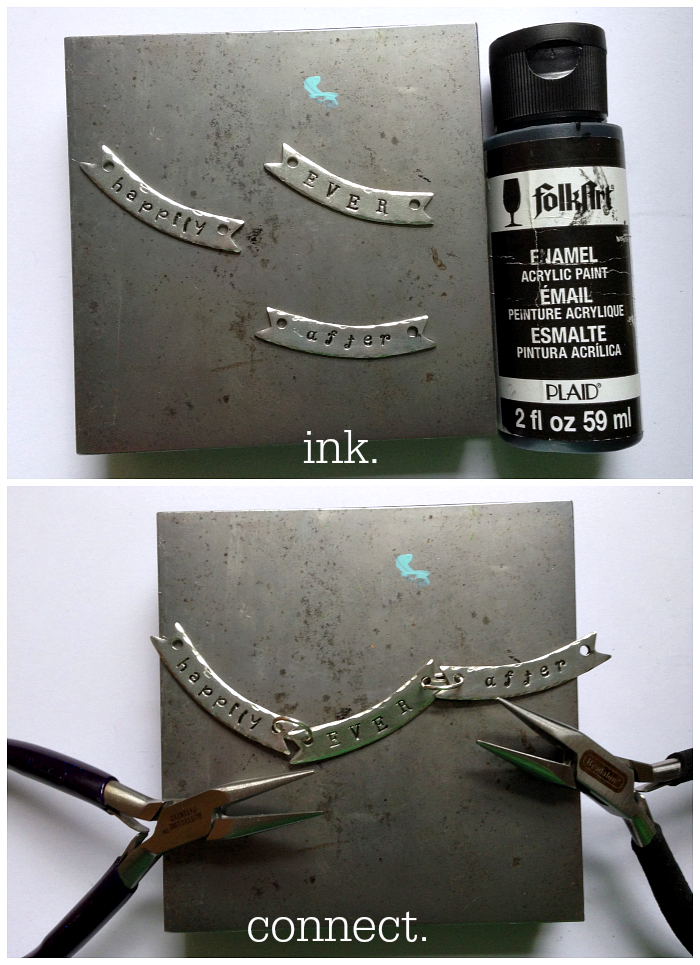
Add Stamp Enamel to the pieces you’ve stamped, let sit for 10 seconds, wipe clean.
Stamp your charms, you can do this as you will. I like to use the tilt and tap method, which means I hit the stamp once dead center, DO NOT LIFT IT, rock to the four corners and hit each time and one last hit dead center. If you lift the stamp, this won’t work, so keep it secure. I made some blanks with hammered edges, some with dotted accents, some with dots and plus signs. Get creative!
Pierce a hole in the top and bottom of each charm with the hole punching pliers.
Slide beads on head pins and make coiled top dangles. You can find a video to do this here.
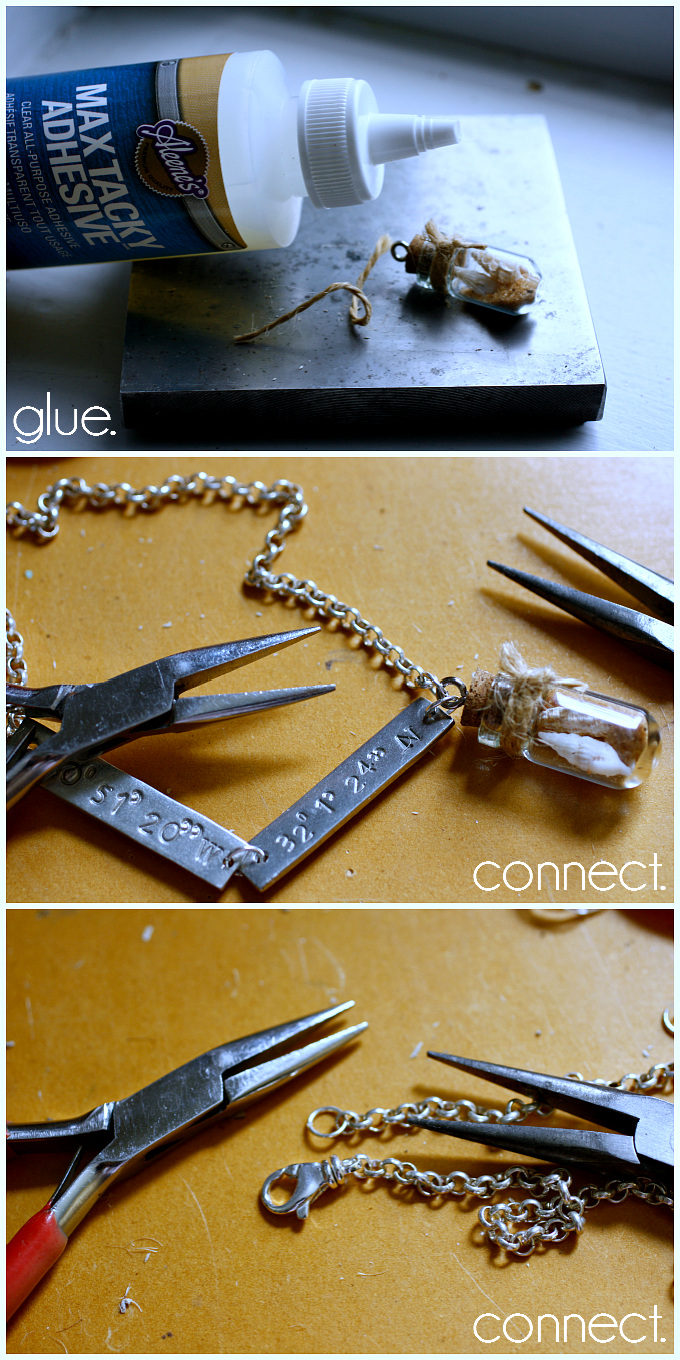
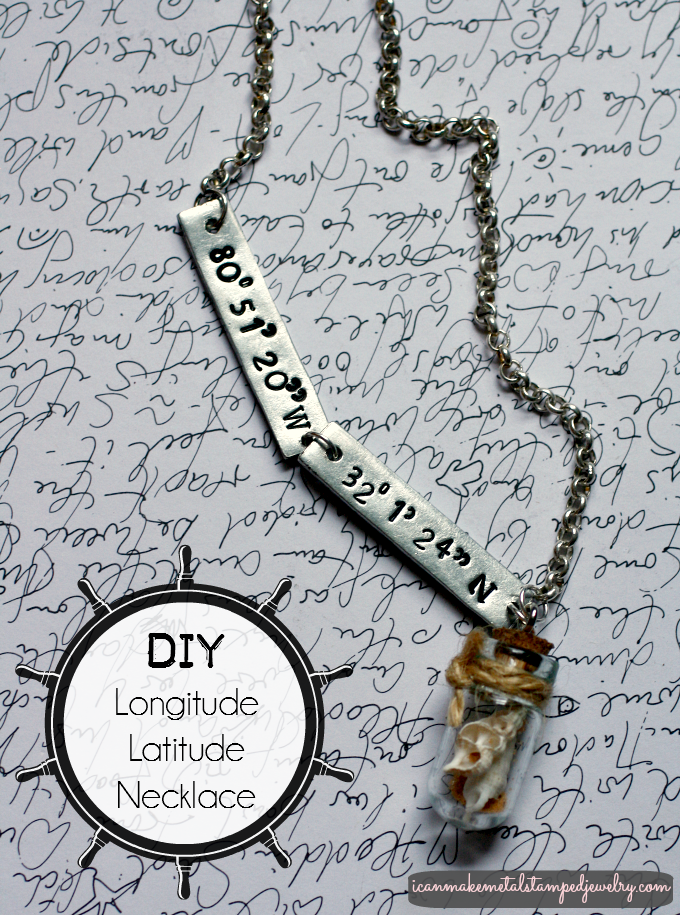
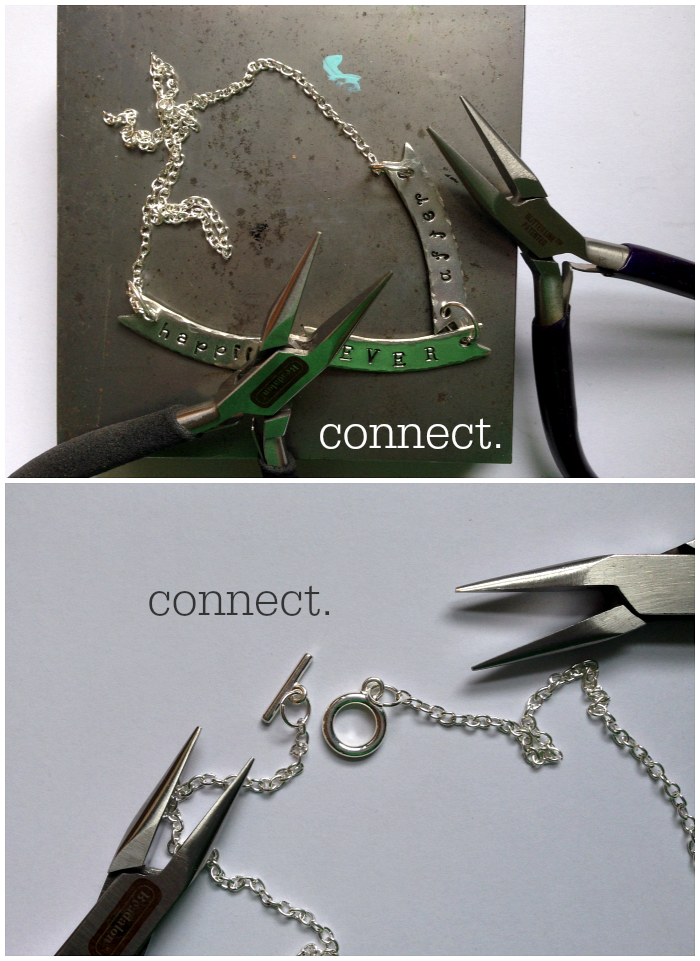
Put it all together using jump rings to connect the elements. Make sure each dangle is hanging from the bottom of the chain links, I spaced them out by four links. It will require you taking your time to get them all hanging from the bottom, but this helps you keep it from being too wonky when you wear the piece. You will have to orient the dangles properly each time you wear this design so it falls properly, just an FYI.
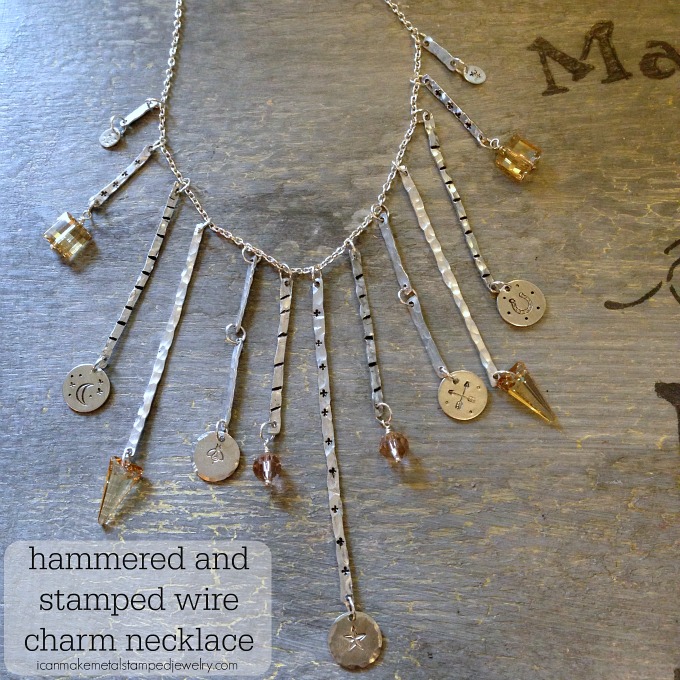
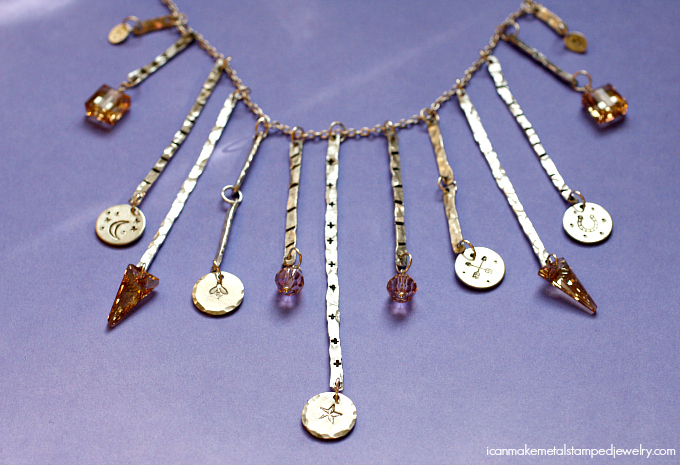
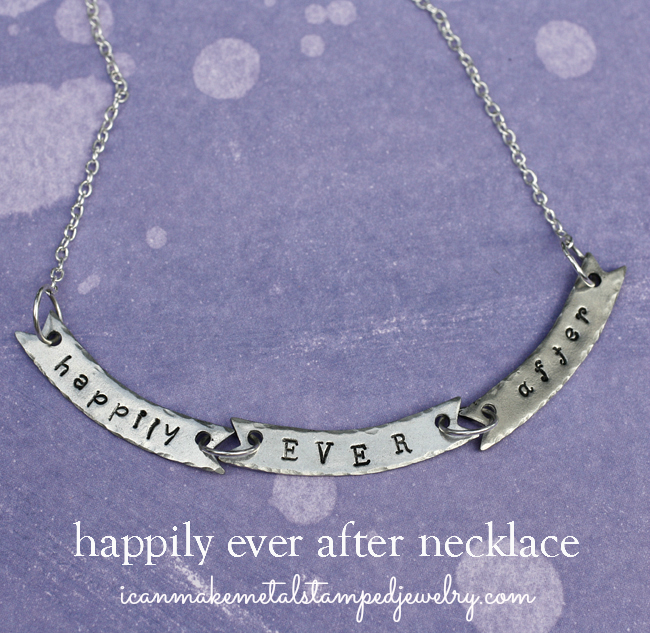
That’s it! You can make this Stamped Aluminum Wire Necklace as dramatic and bold or simply and refined as you desire. These wire segments can be used to make all manner of fun things, even home decor items. If you make this piece or use this technique, let us know in the comments!
Cheers,
Margot and Avalon