Tag: get started metal stamping

  • DIY Metal Stamped Washi Tape Pendant

    Spring Forward One

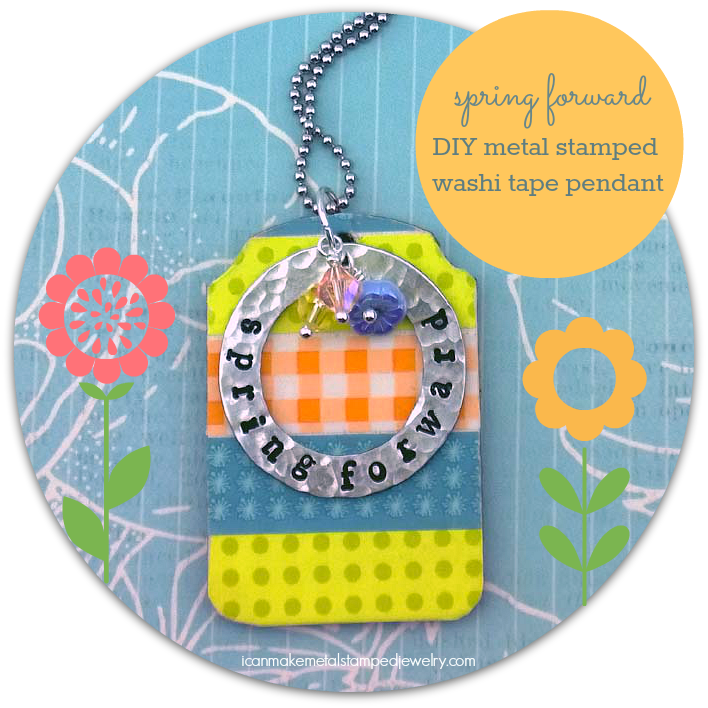
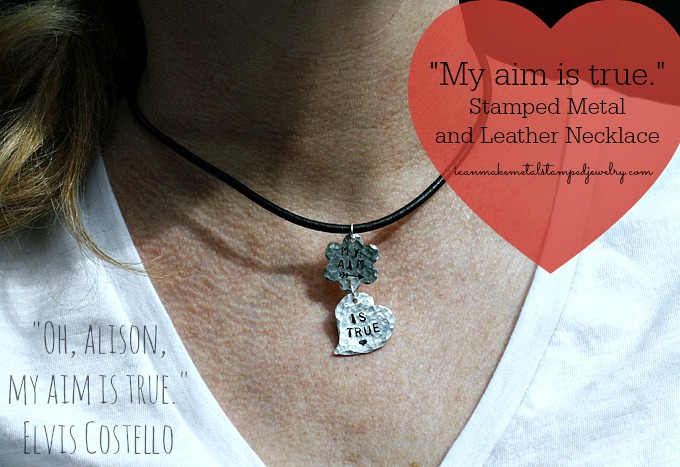
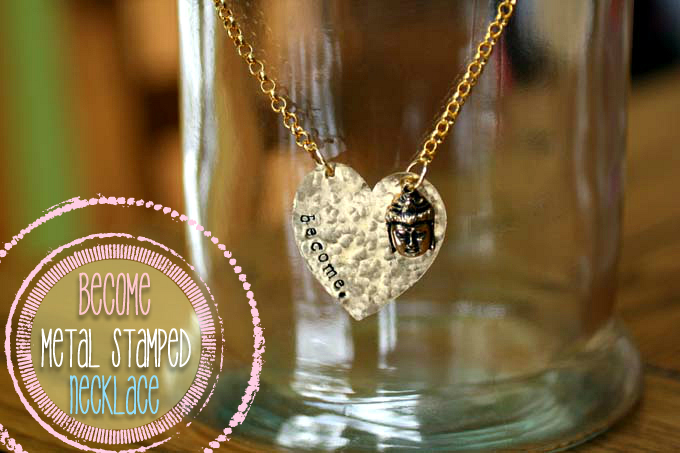
    Capture that happy springtime feeling with a DIY metal stamped washi tape pendant. Or remind yourself to keep moving, even when you feel like standing still. Either way, you’ll look pretty doing it!  You can find these balsa wood tags in the scrapbook aisles at the craft stores. Add some matching beads and a custom stamped pendant to bring it all together. Learn how to stamp along a curved edge and…what not to do when stamping a word that uses the same letter multiple times. Derp. I got the miniature tape set with tiny tape dispenser at our local Target, but I’ve included a link to some other options below. I have to admit that I’m developing a mini-obsession with washi tape.
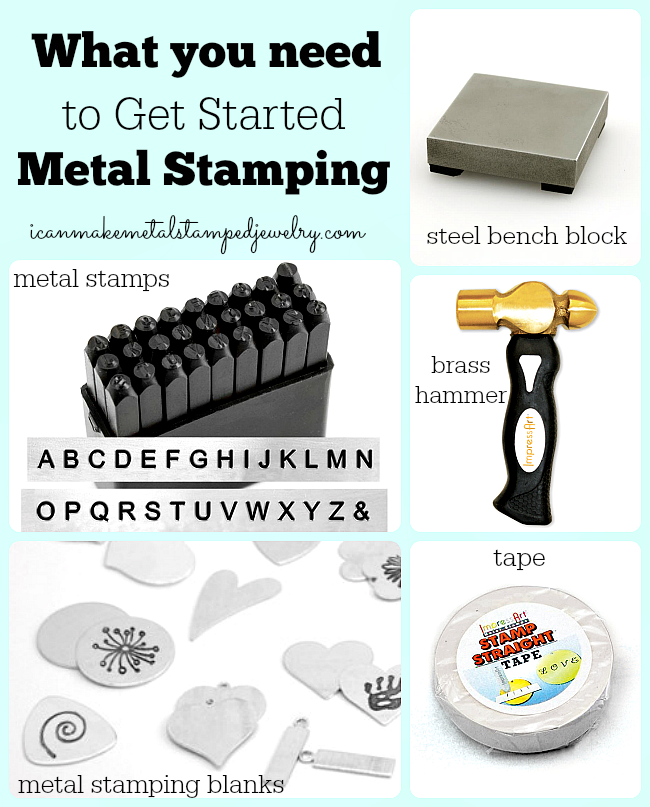
    You will need:
    Wood Tag
    ImpressArt, Washer Stamping Blanks, Aluminum, 1 1/2″- 24 pc.
    4mm Beads in pastel colors
    10-MM Jump Ring Nickel Free Silver Plate
    3 Ball Tipped Head Pins
    Ball Chain Necklace 18 Inch With Clasp
    ImpressArt Metal Stamping Kit- Newsprint Lowercase
    ImpressArt Stamp Straight Tape
    ImpressArt Chasing Hammer
    Folk Art Enamel Acrylic Paint, Licorice
    Paper towel or cloth

    Spring Forward Pendant

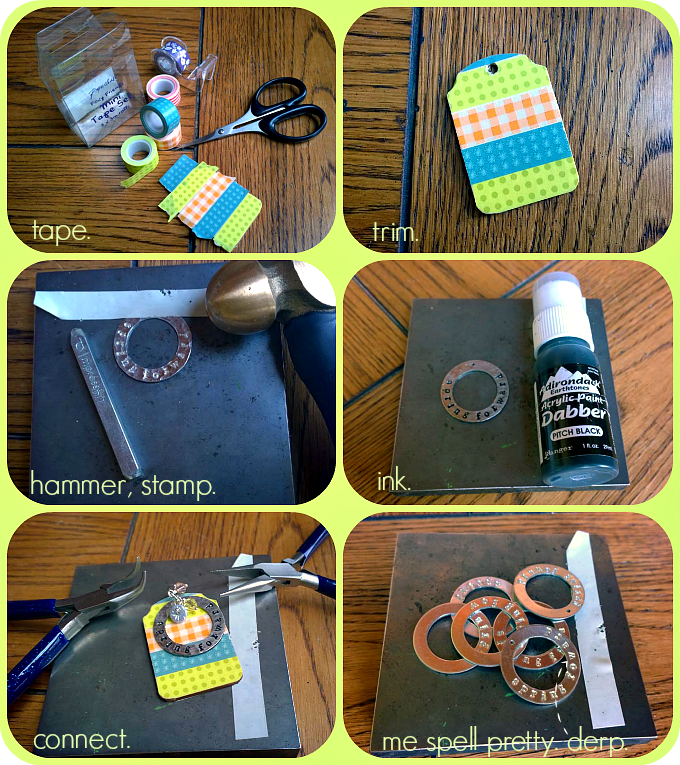
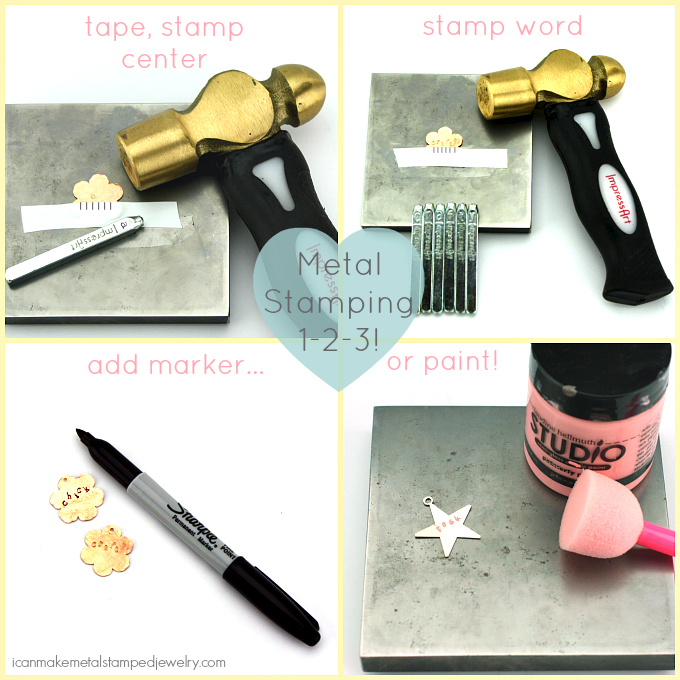
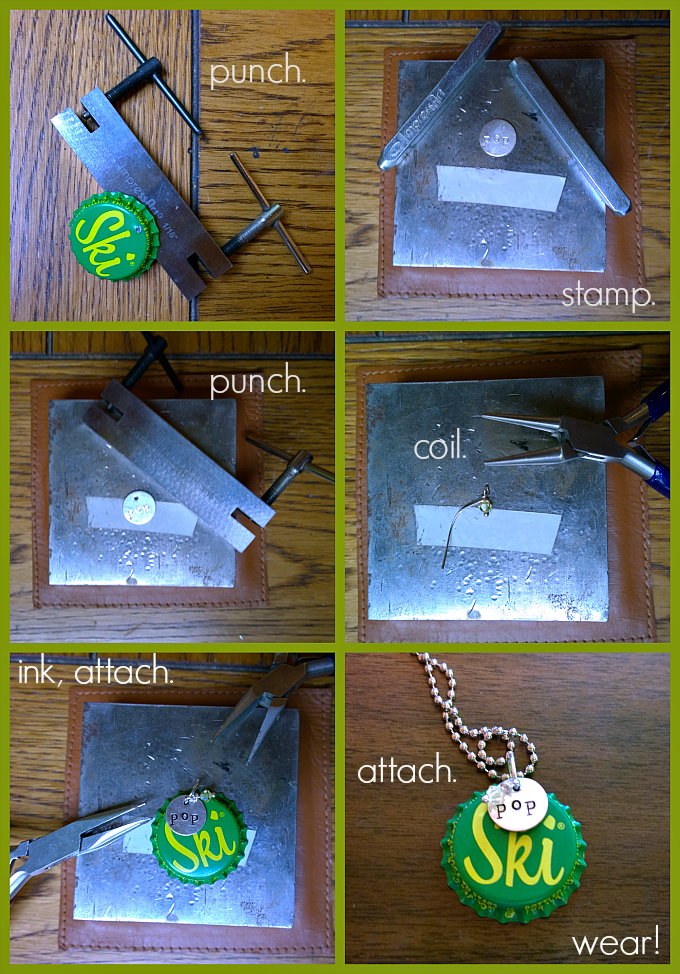
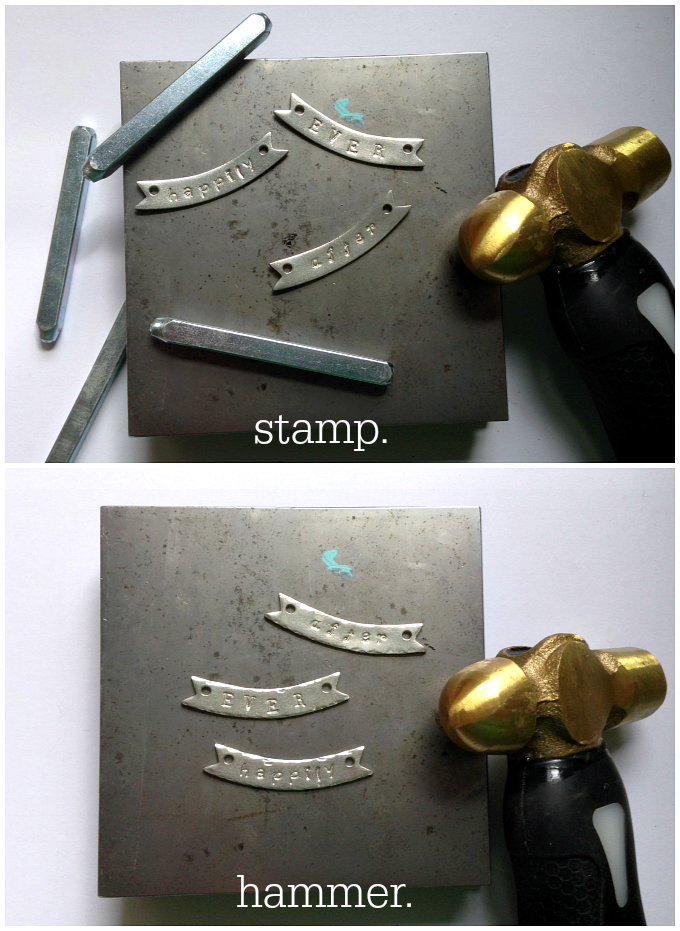
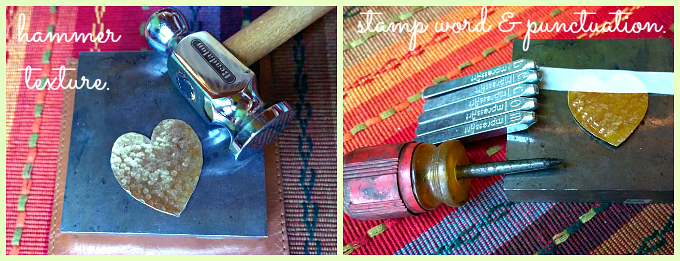
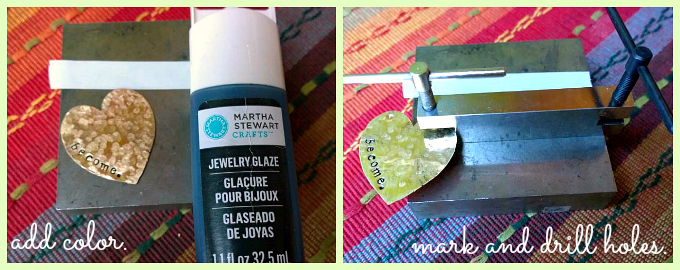
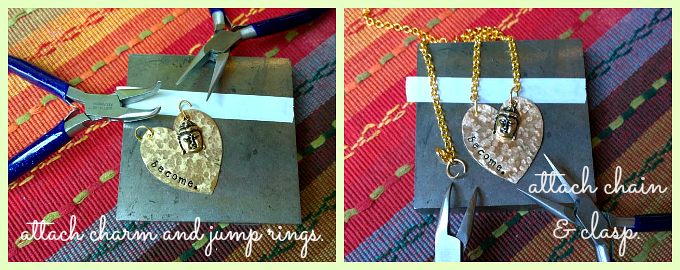
    Step one: Stick washi tape in strips across front of tag. The top strip is super thin, but if you burnish it with your fingernail it will stay. I swear! If you want, you can seal this with some decoupage medium. Step two: Use small scissors or a craft knife to trim excess tape flush to edge of pendant. I put tape on both sides, you can do the same or opt to leave the back plain. Step three: Tape blank down to bench block with StampStraight tape, this helps secure it while you stamp. Use the round end of your ball pein hammer to add texture. Map out the placement of your letters. If you start in the center, it helps line them up evenly. There is a space between the words, make sure you leave it open. I have a diagram below, so check that out for help! The key is to turn the bench block as you work so the space you are stamping is directly facing you. Hold the stamp flush and in the center of the blank. Hit one time with the brass hammer. Move over to the next letter. Because this blank is circular the stamps are turned slightly each time, kind of like a clock! Start at 6 with the letter f and you’ll end at 2 and 10 with s and d. Step four: Swipe acrylic paint or permanent marker across letters, wipe off with a paper towel. Step five: Make some coiled dangles using matching beads. Connect the beads, stamped washer and washi tape pendant together with a jump ring. Attach it to a ball chain. Oh and…the letter “r” appears in this pendant three times, only I kept skipping it and stamping Spring Foward. Derp. Me spell pretty. Try to remember to use all of the letters in your words. Yes, I make mistakes too.

    Hammer and Stamp Details

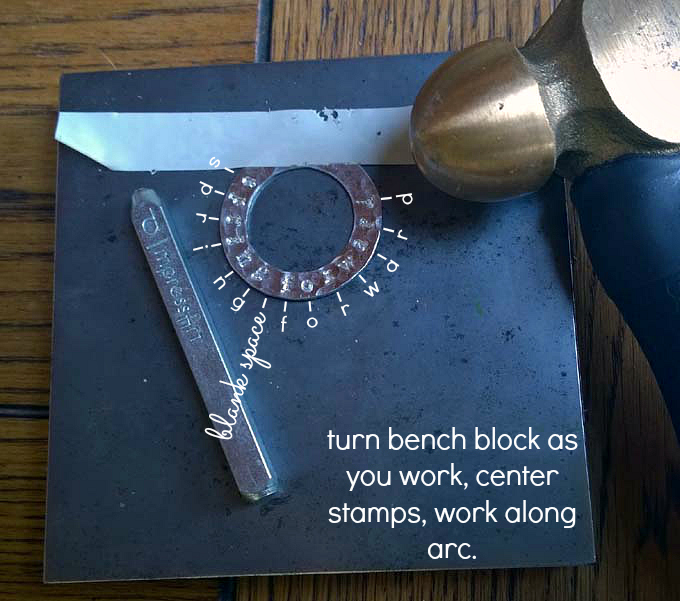
    Here’s a guide to help you stamp on the washer. Hope it helps!

    That’s it,  pretty, simple, flirty, fun and with a little practice stamping (and spelling,) easy!  Now you can make a DIY Metal Stamped Washi Tape pendant of your own!

    We’d love to see your metal stamped creations.  We’re going to be doing regular stamping round-ups so if you have a DIY metal stamping project you want us to share, let us know!  You can email us or leave a link in the comments.

    Cheers,
    Margot and Avalon

    *DIY Project Policy: Our tutorials are meant for your creative inspiration. Feel free to make and gift or wear these designs. Please make sure that you give credit to us as the designer if you make and share these designs on your blog or social sites. Please do not make and sell copies of our designs or sell them as kits. Please do not teach these designs as classes for profit. This is how we make our living and we ask that you respect our creativity and the time it takes to design, photograph and write these free tutorials. You may use a single photograph from each project online if you include a direct link back to our tutorial. Any use of these designs for retail sale for profit online in places like Etsy or eBay or in retail bricks and mortar, flea markets or outdoor fairs is not permitted. Thank you!

    StudioPress Theme of the Month

  • 10 Minute Craft: Queen Bee Earrings

    Queen Bee Earrings One

    Got ten minutes? Then you’ve got enough time to make these punny earrings and show ’em who’s Queen Bee. Heck, you can make up a whole hive’s worth! In fact, you can make these Queen Bee Earrings in just three easy steps, just stamp, ink, connect and wear! Even the busiest gal has time for that. And don’t be afraid, the new Soft Strike pewter stamping blanks from ImpressArt make it easy to make a great first impression. You got this!

    What you need:

    2 ImpressArt Stamping Blank Washer, 15/16-Inch, Pewter
    2 Fine Silver Plated Pewter Small Honey Bee Charms
    2 Beadalon 10-MM Jump Ring, Silver Plated
    2 Beadalon Dapped and Spring Ear Wire, Silver Plated
    ImpressArt Newsprint Stamps in Lowercase and Uppercase
    ImpressArt 2 by 2-Inch Steel Block
    Ergo-Angle Metal Stamping Hammer
    ImpressArt Stamp Straight Tape
    ImpressArt Bent Nose Pliers
    ImpressArt Chain Nose Pliers
    Cotton swab
    Paper towel

    Steps 1-4

    Step one: Stamp ‘Q u e e n’ on each blank. Start at the bottom center with the letter ‘e’ and work up each side, spacing your letters evenly as in photo. Step two: Use cotton swab to dab ink into letters. Wipe excess off of surface with paper towel, leaving ink in the stamped areas. Step three: Connect the washer, charm and ear wire in that order to a 10mm jump ring using the bent and chain nose pliers. You may need to gently turn the loop at the bottom of your ear wire so they hang forward. Step four: Wear them with pride because you made them!

    “You can call me Queen Bee,
    and baby I’ll rule, I’ll rule,
    let me live that fantasy.”
    Lorde

    Queen Bee Earrings Three

    These Queen Bee Earrings would make a lovely Mother’s Day gift too, I’m just sayin’.

    Cheers,
    Madge

    *DIY Project Policy: Our tutorials are meant for your creative inspiration. Feel free to make and gift or wear these designs. Please make sure that you give credit to us as the designer if you make and share these designs on your blog or social sites. Please do not make and sell copies of our designs or sell them as kits. Please do not teach these designs as classes for profit. This is how we make our living and we ask that you respect our creativity and the time it takes to design, photograph and write these free tutorials. You may use a single photograph from each project online in blog round-ups or blog posts ONLY if you include a direct link back to our tutorial. Any use of these designs for retail sale for profit online in places like Etsy or eBay or in retail bricks and mortar, flea markets or outdoor fairs is not permitted. Thank you!

    (FTC DISCLOSURE: *This post contains affiliate links, if you click on a link and make a purchase we get a small percentage of the sale. The blogger is employed by ImpressArt, but this is her personal blog. All opinions are 100% her own!)

  • Basic Metal Stamping 1 2 3

    Metal Stamping 1 2 3

    (Disclosure: This post contains affiliate links, if you click on a link and make a purchase, we get a small percentage of the sale.)

    Metal stamping 1 2 3, it’s really that easy. Here’s what you need to get started!

    Brass Stamping Hammer
    (I prefer a brass hammer to steel, brass is softer and disperses or transfers the energy of the hit into the blank preventing skipping or ghost impressions)

    Metal Stamps

    Steel Block

    Stamp Straight Tape

    Acrylic Enamel Paint

    Metal Stamping Blanks (Try aluminum when you start out, it’s softer and easier to stamp than base metal and it’s less expensive.)

    And here are the basic steps:

    Step One:

    Plan out your word, line up your stamps and make sure that the word will fit on the blank. Tape the blank to the bench block and start in the center working out from there.

    Step Two:

    Hold your stamp so it is in full contact with the surface of the blank.  Make sure it’s straight, not tilted!  Keep your fingers away from the top of the stamp.  Give your stamp one good hit, don’t stamp more than once to avoid skipping or double impressions.  Stamp your word, keep the stamps lined up to the top of the tape.  You can angle the alignment of your stamps for a more whimsical effect. If you are worried about spacing, draw marks on the tape to line up your letters or even mark directly on your metal blank with a pencil.

    Step Three:

    Add color with a permanent marker, wipe clean with a dry cloth before the marker sets.

    OR

    Use acrylic paint instead, giving it a few seconds to set before wiping the surface.

    And that’s Metal Stamping 1 2 3. You got this!

    Follow us on Bloglovin’:

    Follow on Bloglovin

  • 11 DIY Metal Stamped Necklaces

    11 DIY Metal Stamped Necklaces 2

    Stamp it, bead it, wrap it, wear it! Whatever your style there’s a little something for everyone in this week’s round-up of 11 stunning DIY Metal Stamped Necklaces.  We love them all!  How about you?  Get the tutorials for these in the links below.  Make sure you show all of these talented bloggers a little love.

    Lucky Charm Close Up Text copy

    Stamp and bead a little lucky charm. Make this, it’s easy!

    IMG_1031

    Stamped jewelry gets some clever DIY packaging with I Spy DIY!

    KONICA MINOLTA DIGITAL CAMERA

    Stamp, texture and form a simply charming necklace with Studio Dax!

    Tutorial-Banner

    Make a Disney inspired commemorative necklace with Magical Day Weddings.

    des240model_2013

    Get ready for summer with this layered Gypsy necklace from Beaducation.

    necklace

    Stamp up a lovely layered necklace with Bubbly Nature Creations.

    avas-day-bridal-set

    Make gorgeous bridesmaid necklaces with Rings ‘n Things.

    Howtohandstampjewelrynecklace

    Show mom some love with this stamped and beaded Mother’s Necklace from Crazy Little Projects.

    Eye-Candy-Necklace-Final

    Make and wear a fabulous stamped and beaded eye candy necklace!

    des290_2013

    Stamp and rivet a rainy day homage with Beaducation!

    Lucky-Penny-2.1

    Turn that lucky penny into a pretty dapped and stamped necklace with Happy Hour Projects!

    There you have it, folks, 11 FABULOUS DIY Metal Stamped Necklaces.  Enjoy!

    Cheers,
    Margot and Avalon

  • Stamped Metal Necklace

    Stamped Metal and Leather Necklace One

    This week’s DIY is a stamped metal necklace on a leather cord. You’ll learn how to stamp, ink, make a two part pendant and turn leather cord into a necklace with 20 gauge plated craft wire.  We love leather cord for guys and gals to give your jewelry a more casual, laid back appeal.

    My sister-in-law Alison was visiting us this weekend for her birthday. I had just *received the new arrow and heart stamps from Beaducation along with their fabulous new beginner’s metal stamp kit and an array of blanks and this design came together from there. One of the best things about hand stamped jewelry is that you can easily share a personalized message using images, numbers and letters. Aluminum blanks are soft and very easy to stamp, I like them best hammered to give them texture and make them look more like precious metal. This is a very easy design to execute and Beaducation has everything you need in their beginner’s kit. In fact, I’ll be giving this kit away on Wednesday, so make sure you come back to enter for the chance to win! (US Residents only.)

    You will need:

    Beaducation aluminum blanks in flower and heart
    2 4.5mm jump rings
    Black leather cord
    20 gauge silver plated copper wire
    Lobster clasp
    OR Black leather finished necklace
    Beaducation Stamping on Metal Starter Kit: Includes bench block, economy stamps in 1/8″ size, 1.5mm hole punch pliers, Sharpie marker, printed instructions, video tutorial CD, copper sheet, ball chain necklace, copper blanks, stamping tape, pro polish pads
    Heart Arrow Stamp
    Tiny Fat Lined Heart Stamp
    1 pound brass stamping hammer
    Chasing hammer
    Black acrylic paint dabber
    Round nose pliers
    Chain nose pliers
    Flush cutters
    Paper towel

    1-4

    Step one: Use round end of chasing hammer to hammer texture on surface of both blanks. Step two: Stamp MY AIM and arrow on flower blank as shown. Step three: Stamp IS TRUE and heart on heart blank as shown. Step four: Use pliers to pierce a hole at the top and bottom petal of flower and top of the larger side of the heart blank as shown.

    5-8

    Step five: Dab paint into stamped areas of blanks. Wipe off excess with paper towel. Step six: Connect the two blanks with a jump ring. Attach a second jump ring to the top hold in the flower blank. Step seven: Cut leather to desired length. Step eight: Use round nose pliers to create a small loop in the end of your wire coil.

    9-13

    Step nine: Wrap wire around leather, working up from turned loop. You will need to leave about 1/4″ of leather on the tail and will coil approximately 5 times. Make sure you wrap this tightly and take your time so it’s neatly coiled. Step ten: Cut the end from wire when you have almost reach the end of the leather. Use cutters to remove excess leather. Step eleven: Grasp the final coil and turn it up to create a loop using your chain nose pliers. Adjust the loop, making sure it’s flush to the top of the leather end with your round nose pliers. Use the chain nose pliers to gently compress the coils together to remove any gaps. Do this on both sides of your leather. Step twelve: Gently open one end loop to attach a clasp. Step thirteen: Attach the pendant to the front of the leather using pliers. Step thirteen: Wear!

    My Aim is True LS No Burst

    What song lyrics would you use for this stamped metal necklace? Let us know in the comments! Don’t forget to come back on Wednesday for the GIVEAWAY!

    Cheers,
    Margot and Avalon

    (*FTC DISCLOSURE: Blogger was provided product for this post and the giveaway, all opinions and instructions are 100%  her own.)

    *DIY Project Policy: Our tutorials are meant for your creative inspiration. Feel free to make and gift or wear these designs. Please make sure that you give credit to us as the designer if you make and share these designs on your blog or social sites. Please do not make and sell copies of our designs or sell them as kits. Please do not teach these designs as classes for profit. This is how we make our living and we ask that you respect our creativity and the time it takes to design, photograph and write these free tutorials. You may use a single photograph from each project online in blog round-ups or blog posts ONLY if you include a direct link back to our tutorial. Any use of these designs for retail sale for profit online in places like Etsy or eBay or in retail bricks and mortar, flea markets or outdoor fairs is not permitted. Thank you!

  • DIY Metal Stamped Silverware Garden Markers

    Metal Stamped Spoons Text

    We’ve seen a lot of metal stamped silverware trending over the past year on the web. It’s such fun, we had to try it ourselves. Check back Friday for a round-up post. Great news, ImpressArt recently debuted a new line of premium metal stamps with a lifetime guarantee for use with harder metals like stainless steel. We used our regular ImpressArt stamps, but if you plan on making a garden full of these, the premium stamps will withstand the punishment. Over time, regular and especially economy stamps will show signs of wear if used on hard metals like the stainless steel in silverware. We scored our spoons for a quarter at a local thrift shop, which makes this a fun upcycled project. Here’s how you can stamp your own spoons (or forks and knives!)

    Metal Stamped Spoon Garden Marker Text

    *You will need:

    Thrift shop spoon
    ImpressArt Lowercase Stamp Set, 3mm, Bridgette stamps lower case or ImpressArt Newsprint Lowercase Alphabet Metal Stamps- New Case stamps lower case
    5 pound sledge hammer
    ImpressArt 2 by 2-Inch Steel Block
    Basement Floor or other Concrete Slab
    ImpressArt Stamp Straight Tape
    Folk Art Enamel Acrylic Paint, Licorice
    Cotton swab
    Paper towel

    Metal Stamped Spoon Steps copy

    Step one: It’s much easier to stamp the spoons if they’re flattened. You can use a regular hammer, but they end up looking pretty rustic (meaning lumpy) that way. My hubby used a sledgehammer in our basement, it took a few hits to take the spoon from round to flat, but using a towel to protect it left the surface smooth when finished. Step two: I stamped “bloom where you’re planted” on the spoon, so I started just below the center with the word you’re.  (The punctuation marks are both in the Bridgette lower case set.) Tape the spoon down, start stamping in the center of each word and work your way out and then up and down.  You’ll need to move the tape for each word. You need a very firm grip on your stamps to prevent them from skipping. Hit each letter 2-3 times in a row (usually we recommend one good hit but stainless is much harder than regular metal blanks.) Step three: Here’s what the spoon should look like when you finish stamping. Step four: Use black enamel paint to help the letters stand out. The impressions won’t be very deep, so the paint won’t pop as much as it does on other blanks. Use cotton swab to dig paint into letters. Let it sit for about 3o seconds. Wipe off the excess paint with a paper towel.

    Metal Stamped Spoon Garden Marker Close Up T

    That’s it! Make a garden full of Metal Stamped Silverware!  These make wonderful Mother’s Day and Wedding gifts and you can use this same technique to make jewelry. Stay tuned for more ideas with this technique in the future and come back Friday for a big metal stamped silverware round-up!

    Cheers,
    Margot and Avalon

    *(FTC DISCLOSURE: There are affiliate links in this post.  If you click on a link and make a purchase, we get a small percentage of the sale.)

  • 10 Minute Craft: Bottle Cap Necklaces

    Bottle Cap Necklaces Two

    These adorable little Bottle Cap Necklaces can be made in under 10 minutes so they’re perfect for the short attention span crafter! They make a fun project for teen parties, ‘girl’s night in’ gatherings or even summer camp art projects. You can find the pre-crimped bottle caps at craft stores and online. Just add a stamped metal blank and a sparkling SWAROVSKI crystal and you’re ready to rock and roll, baby. Good times!

    You will need:

    Vintage Bottle Caps
    ImpressArt Circle 1/2″ Stamping Blanks
    10-MM Jump Rings
    Ball Chain with Connector
    Beadalon Ball Pin Medium Head Pin
    Folk Art Enamel Acrylic Paint, Licorice
    ImpressArt Stamp Straight Tape
    ImpressArt- Basic Metal Stamp Set, Lowercase, 3mm
    Ergo-Angle Metal Stamping Hammer
    ImpressArt 2 by 2-Inch Steel Block
    ImpressArt 2-Hole Punch Kit
    Round Nose Pliers for Jewelry Making
    2 pairs ImpressArt Chain Nose Pliers
    ImpressArt Flush Cutters
    Cotton swab
    Paper towel

    Bottlecap Necklace Steps

    Step one: Use 2-hole punch to make a hole in the top center of bottle cap. Step two: Stamp “p o p” into blank. (You could also stamp ‘s o d a’ or ‘c o l a’.) Step three: Punch hole in top of blank. Step four: Slide crystal on head pin and coil top. Cut off excess wire, tuck under. Step five: Swipe ink across surface of blank with cotton swab, wipe off excess with paper towel. Attach bottle cap, blank and crystal together with jump ring. Step six: Slide pendant on ball chain.

    Bottle Cap Necklace Two

    Watch me share this project on our local NBC Affiliate here:

    That’s it! Fun fast and fabulous Bottle Cap Necklaces! Stamp up a six pack to go!

    Cheers,
    Margot and Avalon

    *DIY Project Policy: Our tutorials are meant for your creative inspiration. Feel free to make and gift or wear these designs. Please make sure that you give credit to us as the designer if you make and share these designs on your blog or social sites. Please do not make and sell copies of our designs or sell them as kits. Please do not teach these designs as classes for profit. This is how we make our living and we ask that you respect our creativity and the time it takes to design, photograph and write these free tutorials. You may use a single photograph from each project online in blog round-ups or blog posts ONLY if you include a direct link back to our tutorial. Any use of these designs for retail sale for profit online in places like Etsy or eBay or in retail bricks and mortar, flea markets or outdoor fairs is not permitted. Thank you!

    (FTC DISCLOSURE: *This post contains affiliate links, if you click on a link and make a purchase we get a small percentage of the sale. The blogger is employed by ImpressArt, but this is her personal blog. All opinions are 100% her own!)

  • DIY Galaxy Pendant

    DIY Galaxy Pendant Closeup

    Galaxy crafts are everywhere lately so we decided to design a metal stamped version of the concept. This DIY Galaxy Pendant is perfect for summertime with a peasant blouse or a maxi dress. Add a floral headband and a wrist full of stamped and stacked bracelets and you’ll look like you stepped out of Coachella. Plus, you can say you made it yourself, how cool is that? Oh, and if that’s not enough to tickle your fancy, you can make this necklace in about 15 minutes too. Sweet!

    *You will need:

    ImpressArt Pewter Stamping Blank Square
    Czech Crystal Snap Rivet, Teal
    Folk Art Enamel Acrylic Paint, Licorice
    10-MM Jump Ring, Silver Plated
    Gun Metal Plated Chain Necklace With Clasp
    ImpressArt Star , Moon, Shooting Star and Sun Stamps
    Wood Handle Scratch Awl
    Ergo-Angle Metal Stamping Hammer
    ImpressArt 2 by 2-Inch Steel Block
    ImpressArt Crystal Rivet Setting Kit
    ImpressArt 2-Hole Punch, Large
    2 pairs ImpressArt Chain Nose Pliers
    ImpressArt Stamp Straight Tape
    Cotton Swab
    Paper Towel

    1-2

    Step one: Stamp the middle, top right and left and bottom left corners of your blank with the sun, moon, star and shooting star from ImpressArt’s Space and Beyond pack. Leave the right bottom corner blank. Step two: Use an awl to stamp tiny stars across the open areas of the blank.

    3-4

    Step three: Use a cotton swab to swipe enamel paint across the surface of your blank, digging it into the recessed areas. Wipe off excess with a paper towel or soft cloth. Step four: Use the smaller (5/8″) side of the ImpressArt large 2-hole punch to pierce a hole in the right bottom corner of the blank.

    5-6

    Step six: Use ImpressArt’s rivet setting tool, mat and the brass hammer to set the rivet into the pierced corner of the blank. Thread the crystal side into the front and the snap side over the back. Turn pendant over and place tool over back of snap. Strike top of tool with hammer. Don’t overdo this, you don’t want to chip or crack your crystal. Make sure it’s secured, you may have to it it a few times. Step seven: Use chain nose pliers to secure a large jump ring to the pendant and thread it on a chain.

    DIY Galaxy Pendant One

    Galaxy Final

    Galaxy Pendant Outdoors

    There you have it folks, a super simple DIY Galaxy Pendant. Not into the cosmic theme? No worries! You can take this idea in so many directions using ImpressArt Design Stamps. Try Zodiac Stamps, Holiday Stamps or Floral Stamps! Whatever you do, metal stamping lets you tell your story with style.

    Cheers,
    Margot and Avalon

    (Post contains affiliate links. If you click on a link and make a purchase, we get a small percentage of the sale.)

    *DIY Project Policy: Our tutorials are meant for your creative inspiration. Feel free to make and gift or wear these designs. Please make sure that you give credit to us as the designer if you make and share these designs on your blog or social sites. Please do not make and sell copies of our designs or sell them as kits. Please do not teach these designs as classes for profit. This is how we make our living and we ask that you respect our creativity and the time it takes to design, photograph and write these free tutorials. You may use a single photograph from each project online in blog round-ups or blog posts ONLY if you include a direct link back to our tutorial. Any use of these designs for retail sale for profit online in places like Etsy or eBay or in retail bricks and mortar, flea markets or outdoor fairs is not permitted. Thank you!

  • What You Need to Get Started Metal Stamping

    What You Need to Get Started Metal Stamping

    If you are thinking about what it takes to get started metal stamping, there are a handful of essential tools. Here’s a list of our ‘must haves’ for success. You don’t have to buy all of these items, but we think having good tools is the best way to ensure good results. Nothing can turn you off faster than the frustration that comes from using bad tools and making big messes. We’ve talked about the technique basics before, but this is an in depth look at the tools and materials.

    Metal Letter Stamps

    Yes, it seems rather obvious that you’ll need metal stamps to get started metal stamping, but there are so many different metal stamps on the market that knowing which ones to buy can be confusing. If you’re just starting out and you aren’t ready to make a big investment, a good set of quality economy stamps with an easy to read font in 3mm size is a great place to start. I like to have lower case, upper case and numbers at hand. If you think metal stamping is something you’re going to really love, I’d suggest plated stamps that are also rated higher on the Rockwell Scale. This scale measures the indentation hardness of a metal, meaning this will tell you how deep the impressions will be from your metal stamp. This all depends on the surface you’re stamping and the force with which you stamp.  It’s important that you know if you’re stamping into a softer metal like aluminum (a great place to start) or something very hard like stainless steel (this material can wear down your metal stamps over time, so you need stamps designed to handle it.) We published a metal stamping blank hardness chart last week. In the carousel below you’ll find links to a variety of stamps from economy to branded to premium. The prices are significantly different, so if your budget is tight, start with economy stamps and see where they take you. If you really get into stamping, you can also explore Design Stamps, something we’ll talk about in a future post.

    Steel Bench Block

    We highly suggest that you purchase a steel bench block for metal stamping. Yes, you can stamp on concrete or wood, but you’re not going to get the same quality results. Concrete will scratch and mar the back of your blanks and wood is too soft. You need something hard, smooth, sturdy and flat, a steel block fits the bill! They come in an array of sizes, but a small 2″x2″ block will work fine when you’re starting out. I highly recommend getting a pad to put under your bench block, not a towel. A rubber mat or leather bench pad will work best. You want to be sure the surface stays flat so you get even impressions. The pad will also help keep the noise down, as you can imagine, metal stamping is very, very loud. Our doggies do not like it at all.

    Brass Hammer

    Yes, you can use a steel hammer, but the problem with steel is that the energy of your hits will transfer back into the hammer. This can cause the hammer to bounce back when you strike and create skipped or ghost impressions. Brass is softer than steel, it will take the impact of the hit and transfer the energy into the blank, helping you make deeper impressions. We love the ImpressArt Brass 1 Pound Hammer, not just because we work with ImpressArt, but because it’s a brilliant design. The short, stubby, grip friendly handle makes it easy to swing and keeps the momentum where it belongs, in the hammer head.

    Metal Stamping Blanks

    When you’re first starting out, metal stamping blanks are the best place to hone your technique. Eventually if you really get into stamping, you will probably start looking for other things to stamp like pennies, silverware, tin cans…or whatever else you think will make for great metal stamped jewelry or decor. Metal stamping blanks come in a wide array of sizes, shapes and metals. For the novice, we think aluminum is your best starting point. It’s very easy to stamp and very inexpensive. As your stamping improves you can move up to pewter, copper, brass and nickel silver. If you want to take things to another level you can try sterling silver or alkeme (a less expensive sterling alternative.) You can buy sheets of metal for practice if you want to just get a feel for the swing of the hammer and the force you need to make impact. We suggest starting with basic shapes like circles, ovals, sticks and squares and then working your way to washers and other shapes.

    Tape

    One of the biggest challenges in metal stamping is planning and aligning your words and letters. We have found that using masking or white plastic tape is a huge help in getting things lined up properly and securing your blanks to prevent them from slipping when you hit them. You can use a marker and a ruler to plan placement of your letters. You can also use the top of the tape to keep the letters in your words all at the same level. Try Stamp Straight Tape from ImpressArt, we love it!

    There are lots of other fun tools and materials you can add to your arsenal if you get deeper into metal stamping, but this is the best place to get started metal stamping. We’ve included image and text links to products you can buy. Just an FYI, we use affiliate marketing on our site so if you click on a link and make a purchase you get a small percentage of the sale. This is how we can afford to give away our tutorials and articles for free. Within the next few months, we’ll have products and kits you can buy from us directly, stay tuned. We’re excited and we hope you are too!

    Happy Stamping,
    Margot and Avalon

  • DIY Hammered Metal Stamped Necklace

    Become Hammered Metal Stamped Necklace

    (*FTC DISCLOSURE BELOW)

    “What we think, we become.” Buddha

    Base metal stamping blanks can look a little, well, cheap.  Adding texture helps take them from meh to marvelous, and it’s very easy to do.  The concept for this hammered metal stamped necklace started with some gold Buddha charms we found on clearance at a big craft chain. We love positive, uplifting jewelry.  Plus, it’s pretty!  You’ll learn how to add texture, stamp along the edge and add holes at the top of the heart to turn this into a necklace.

    What you need:
    ImpressArt, Heart, Brass, 1 1/2″ Stamping Blank
    Antique Brass Buddha Head Charms
    2 8″ segments 22K Gold Plated Slim Rolo Chain
    10mm Gold Plated Clasp
    4 10mm 6mm Jump Rings
    Folk Art Enamel Acrylic Paint, Licorice
    Cloth or paper towel
    Wood Handle Scratch Awl
    Beadalon Ball Pein Hammer
    ImpressArt Metal Stamping Kit- Newsprint Lowercase
    ImpressArt Stamp Straight Tape
    ImpressArt Hole Punch Pliers
    Marker

    Steps 1-2

    Step one: Place your blank on the bench block and use the round or ball end of a ball pein hammer to add texture.  Strike it all over, including along the sides to create a hammered finish.  Don’t hit it too hard, or too soft, somewhere in between.  The blank may start to curl a little as you hammer, but don’t worry.  When you finish you can turn it over and use the flat side of the ball peen hammer or the brass hammer to flatten it.  Step two: Tape the hammered blank down to the bench block.  Stamp along the curve of the left edge.  Space your stamps out evenly as you go.  I didn’t mark these, but you can use a ruler and a pencil to help mark even placement.  Finish by adding a period using an awl or a period punctuation stamp.  Strike the top of the awl with your brass hammer, don’t overdo this or you could pierce the blank.

    Steps 3-4

    Step three: Wipe some Martha Stewart jewelry glaze across the letters.  Let it sit for a few seconds, then wipe it off with a paper towel or cloth.  Step four: The drill holes should be placed at the top center of both sides of the heart.  You can use a marker and a ruler or you can eyeball this.  Use the smaller side of the 2-hole punch, twisting it down until you feel it pierce the metal, then twisting it back up to remove it from the tool.  You don’t have to screw the tool all of the way down, that can potentially scratch or mar the metal.  Just twist until you feel that release and then remove it.

    Steps 5-6

    Step five: Use chain and bent nose pliers to attach the charm and the jump rings to the pendant.  (Here’s a video to help if you’ve never done this before.)  Step six: Attach the chain to the jump rings on your pendant and attach a jump ring to one open end and a jump ring and clasp to the other.

    Become Metal Stamped Necklace

    Make a hammered metal stamped necklace and become…fabulous!  We love adding texture to our metal pieces, even without adding text it gives them an artisan appeal.  You can do so much with this technique, try only hammering the edges, or half of the blank or mix hammered and polished pieces in one design.  So much to love here!  Just so you know, as you are hammering a piece of metal you are actually changing the molecular structure.  This is called work hardening.  The key is not to over hammer, or the metal can become brittle.  Softer metals can be strengthened by hammering, it works very well on soft jewelry wire when making findings like ear wires or clasps.  Stay tuned, because we’ll be showing you how to make your own findings in upcoming posts.

    Cheers,
    Margot and Avalon

    (*FTC DISCLOSURE: Post contains affiliate links, if you click on a link and make a purchase we get a small percentage of the sale.  That’s how we keep the lights on, folks!)

    *DIY Project Policy: Our tutorials are meant for your creative inspiration. Feel free to make and gift or wear these designs. Please make sure that you give credit to us as the designer if you make and share these designs on your blog or social sites. Please do not make and sell copies of our designs or sell them as kits. Please do not teach these designs as classes for profit. This is how we make our living and we ask that you respect our creativity and the time it takes to design, photograph and write these free tutorials. You may use a single photograph from each project online if you include a direct link back to our tutorial. Any use of these designs for retail sale for profit online in places like Etsy or eBay or in retail bricks and mortar, flea markets or outdoor fairs is not permitted. Thank you!

    Don’t miss a post! Follow us with Bloglovin’:

    Follow on Bloglovin