• Skip to main content
  • Skip to footer

I can make metal stamped jewelry

Metal Stamped Newlywed Necklaces

May 3, 2025 by decey Leave a Comment

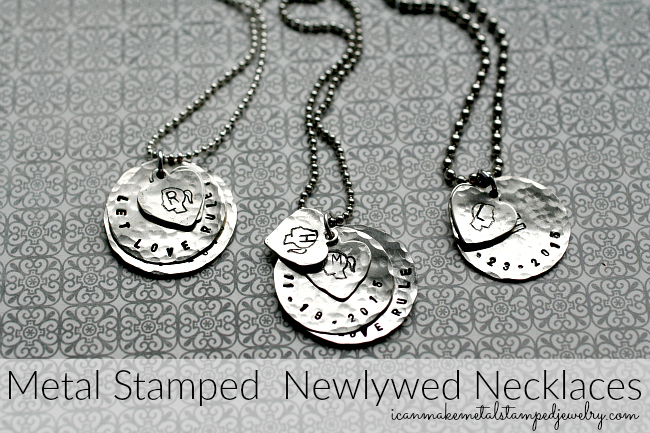
Metal Stamped Newlywed Necklaces two

Make a pair of matching Metal Stamped Newlywed Necklaces for the happy couple with our DIY Stamped Newlywed Charms. These charms feature tiny 1.5mm stamps, which we love because they fit on small blanks with ease. The key is to line them up in order on your table or bench before you start stamping. You can still start in the center and work side to side, but this helps keep things organized as you go along.

You will need:
1/16 Inch 1.5mm Uppercase Letter and Number Sans Serif Font Stamps
1/8 Inch Uppercase Sans Serif Letter Stamps
ImpressArt, Circle, Nickel Silver, 3/4″ Stamping Blank
ImpressArt, Circle, Nickel Silver, 3/4″ Stamping BlanksImpressArt, Heart w/ Ring, Nickel Silver, 1/2″ Stamping Blank
Beadalon 6-MM Jump Rings, Silver Plated
Ball Chain Necklaces 18 Inch With Loster Clasp
Folk Art Enamel Acrylic Paint, Licorice
ImpressArt- 6mm, Girl Profile Metal Stamp
ImpressArt- 6mm, Boy Profile Metal Stamp
ImpressArt- 6mm, Equal Symbol Metal Stamp or ImpressArt Design Stamps, 6mm, Lace Heart
Ergo-Angle Metal Stamping Hammer
ImpressArt 2 by 2-Inch Steel Block
ImpressArt Hole Punch Pliers
Wood Handle Scratch Awl
ImpressArt Stamp Straight Tape
2 Pairs ImpressArt Chain Nose Pliers
Cotton Swab
Paper Towel

Step One: Stamp silhouettes on hearts.

Step Two: Stamp initials inside of silhouettes on hearts using the 1/8″  stamps.

Step Three: Stamp LET LOVE RULE around edge and heart or equal symbol in center of the largest circles using the 1/16″ stamps.

Step Four: Stamp wedding date around the edge of the smaller circles using the 1/16″ stamps. Use awl as a stamp to add dots between numbers.

Step Five: Use chasing hammer to add texture.

Step Six: Use fingertip or cotton swab to apply enamel to the stamped areas of your blanks. Let sit for 10 seconds, wipe clean with paper towel or soft cloth.

Step Seven: Use hole punch pliers to pierce holes in top center of circle blanks.

Step Eight: Layer charms on jump ring smallest to largest, secure jump ring closed with tension.  Slide charms on ball chain necklace.
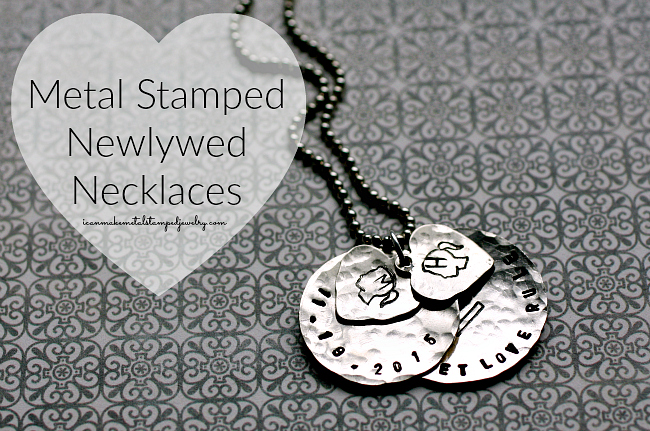
Metal Stamped Newlywed Necklaces One

You can personalize these Metal Stamped Newlywed Necklaces to suit the happy couple, ImpressArt has an eclectic array of design stamps that open up all sorts of possibilities. We hope you enjoy this project and if you make some, we’d love to see them!

Happy Stamping,
Margot and Avalon
Filed Under: Diy Tagged With: diy wedding, diy wedding projects. metal stamped necklaces, i can make metal stamped jewelry, margot potter, marriage equality jewelry, metal stamped necklaces, metal stamped wedding jewelry

Artist Spotlight: Adrianne Surian

March 26, 2025 by decey Leave a Comment

Artist Spotlight Adrianne Surian

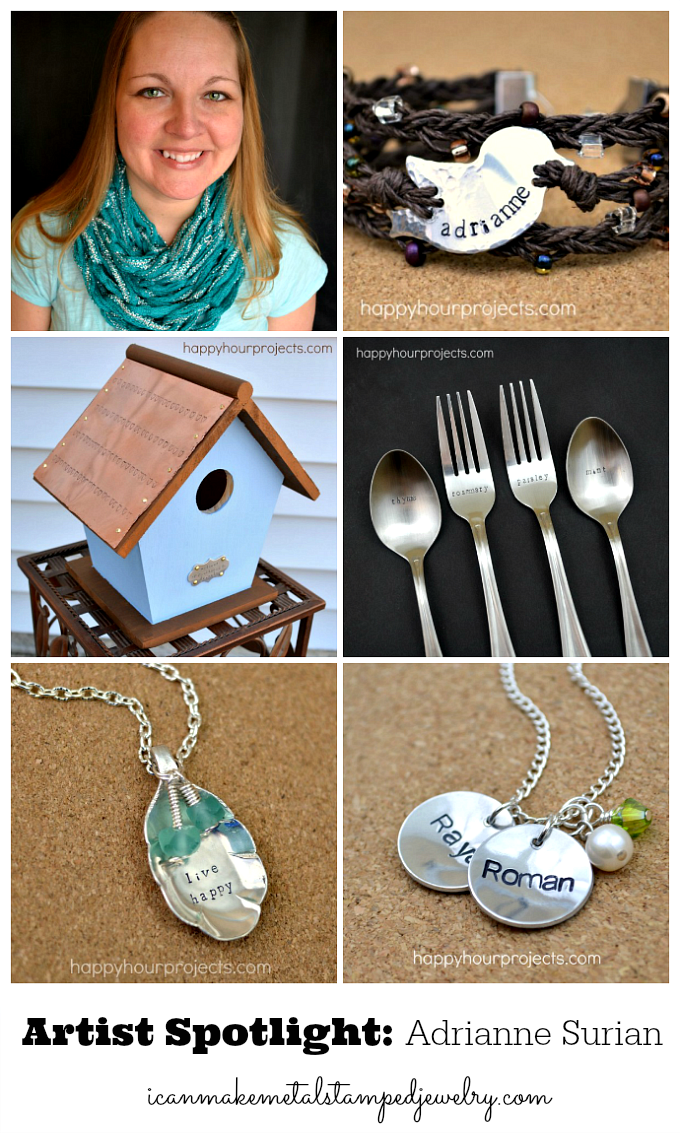
This week, we’re shining the spotlight on the lovely and talented Adrianne Surian of Happy Hour Projects. Adrianne is a prolific lifestyle blogger with a large and loyal following. She shares easy to DIY tutorials all focused on projects you can make in under an hour, which is terrific for the short attention span crafter. She’s an avid metal stamping enthusiast and her tutorials are fabulous with detailed step by step photos, videos and lots of inspiring new techniques. Adrianne took some time to answer our five easy questions and she shares some great tips for success making metal stamped jewelry and DIY projects!

  1. When did you start making jewelry and why?

Forever and ever ago – truly. Like, macaroni necklace age. I really began to realize my interest in jewelry around age 8 when I learned to make paper beads, and when I made dozens and dozens of friendship bracelets. I played around with design concepts when I was about 10… not that the average 10-year-old oozes style, of course. I still remember a particularly interesting pair of earrings I made from a pair of miniature rubber frogs I talked my mom into buying me on a science museum trip. I’ve always leaned toward crafty, but jewelry is especially satisfying to make, because you can bring it with you, by wearing it!

  1. What is your favorite source for jewelry making inspiration?

It’s usually the components themselves! A lot of times, I’ll get my hands on a specific piece – a bead, a charm, a certain shape – and I’ll get an idea to evolve it. Though I’m not going to lie, every time I’m out shopping, I have to take a peek at the new trends!

  1. What advice do you have for folks just starting out?

Regarding design itself – if you enjoy it, then push your limits. Not every piece has to be perfect, allow yourself a learning curve. And put your own spin on any design that inspires you. You don’t ever have to make exactly what someone else does. Adding your own touch makes your piece truly one of a kind and that much more special.

If you do enjoy it… well, it’s like any hobby. You will end up with an enormous stash. So get organized early, and keep tabs on what you’ve got. It will save you money when you’re eyeing something fabulous… and can’t remember if you already bought it or not, haha. Not that that has happened, of course… ahem.

  1. What tips or tricks can you share for successful metal stamping?

If you’re just starting out, then practice, practice, practice. Seriously. Keep with it. You’ll improve. In the early days, I was all over the place. I wrecked a lot of blanks. In fact, I still have them. I save my bad blanks for practice if it’s been a while since I’ve gotten the hammer out! It’s a great way to brush up my spacing and consistency before wasting a new blank – and it shows if it’s been a while since I stamped.

My other advice for beginners is: you won’t hit your hand. So don’t worry about it! Early on, my hesitation showed in the final product, and it’s because I was worried about exactly that.

If you’ve conquered the beginners’ hurdles, then my next advice is to step it up. Think outside your letter set. Think textures, shapes, and the other things that metal is, and what it can do. Once I started stamping spoons, I crossed over into a different way of thinking about stamping. The next thing I stamped was a copper sheet roof for a birdhouse. I’m starting to believe that there’s anything that can’t be stamped. Seriously. I will find a way.

  1. Where can our readers find you?

I blog at Happy Hour Projects. My focus is tutorials and inspiration geared toward beginners, and I’ve been talking about my experience since I was a beginner myself!

You can visit Adrianne Surian at her website Happy Hour Projects and her social pages. You can find the links below! We’ll be back on Wednesday with more metal stamping inspiration!

Happy Hour ProjectsWebsite

Happy Hour Projects Website Stamping Tutorials

Facebook

YouTube

Twitter

Pinterest

Instagram

Cheers,
Margot and Avalon

Filed Under: Diy Tagged With: artist spotlight, designer spotlight, DIY hand stamped jewelry, how to make metal stamped jewelry, metal stamped jewelry, metal stamping basics

Easy Metal Stamped Penny Necklace

March 25, 2025 by decey Leave a Comment

easy metal stamped penny necklace margot potter

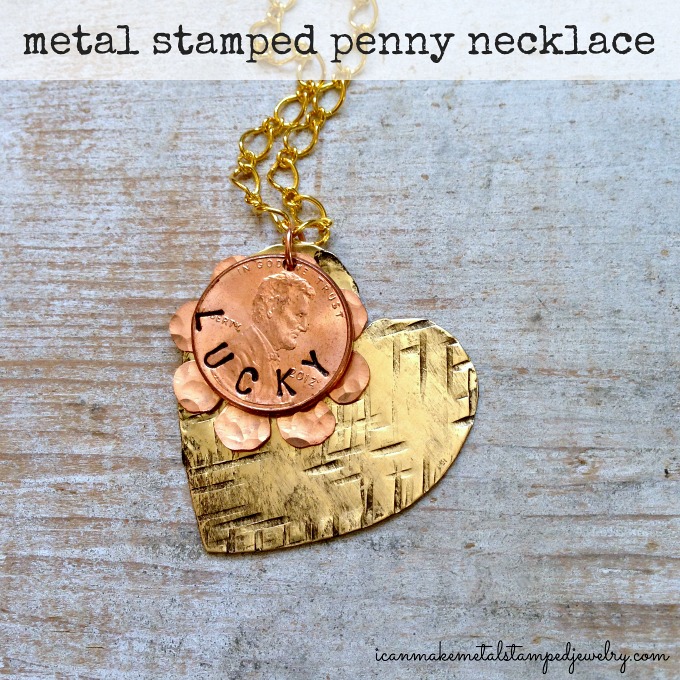
Stamping on a curved surface is a great way to practice and master metal stamping. Stamping straight lines is challenging for beginners, but by marking and stamping around a curve, you can begin to get a feel for what it takes to make deep, crisp, even impressions. Here’s a simple, layered Metal Stamped Penny Necklace that features stamping letters on a curve and adding textures to metal blanks. Turn your lucky penny into a pretty keepsake, or make one for a friend featuring their birth year or a special date!

You will need (Disclosure: Links below are affiliate links, if you click on a link and make a purchase, we get a small percentage of the sale. That’s how we keep the lights on, folks.)

Penny
ImpressArt, 8 Petal Flower, Copper, 15/16″ Stamping Blank
ImpressArt, Heart, Brass, 1 1/2″ Stamping Blanks- 24 pc.
Beadalon Chain Figaro Medium Gold Plated
Beadalon Jump Ring 6mm Nickel Free Gold Plated
Folk Art 4032 Enamel 2-Ounce Acrylic Paint, Licorice
ImpressArt Basic Metal Stamp Set, Uppercase, San Serif, 3mm
ImpressArt 2 by 2-Inch Steel Block, Small
Metal Hole Punch Pliers for Sheet Metal, 1.5mm
ImpressArt Face Chasing Hammer
ImpressArt Brass Stamping Hammer
ImpressArt Texture Hammer, Cross Hatch/Rectangular Stars
2 Pairs Chain Nose Pliers W/White Sparkle Handles-
Non-permanent marker
Cotton swab
Soft cloth or paper towel

1-4 Lucky

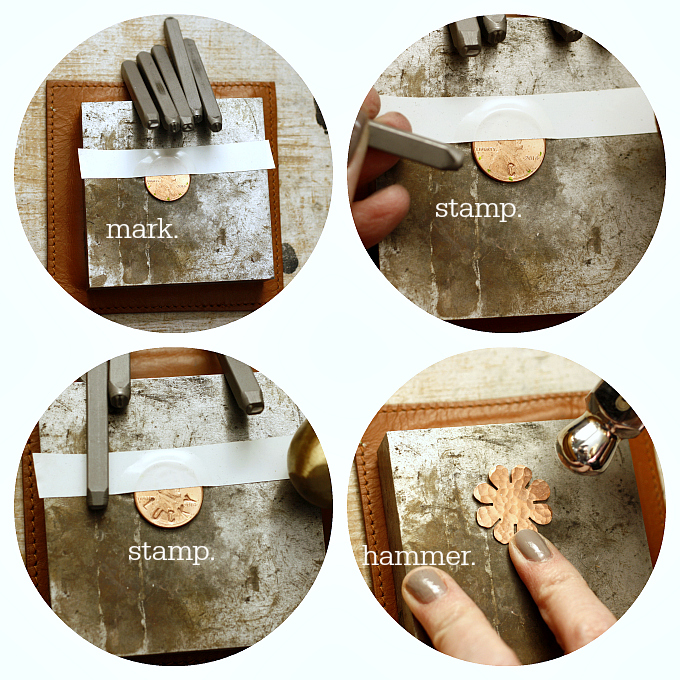
Step one: Use a non-permanent marker to mark even placement of letters. Step two: Stamp the center letter. Step three: the bench block so the area you plan to stamp is facing you and stamp above your marks as shown to spell the word LUCKY. Be sure to hold the stamp straight, it needs to be in full contact with the blank to make an even impression. If you hold it straight and hit it firmly dead center, you should get a good impression. If you flinch while stamping, don’t lift your hand or move the stamp and you can hit it again. Step four: Use the round end of a chasing hammer to add texture to the flower blank as shown.

5-8 Lucky

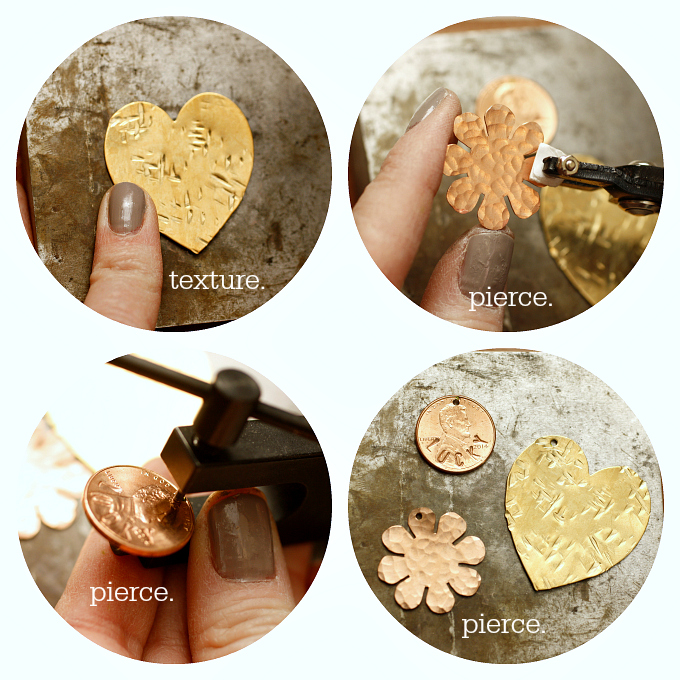
Step five: Strike surface of heart blank with texture hammer making a criss-cross pattern. Step six: Mark and pierce one of the petals of your flower blank. Step seven: Mark and pierce top center of penny. Step eight: Mark and pierce top left corner of heart as shown.

9-12 Lucky

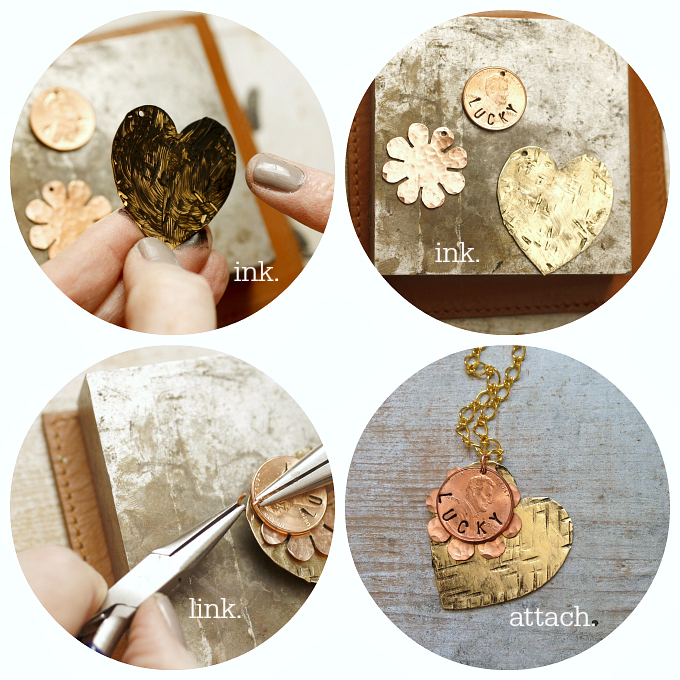
Step nine: Use a cotton swab or your finger tip and apply an even coat of acrylic enamel paint to surface of heart, dig the paint into the stamped areas. Wipe clean with a soft cloth. Step ten: Repeat the process with your stamped penny. Step eleven: Slide a jump ring through all three blanks, the penny is on top, then the flower, then the heart. Step twelve: Attach the jump ring to the chain, secure closed with tension using two pairs of chain nose pliers.

That’s it! If you don’t want to have the layers, just stamp the penny and attach it to a chain, key chain, earring wire, bracelet, or stamp a penny and give it as a keepsake without the pierced hole. Make an Easy Metal Stamped Penny Necklace of your own in just a few simple steps and in the process, master the basics of metal stamping.

Cheers,
Margot and Avalon

Filed Under: Diy Tagged With: DIY lucky penny, DIY metal stamped jewelry, easy hand stamped jewelry, easy metal stamped jewelry, hand stamped pennies, how to hand stamp a penny, i can make metal stamped jewelry, ImpressArt, margot potter, metal stamping pennies

DIY Flower Earrings

March 24, 2025 by decey Leave a Comment

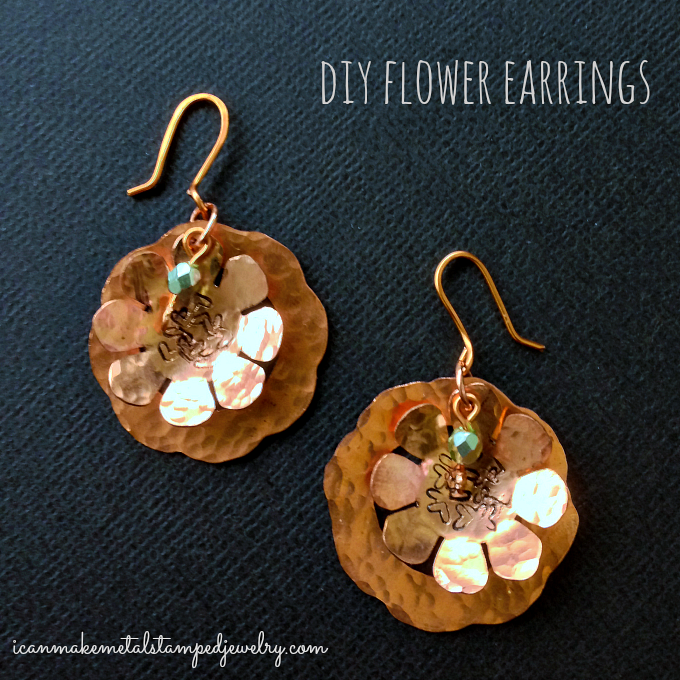
DIY Flower Earrings

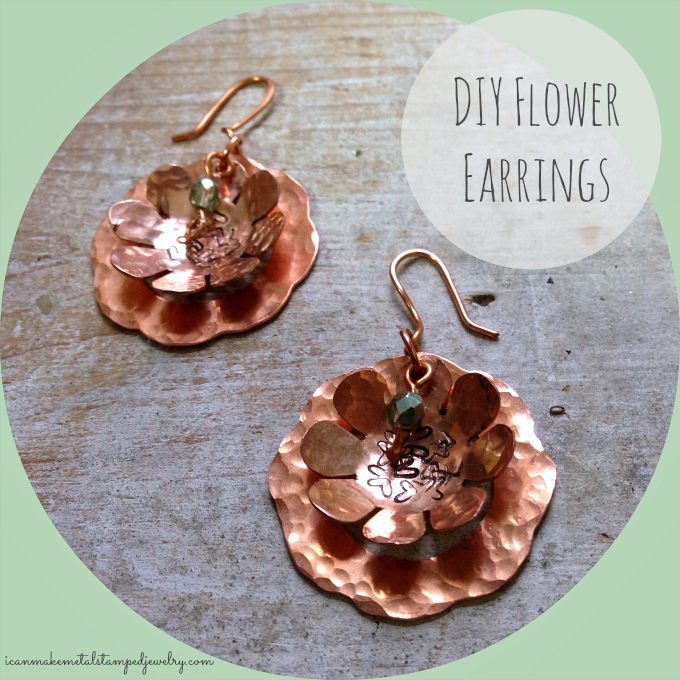
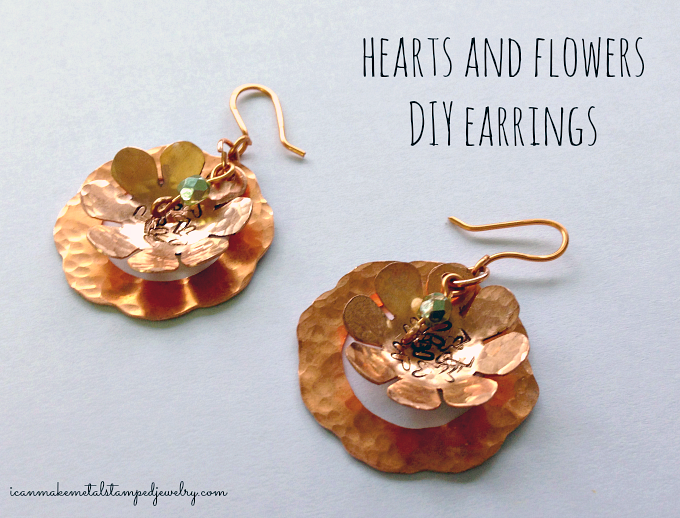
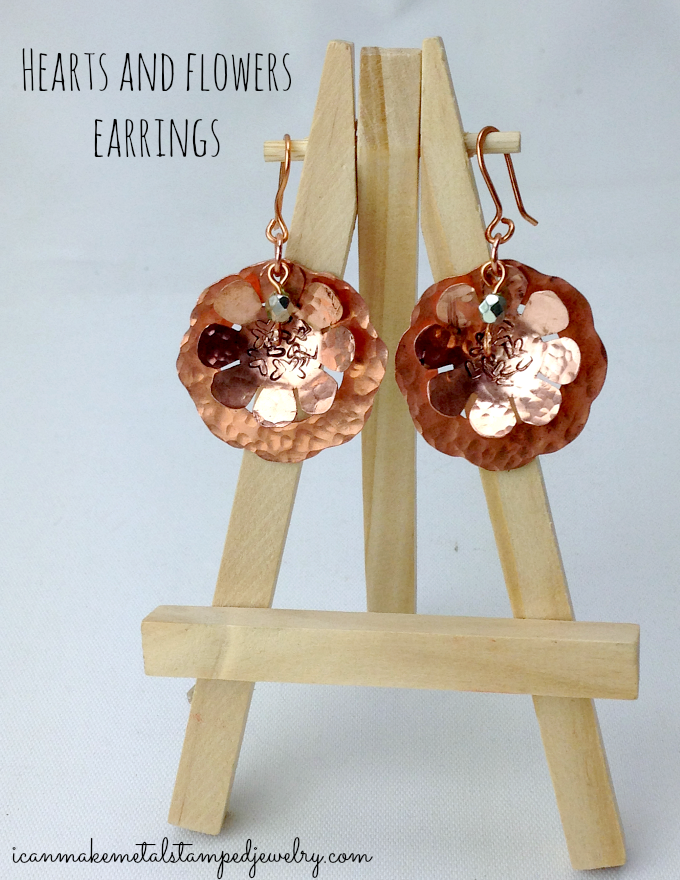
I love these flower shaped base metal stamping blanks, they’re so much fun to use in layers. These DIY Flower Earrings would be perfect with our Shine necklace, or on their own. Easy and fun to make out of copper blanks with just a single design stamp in a repeated pattern to add texture. Hammer, stamp, ink and layer and if you like you can make your own head pins and ear hooks using 20 gauge wire.

What you need:

2 ImpressArt, 8 Petal Flower, Copper, 15/16″ Stamping Blanks- 24 pc.
2 ImpressArt, Scalloped Washer Stamping Blanks, Copper, 1 1/8″- 24 pc.
2 Copper Ear Wires
2 Preciosa Czech Fire 6 mm Faceted Round Polished 2 Glass Beads, Transparent Dark Grey, 200-Pack
Artistic Wire 20-Gauge Bare Copper Wire,15-Yards
2 Premium Jump Rings, Copper, 18 Gauge, 3/16″- 200 pc.
ImpressArt Design Stamps, 3mm, Whimsy Heart
ImpressArt Face Chasing Hammer
ImpressArt Stamping Hammer
ImpressArt Steel Stamping Block
Folk Art Enamel Acrylic Paint in Licorice
Dapping Set Block
1.25mm Round Hole Punch Pliers for Sheet Metal
Cotton Swab
Paper Towel

Amazon.com Widgets

Amazon.com Widgets

1-3

Step one: Hammer the heart stamp into the center of the smaller flower blank repeatedly, this is to create texture. Use round end of chasing hammer to hammer flower. Step two: Use round end of chasing hammer to hammer larger flower blank. Step three: Use dapping tool to dap smaller flower into a curved shape.

4-6

Step four: Use hole punch to pierce holes in top center petal of both blanks. I use chain nose pliers to pull one of the petals on the smaller flower back a little so it hangs nicely. (If you want the stamped areas on the center of the blank to be more defined, use a cotton swab to wipe some acrylic enamel paint on the blank. Let set for 30 seconds and use a soft cloth or paper towel to wipe away the excess.) Step five: Cut a 1″ segment of wire. Bend and loop the ends using round nose pliers. Step six: Hammer the loop flat with the flat side of your chasing hammer.

7-9

Step seven: Slide bead on wire. Bend wire flush to top of bead at a 90 degree angle. Cut wire to 1/4″. Grasp end of wire and bend into a loop. Step eight: Your ear wire loop needs to be bent perpendicular so the earring will hang to the front when attached. Use your chain nose pliers to gently bend the loop. If it opens up, be sure to secure it closed. Your round nose pliers can help with that. Step nine: Assemble the layers large to small attaching them to the jump ring and the ear wire as shown.

Hearts and Flowers One

Flower Earrings Black

Hearts and Flowers

That’s it! Fun, fast and fabulous. You can make these in mixed metals, add larger beads, use colored paint and make this project your own. Adding texture to your metal really gives it an artisan appeal and it is so easy to do. With winter looming, these pretty DIY Flower Earrings give you just a touch of spring even on the coldest days.

Cheers,
Margot and Avalon

*DIY Project Policy: Our tutorials are meant for your creative inspiration. Feel free to make and gift or wear these designs. Please make sure that you give credit to us as the designer if you make and share these designs on your blog or social sites. Please do not make and sell copies of our designs or sell them as kits. Please do not teach these designs as classes for profit. This is how we make our living and we ask that you respect our creativity and the time it takes to design, photograph and write these free tutorials. You may use a single photograph from each project online in blog round-ups or blog posts ONLY if you include a direct link back to our tutorial. Any use of these designs for retail sale for profit online in places like Etsy or eBay or in retail bricks and mortar, flea markets or outdoor fairs is not permitted. Thank you!

Filed Under: Diy Tagged With: DIY Earrings, DIY hand stamped jewelry, DIY metal stamped jewelry, easy hand stamped jewelry, easy metal stamped jewelry, hand stamped earrings, metal stamped earrings

Hammer Time: Basic Metal Stamping Hammers

March 8, 2025 by decey Leave a Comment

Basic Metal Stamping Hammers

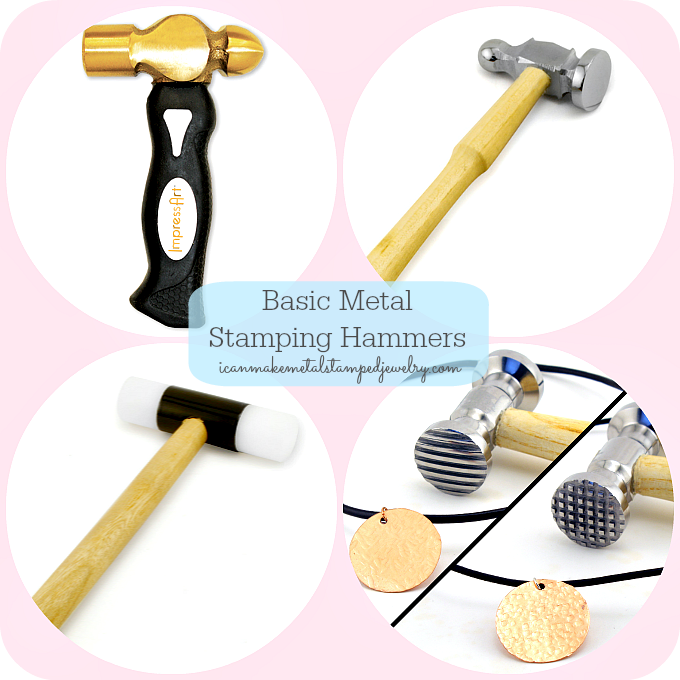
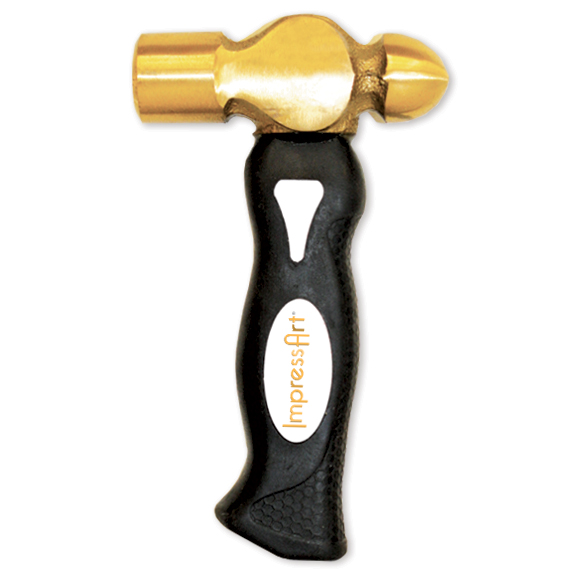
It’s *Hammer Time! Hooray! Today we’re taking a look at four basic metal stamping hammers that will help you take your stamping to a higher level of professionalism and overall fabulosity. You don’t need all of these to get started, but you’ll be glad you have them!  Trust us, we know about these things. First up, possibly our favorite of the bunch, the one pound brass hammer with the ergonomic handle.

stamping_hammer.4

ImpressArt debuted this fabulous ImpressArt 1 Pound Metal Stamping Hammer two years ago. It’s got a lot going for it in terms of reasons why it’s the best choice for metal stamping.  First of all, the hammer head is made of solid brass. Brass is softer than steel (your household hammer is probably steel.) The softness of the brass allows the impact of your hit to be transferred directly into your metal blank. When you hit with a steel hammer, the energy bounces back up the handle and into the hammer. By stamping on a solid block of steel and using this hammer, all of the energy of every hit goes into your blank creating deep, crisp impressions. Because only one good hit is needed with this hammer it lessons the risk of skipped or ghost impressions. The handle is short, stubby and covered in a soft textured rubber, this makes it easy for smaller and larger hands to get a firm grip and again, helps transfer that stamping energy into your blanks. This hammer also helps prolong the life of your metal stamps, another bonus! If we could hand this to you through the computer screen, you’d immediately feel how yummy it is to grip and how heavy it is, yet completely balanced. Yes, you can start out with a regular steel hammer, but if you want to up your chances of success, try this one. It may take a little practice to get used to the feeling of one pound of brass heading towards your other hand, but we truly believe you will come to love this hammer as much as we do. ImpressArt recently debuted an 8 ounce version of this hammer for use with their new softer stamping blanks. We like the smaller hammer, but personally, this is the one we use most of the time.  TOOL TIP: This hammer requires a little maintenance, you can use a heavy grit sandpaper or a metal grinding wheel to smooth the surface as it becomes dented over time with regular use.

31bpZEC8AOL

Last year, ImpressArt upped the ante with their Ergo-Angle Metal Stamping Hammer. This hammer represents the evolution of the original brass hammer, with an angled head designed for ease of use and precision stamping, a replaceable brass head, comfortable grips for varied finger placement, and an ergonomic design to prevent fatigue. The weight, the ease, the softness of the brass are all still there, but upgraded to make it even easier to make a great impression!

chasing-hammer smaller

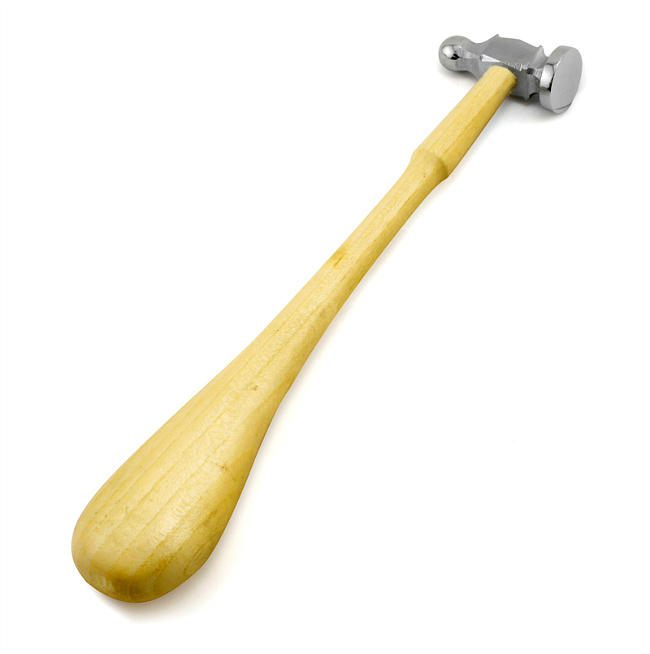
In case you have not yet met, let us introduce you to the wonderful multi-purpose ImpressArt Face Chasing Hammer. This is a tool useful for metal stampers, wire workers, crafters and jewelry makers. The ball pein hammer has two sides.  The round end is used to add texture to wire or metal by repeatedly striking as you move across the surface of the material. The flat end is used to flatten wire or metal out. The motion of striking your metal creates molecular changes in the material making it harder and less flexible. Too much striking can result in brittleness, so it’s important to not overdo it. This process is called work hardening. We use this tool on a regular basis, it’s fabulous for making earring wires, findings and of course, works great for metal stamping when you want to add texture around the edges of a piece, harden or flatten your blanks.

text-hammer-2 smaller

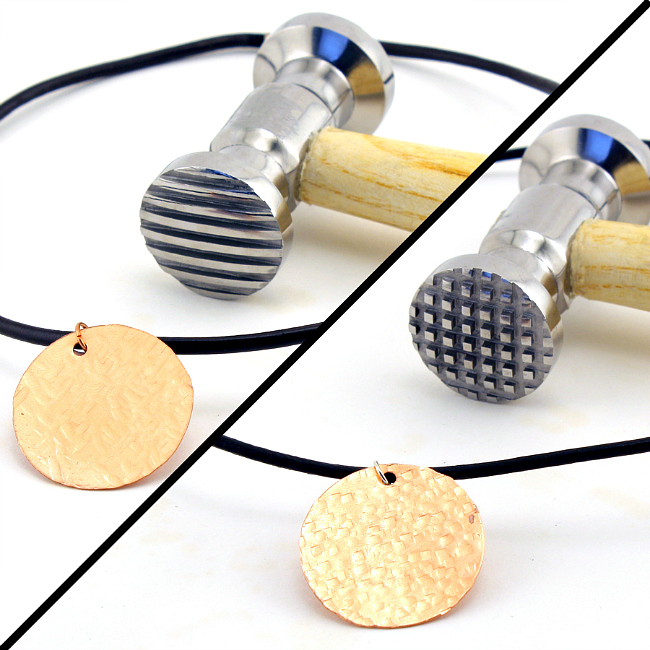
Texture Hammers add a variety of textures to your metal blanks and wires. They come in a variety of surfaces, some even have replaceable heads. By varying the placement of the hammer as you hit, you can create beautiful designer one of a kind pieces. We recommend you create texture first, then stamp into the textured metal. Try using more than one on different areas of your blanks. Add texture to the edges or along portions of the pieces leave some smooth. Hit along the edges to give the blanks a more organic appeal. As with the other hammers, you need to be careful not to overdo things. The process of adding texture is also work hardening your materials.

nylon-hammer smaller

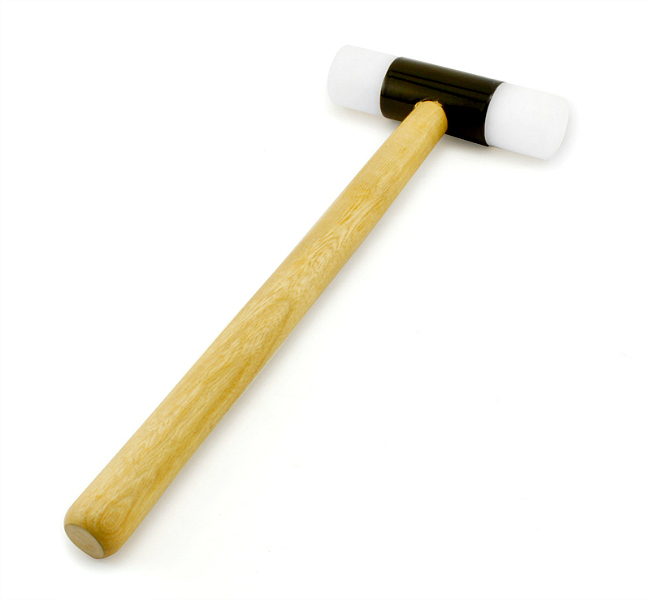
Finally, we give you the Nylon Hammer. This will protect the material from being scratched or marred while flattening. Thinner and softer materials may start to curve or curl in around the edges while being stamped. Use this hammer with your bench block to flatten them back out. Works great for wire and metal blanks. After all, you don’t want your beautiful stamped metal pieces to get unintended dents or dings or be curved when they’re not supposed to be!

As with all tools, practice helps you perfect your technique. Don’t be afraid to make “mistakes”, that’s how you learn. Sometimes those mistakes become pathways for new design ideas and fresh techniques. Do you have any of these basic metal stamping hammers in your tool box? If so, do you have a favorite? Let us know in the comments!

Hammer images courtesy of ImpressArt.

Cheers,
Margot and Avalon

(*FTC DISCLOSURE: Post contains affiliate links. If you click on a link and make a purchase, we get a small percentage of the sale. Blogger works part time for ImpressArt, but all opinions in this post are 100% her own. That is all.)

Filed Under: Diy Tagged With: brass stamping hammer, DIY jewelry, how to make metal stamped jewelry, impressart brass hammer, metal stamping 101, metal stamping basics, metal stamping hammers

  • « Go to Previous Page
  • Page 1
  • Page 2
  • Page 3
  • Page 4
  • Page 5
  • Page 6
  • Interim pages omitted …
  • Page 15
  • Go to Next Page »

Pages

  • About Us
  • Contact Us
  • Privacy Policy

Copyright © 2026 · Aspire Theme on Genesis Framework · WordPress · Log in