• Skip to main content
  • Skip to footer

I can make metal stamped jewelry

Stamped Aluminum Wire Necklace

September 26, 2025 by decey Leave a Comment

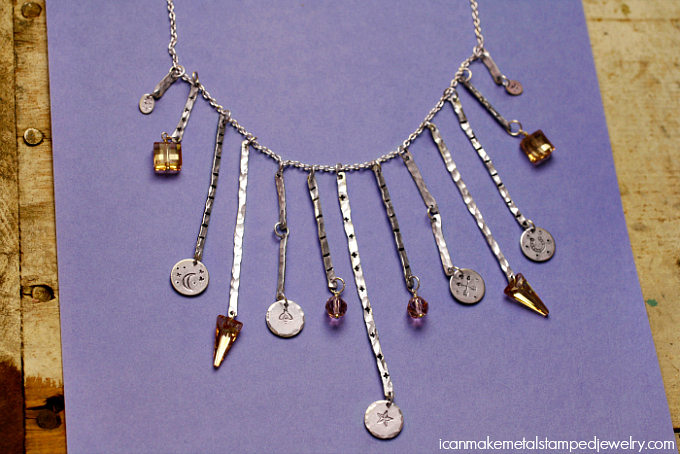
Stamped Aluminum Wire Necklace Beauty Two

(THIS POST CONTAINS AFFILIATE LINKS, IF YOU CLICK ON A LINK AND MAKE A PURCHASE WE GET A SMALL PERCENTAGE OF THE SALE.)


I’ve been working with wire for years, but I’ve never been a huge fan of aluminum wire. It’s so soft and malleable, I just couldn’t see the point…until now. I got a coil of 12 gauge Aluminum Artistic Wire recently and started playing. I was so excited when I discovered that by hammering and stamping, it was possible to work harden the wire enough to make some beautiful jewelry. Aluminum will stay shiny too, and gets even shinier when you hammer it, so that’s another bonus. Plus, it’s very inexpensive so it’s a great place to start playing with wire if you’re a newbie. I made this Stamped Aluminum Wire necklace to wear to a big trade show and I thought it would be fun to share the technique I used with you. Stamping on this wire does take a little practice, because the stamps have to be centered. Make sure you flatten it enough to accommodate the width of the stamp, nothing wider than 1.5 for a full impression, the stamp I used to make the stripes was a little wider than that.

Watch the video for the tutorial and grab the materials below!
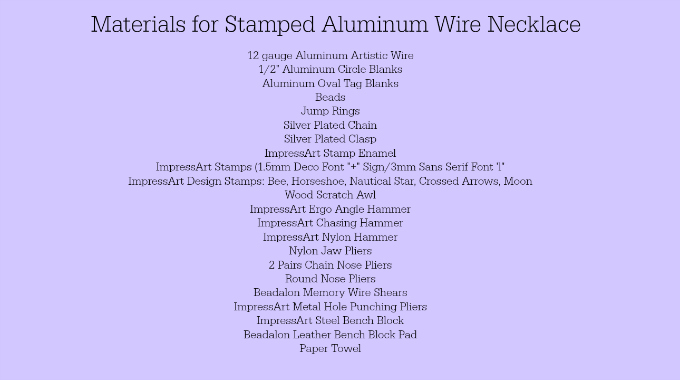
Stamped Aluminum Wire Necklace Materials List

What you need to make this Stamped Aluminum Wire Necklace (these are affiliate links, if you click on a link and make a purchase we get a small percentage of the sale, which is how we pay the rent!):
Artistic Wire Aluminum Craft Wire, 12 Gauge
ImpressArt, Circle, 1/2″, Aluminum Stamping Blanks
ImpressArt, Tag, Oval, w/ Ring, 5/8″, Aluminum Stamping Blanks
Beads (Swarovski Light Rose, 8 MM round beads, Swarovski Crystal, #6480 Spike Pendant 18mm Crystal Golden Shadow
, Swarovski Crystal, #5051 Oval Mini Beads 10mm, Crystal Golden Shadow
Beadalon Jump Ring 6mm Silver Plated
Beadalon Chain, 6m, Small Cable, Silver Plated
Beadalon Lobster Clasp Medium Silver Plated
Beadalon Ball Head Pin Silver Plated
1.5mm + stamp (You can find one in the new 1.5 mm Deco lower case font set from ImpressArt)
3mm Basic Sans Serif Lowercase “l” ImpressArt- Basic Metal Stamp Set, Lowercase, 3mm
ImpressArt Stamp Enamel
ImpressArt Chasing Hammer
ImpressArt Nylon Hammer
Artistic Wire Nylon Jaw Pliers
ImpressArt Ergo-Angle Metal Stamping Hammer
Round Nose Pliers
2 Pairs ImpressArt Chain Nose Pliers
ImpressArt Steel Stamping Block
Beadalon Leather Pad For Block and Anvil
Beadalon Memory Wire Shear
ImpressArt Hole Punch Pliers
Paper Towel

Steps:

Cut wire segments using memory wire shears or flush cutters, make sure both ends are flush cut. If they’re pointy, your hammered pieces will be scratchy!

Use flat end of chasing hammer to flatten wire enough that it will be able to accept the 1.5mm stamps. Don’t overdo this, if you over hammer you will go from work hardening to making it brittle. Yup, more physics. Use round end to add texture.

Use stamps to add patterns to some of the wires. I used the ‘+’ on some and the ‘l’ on others as stripes, varying it on the diagonal and straight across. Make a variety of lengths of wire pieces, as you can see I even did a double segment for two of them.

Pierce a hole in both ends of the wire with the metal hole punching pliers. Make sure the pliers are centered before you punch!

Add Stamp Enamel to the pieces you’ve stamped, let sit for 10 seconds, wipe clean.

Stamp your charms, you can do this as you will. I like to use the tilt and tap method, which means I hit the stamp once dead center, DO NOT LIFT IT, rock to the four corners and hit each time and one last hit dead center. If you lift the stamp, this won’t work, so keep it secure. I made some blanks with hammered edges, some with dotted accents, some with dots and plus signs. Get creative!

Pierce a hole in the top and bottom of each charm with the hole punching pliers.

Slide beads on head pins and make coiled top dangles. You can find a video to do this here.

Put it all together using jump rings to connect the elements. Make sure each dangle is hanging from the bottom of the chain links, I spaced them out by four links. It will require you taking your time to get them all hanging from the bottom, but this helps you keep it from being too wonky when you wear the piece. You will have to orient the dangles properly each time you wear this design so it falls properly, just an FYI.
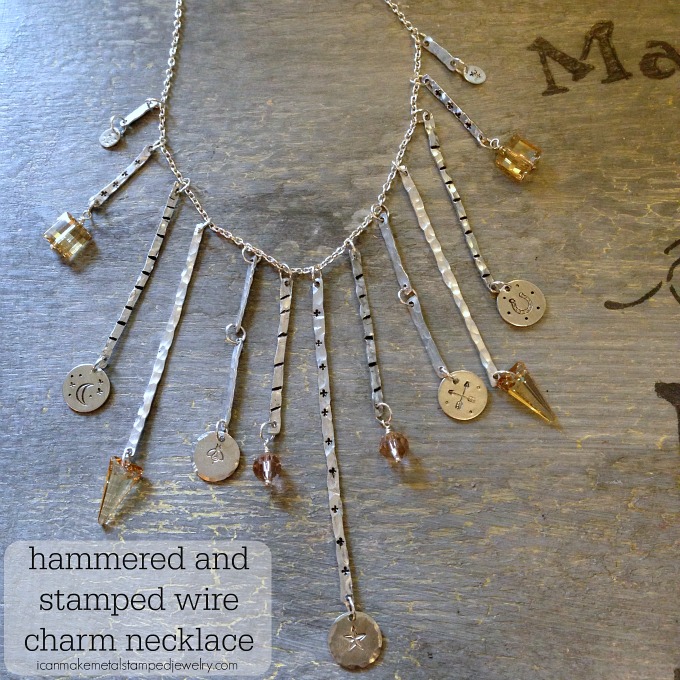
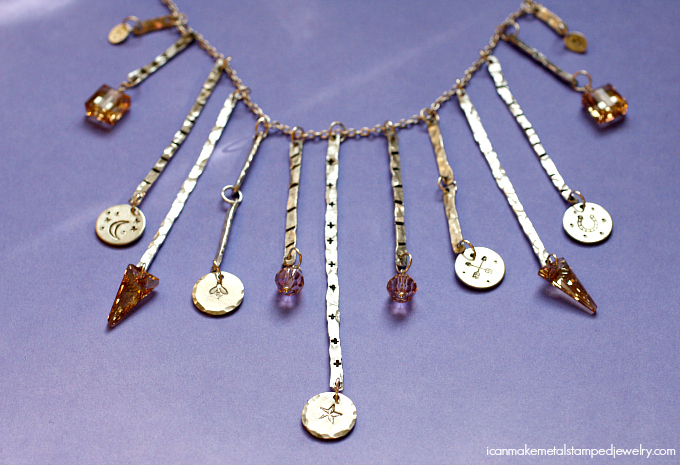
Wire Charm Necklace Margot Potter

Stamped Aluminum Wire Necklace Three

That’s it! You can make this Stamped Aluminum Wire Necklace as dramatic and bold or simply and refined as you desire. These wire segments can be used to make all manner of fun things, even home decor items. If you make this piece or use this technique, let us know in the comments!

Cheers,
Margot and Avalon
Filed Under: Diy Tagged With: aluminum wire jewelry, hand stamped necklace, how to make wire jewelry, make it with madge, margot potter, metal stamped necklace, stamped aluminum wire necklace, stamped wire necklace, wire jewelry, working with wire

30 Minute Craft: DIY metal stamped initial pendants

August 26, 2025 by decey Leave a Comment

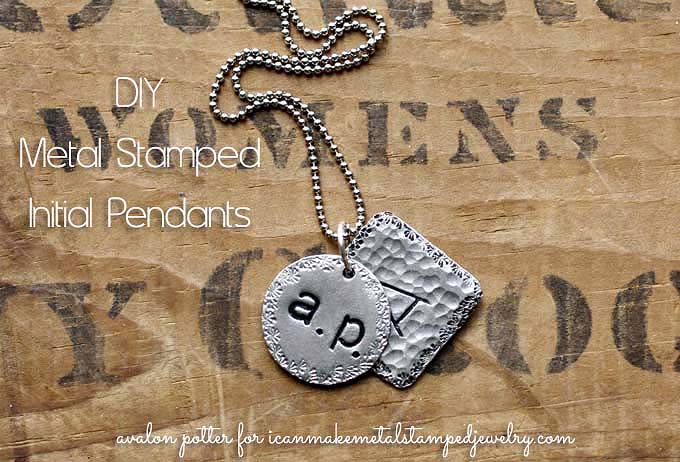
Initial Pendants Wood Three copy

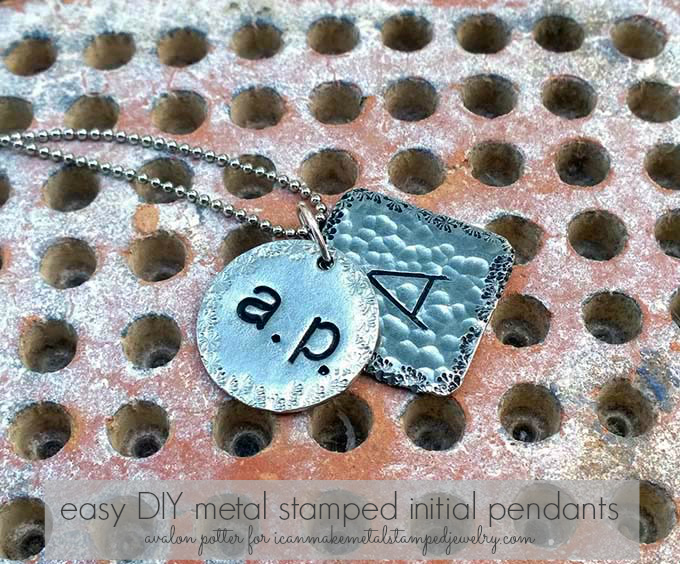
Miss Avalon made these pretty pendants and we LOVE them!  You only need a few metal stamps and a few minutes to make these DIY metal stamped initial pendants.  It doesn’t get much easier than that!  We’ve used a dandelion stamp to add interest to the edges and extra large stamps for the initials.  You can opt to add texture or leave the blank smooth, that’s totally up to you.

What you need:
ImpressArt Pewter Stamping Blanks
Ball Chain Necklace with Clasp
Beadalon 10-MM Jump Ring
1/4” 6mm Metal Punch Stamp Lowercase
1/4” 6mm Metal Punch Stamps Uppercase
Ergo-Angle Metal Stamping Hammer
ImpressArt Chasing Hammer
ImpressArt 2 by 2-Inch Steel Block
ImpressArt Chain Nose Pliers
ImpressArt Bent Nose Pliers
ImpressArt Stamp Straight Tape
Folk Art Enamel Acrylic Paint, Licorice

Metal Stamped Initial Pendants Steps

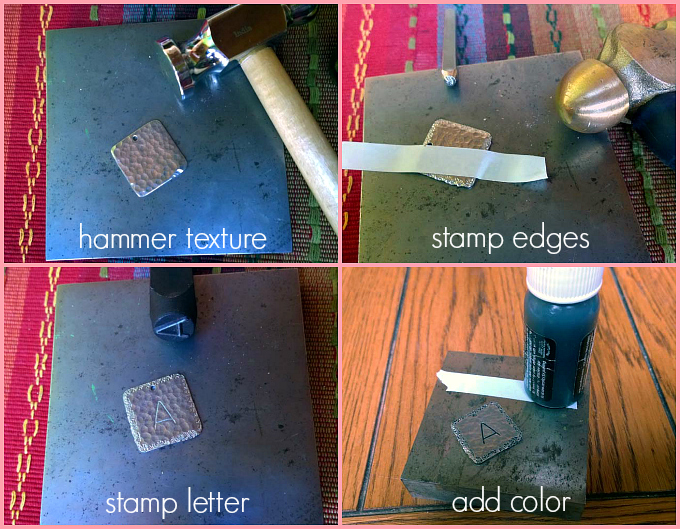
One: Use rounded end of chasing hammer to add texture on surface of blank.  Two: Use dandelion stamp to stamp texture along edges of blank.  This is organic and freeform, don’t worry about it being “perfect.” Three: Stamp letter in center of blank. Four: Swipe paint or marker across surface of blank and wipe from surface. Color will rest in the stamped areas.

Step Five

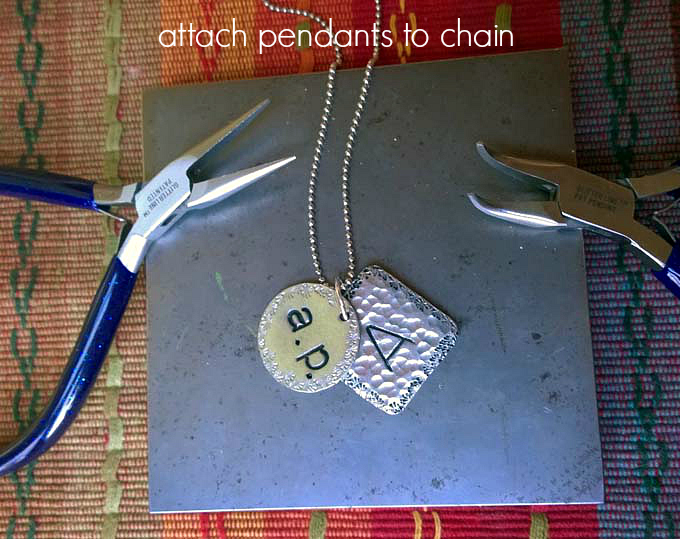
Five: Attach charms to chain using a jump ring and chain nose pliers.

Metal Stamped Initial Pendants Text Two

That’s it, in four simple steps and under 30 minutes you can make your own easy DIY Metal Stamped Initial Pendants!

Cheers,
Avalon and Margot

Filed Under: Diy Tagged With: 30 minute craft, DIY hand stamped jewelry, DIY jewelry, DIY metal stamped initial pendants, DIY metal stamped jewelry, easy metal stamping projects, how to make metal stamped jewelry, metal stamping basics

DIY Metal Stamping on WBIR Channel 10

August 23, 2025 by decey Leave a Comment

WBIR Channel 10 News

I appear on our local NBC affiliate in DIY craft segments every month.  Yesterday, I got a chance to share my passion for all things metal stamping!  Yup, I shared the basics of DIY metal stamping on WBIR Channel 10 here in Knoxville. We had a great time and Moira Kaye really seemed to enjoy it.  My patient husband drove me there, helped me set up and break down and took some great pictures while I was taping.  He’s the best metal stamper in the family by far, but he prefers staying out of the spotlight!

The more I stamp and talk with folks about it, the more I fall in love with it. There is something so satisfying about smacking a hammer on a stamp and making a piece of jewelry in seconds.  It’s easy and fun.  Once you start, it really is addicting in the best possible way.  Check out our metal stamping on WBIR Channel 10 segment below. I share some quick tips and tricks for making a quick and easy initial pendant using ImpressArt metal stamps, SoftStrike blanks, StampStraight tape and the ImpressArt brass hammer.  Good times!

Cheers,
Margot and Avalon
Filed Under: Diy Tagged With: DIY metal stamped jewelry, how to make metal stamped jewelry, metal stamped jewelry, metal stamping 101, metal stamping basics, WBIR Channel 10 News

DIY Metal Stamped Washi Tape Pendant

August 22, 2025 by decey Leave a Comment

Spring Forward One

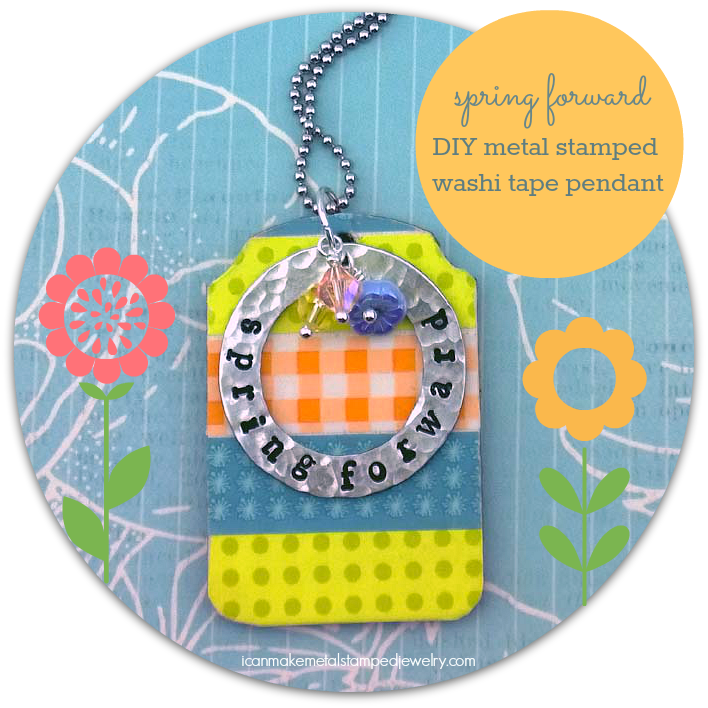
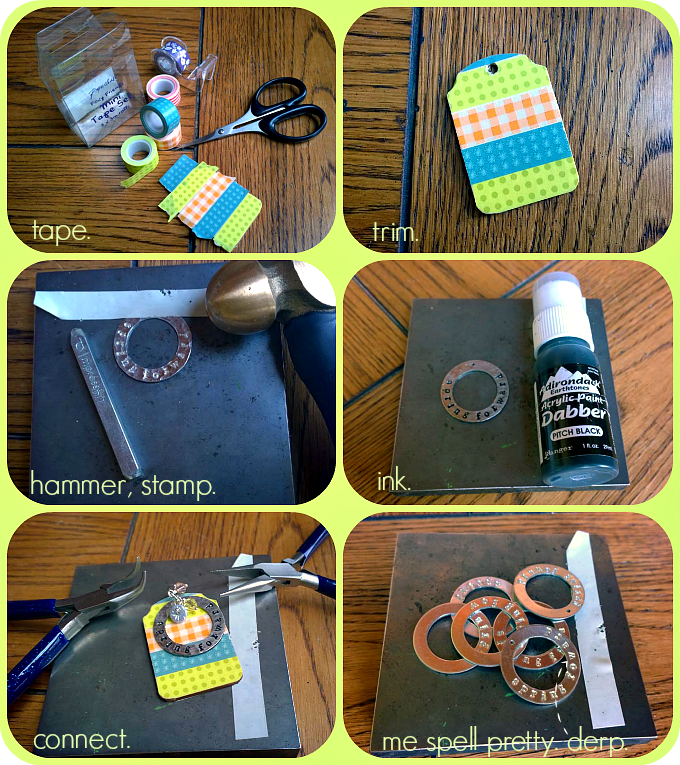
Capture that happy springtime feeling with a DIY metal stamped washi tape pendant. Or remind yourself to keep moving, even when you feel like standing still. Either way, you’ll look pretty doing it!  You can find these balsa wood tags in the scrapbook aisles at the craft stores. Add some matching beads and a custom stamped pendant to bring it all together. Learn how to stamp along a curved edge and…what not to do when stamping a word that uses the same letter multiple times. Derp. I got the miniature tape set with tiny tape dispenser at our local Target, but I’ve included a link to some other options below. I have to admit that I’m developing a mini-obsession with washi tape.

You will need:
Wood Tag
ImpressArt, Washer Stamping Blanks, Aluminum, 1 1/2″- 24 pc.
4mm Beads in pastel colors
10-MM Jump Ring Nickel Free Silver Plate
3 Ball Tipped Head Pins
Ball Chain Necklace 18 Inch With Clasp
ImpressArt Metal Stamping Kit- Newsprint Lowercase
ImpressArt Stamp Straight Tape
ImpressArt Chasing Hammer
Folk Art Enamel Acrylic Paint, Licorice
Paper towel or cloth

Spring Forward Pendant

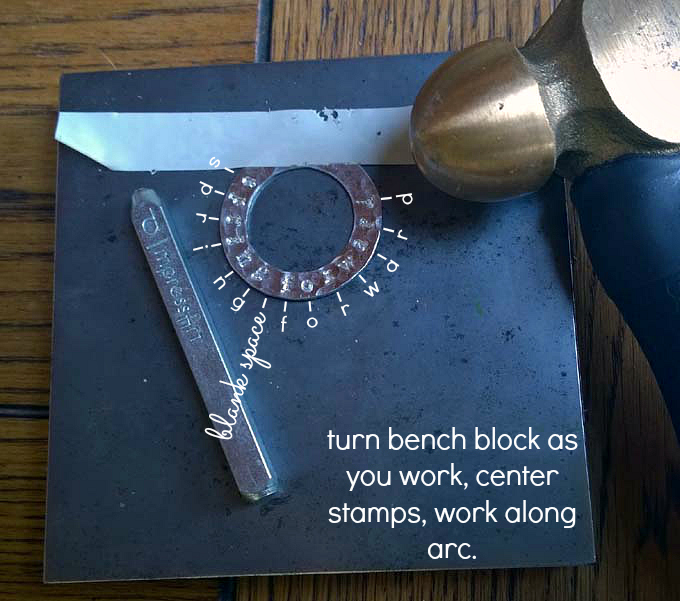
Step one: Stick washi tape in strips across front of tag. The top strip is super thin, but if you burnish it with your fingernail it will stay. I swear! If you want, you can seal this with some decoupage medium. Step two: Use small scissors or a craft knife to trim excess tape flush to edge of pendant. I put tape on both sides, you can do the same or opt to leave the back plain. Step three: Tape blank down to bench block with StampStraight tape, this helps secure it while you stamp. Use the round end of your ball pein hammer to add texture. Map out the placement of your letters. If you start in the center, it helps line them up evenly. There is a space between the words, make sure you leave it open. I have a diagram below, so check that out for help! The key is to turn the bench block as you work so the space you are stamping is directly facing you. Hold the stamp flush and in the center of the blank. Hit one time with the brass hammer. Move over to the next letter. Because this blank is circular the stamps are turned slightly each time, kind of like a clock! Start at 6 with the letter f and you’ll end at 2 and 10 with s and d. Step four: Swipe acrylic paint or permanent marker across letters, wipe off with a paper towel. Step five: Make some coiled dangles using matching beads. Connect the beads, stamped washer and washi tape pendant together with a jump ring. Attach it to a ball chain. Oh and…the letter “r” appears in this pendant three times, only I kept skipping it and stamping Spring Foward. Derp. Me spell pretty. Try to remember to use all of the letters in your words. Yes, I make mistakes too.

Hammer and Stamp Details

Here’s a guide to help you stamp on the washer. Hope it helps!

That’s it,  pretty, simple, flirty, fun and with a little practice stamping (and spelling,) easy!  Now you can make a DIY Metal Stamped Washi Tape pendant of your own!

We’d love to see your metal stamped creations.  We’re going to be doing regular stamping round-ups so if you have a DIY metal stamping project you want us to share, let us know!  You can email us or leave a link in the comments.

Cheers,
Margot and Avalon
*DIY Project Policy: Our tutorials are meant for your creative inspiration. Feel free to make and gift or wear these designs. Please make sure that you give credit to us as the designer if you make and share these designs on your blog or social sites. Please do not make and sell copies of our designs or sell them as kits. Please do not teach these designs as classes for profit. This is how we make our living and we ask that you respect our creativity and the time it takes to design, photograph and write these free tutorials. You may use a single photograph from each project online if you include a direct link back to our tutorial. Any use of these designs for retail sale for profit online in places like Etsy or eBay or in retail bricks and mortar, flea markets or outdoor fairs is not permitted. Thank you!

StudioPress Theme of the Month

Filed Under: Diy Tagged With: alkeme metal blanks, DIY metal stamped jewelry, get started metal stamping, how to make metal stamped jewelry, how to metal stamp along a curve, metal stamped jewelry, metal stamping basics, washi tape crafts, washi tape jewelry

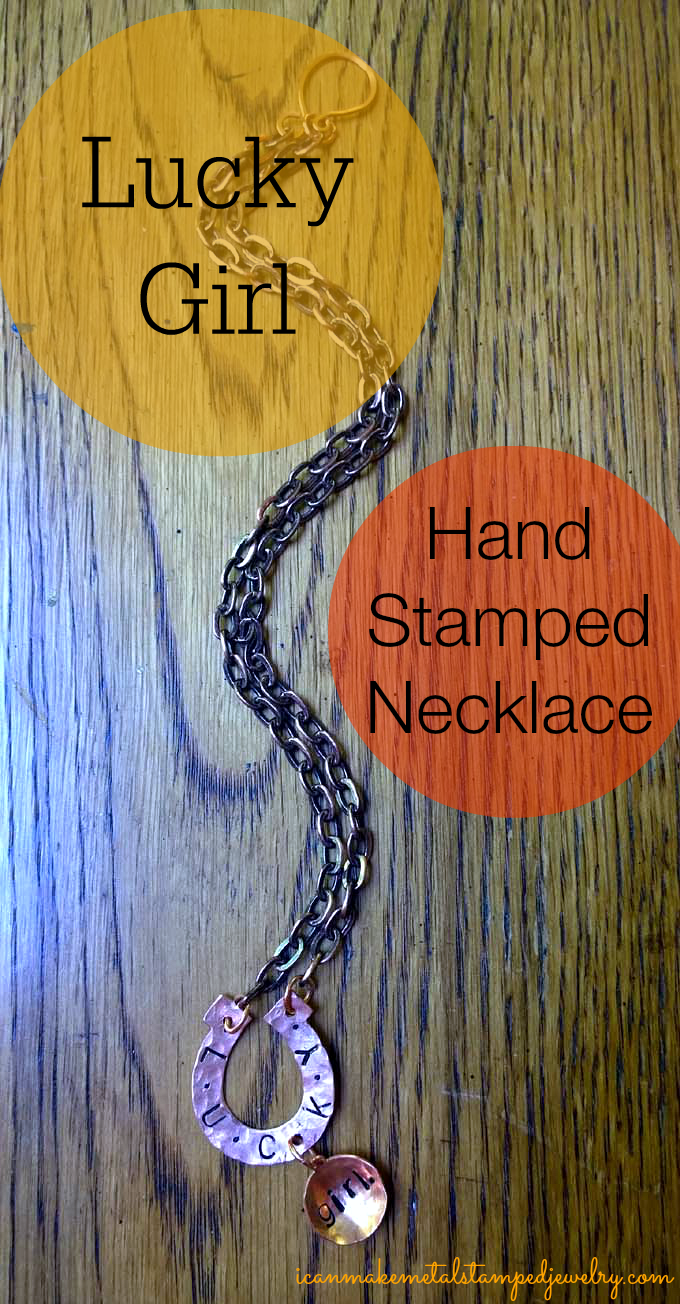
Lucky Girl Hand Stamped Necklace

July 27, 2025 by decey Leave a Comment

Lucky Girl Hand Stamped Necklace Three Text

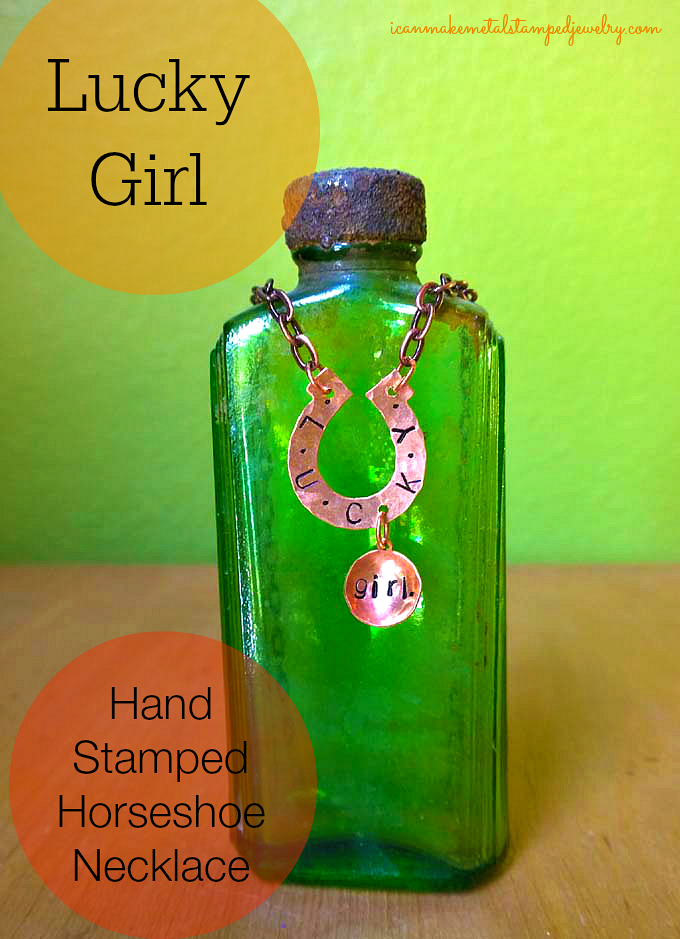
Here’s a fun Lucky Girl Hand Stamped Necklace that’s perfect for t-shirt season! We’re in the middle of some big changes here at Casa de Potter. I believe we make our own luck and so far, that’s been proving true as we navigate the challenges we’re facing. This is a little talisman to remind me of that whenever I start to feel stressed. I LOVE these horseshoe blanks from ImpressArt, don’t you? As soon as I saw them, I had the idea for this necklace Cute, yes? Easy too! This should take about 30-45 minutes to recreate, so it’s not as simple as our 10 minute crafts, but you can do this and we’ll show you how.

*You will need:

ImpressArt Horseshoe Stamping Blanks
ImpressArt 1/2″ Circle Stamping Blank
5 6mm Nickel Free Copper Plated Jump Ring
Copper Chain with Clasp
Folk Art Enamel Paint-Licorice
Awl
3mm Upper and Lower Case Stamps
ImpressArt Metal Stamping Hammer
ImpressArt Nylon Hammer
ImpressArt Chasing Hammer
ImpressArt Steel Stamping Block
ImpressArt 2-Hole Punch
Impress Art Stamp Straight Tape
Steel Dapping Block
Dapping Punches
Cotton swab
Paper towel

Amazon.com Widgets

Amazon.com Widgets

1-4

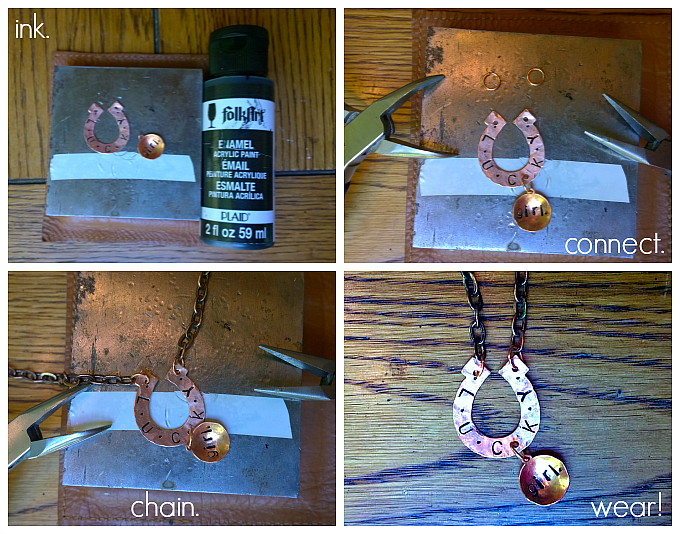
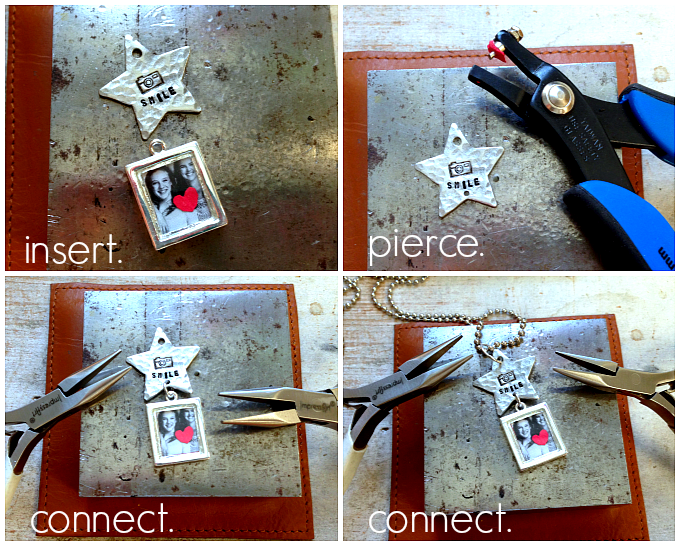
Step one: Hammer horseshoe blank with round end of chasing hammer. Step two: Stamp the word L U C K Y, leaving a space between each letter as shown (at the 2, 4, 6, 8 and 10 o’clock positions.) Start with the letter C in the center and move up each side. Step three: The blank may bend as your stamping, after you finish use the nylon hammer to flatten it back out. Step four: Use the awl or period stamp to add a dot in the center between each letter and at the top above the first and last letters as shown.

5-8

Step five: Hammer smaller blank with round end of chasing hammer. Step six: Stamp the word “girl” and add a period. Step seven: Use dapping block and tool to curve the smaller blank as shown. Step eight: Mark and punch holes at top center on both sides and on the bottom left side as shown.

9-12

Step nine: Use the cotton swab to swipe black enamel paint over stamped areas on both blanks. Wipe off excess with paper towels. Step ten: use jump rings to connect smaller blank to horseshoe. Step eleven: attach chains to top jump rings on horseshoe. Step twelve: Wear your new creation, lucky girl!

Lucky Girl Hand Stamped Necklace Final

That’s all there is to it! Enjoy your Lucky Girl Hand Stamped Necklace and when the compliments pour in, tell ’em you made it yourself.

Cheers,
Margot and Avalon

*FTC DISCLOSURE: This post contains affiliate links. If you click on a link and make a purchase, we get a small percentage of the sale.

*DIY Project Policy: Our tutorials are meant for your creative inspiration. Feel free to make and gift or wear these designs. Please make sure that you give credit to us as the designer if you make and share these designs on your blog or social sites. Please do not make and sell copies of our designs or sell them as kits. Please do not teach these designs as classes for profit. This is how we make our living and we ask that you respect our creativity and the time it takes to design, photograph and write these free tutorials. You may use a single photograph from each project online in blog round-ups or blog posts ONLY if you include a direct link back to our tutorial. Any use of these designs for retail sale for profit online in places like Etsy or eBay or in retail bricks and mortar, flea markets or outdoor fairs is not permitted. Thank you!

Filed Under: Diy Tagged With: DIY hand stamped jewelry, DIY jewelry, DIY metal stamped jewelry, easy metal stamping projects, hand stamped jewelry, how to make metal stamped jewelry, positive affirmations jewelry

  • « Go to Previous Page
  • Page 1
  • Page 2
  • Page 3
  • Page 4
  • Interim pages omitted …
  • Page 15
  • Go to Next Page »

Pages

  • About Us
  • Contact Us
  • Privacy Policy

Copyright © 2026 · Aspire Theme on Genesis Framework · WordPress · Log in