• Skip to main content
  • Skip to footer

I can make metal stamped jewelry

DIY Stamped Charm Bangle Bracelets

March 3, 2025 by decey Leave a Comment

Stamped Charm Bangle Bracelets Xtra Text

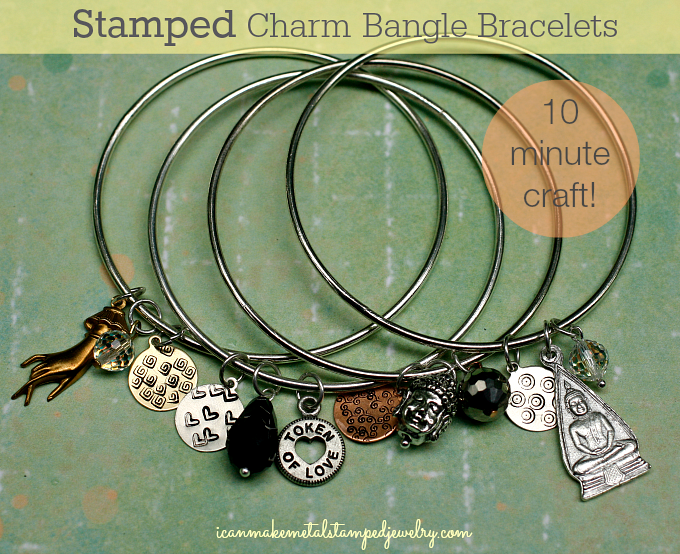
Are you smitten with the charm bracelet trend? Why not make your own DIY Stamped Charm Bangle Bracelets? In under ten minutes you can create a personalized, custom design with design stamps, beads and pre-made charms. It’s easy, really.  We’ll show you how!

You will need:

Silver Plated Bangle Bracelets
ImpressArt 1/2″ Circle Stamping Blanks in Silver Plated
, Brass and Copper
Various Charms (get the cast pewter Buddhas from my friend Stan at GreatCraftWorks here and here and the Victorian style hands on Etsy!)
Various 8mm Beads
6-MM Jump Rings
Beadalon Ball Head Pins
ImpressArt- Symbols and Shapes Stamp Pack
Ergo-Angle Metal Stamping Hammer
ImpressArt 2 by 2-Inch Steel Block
ImpressArt Stamp Straight Tape
2 pairs ImpressArt Chain Nose Pliers
Folk Art Enamel Acrylic Paint, Licorice
Cotton Swab
Paper Towel
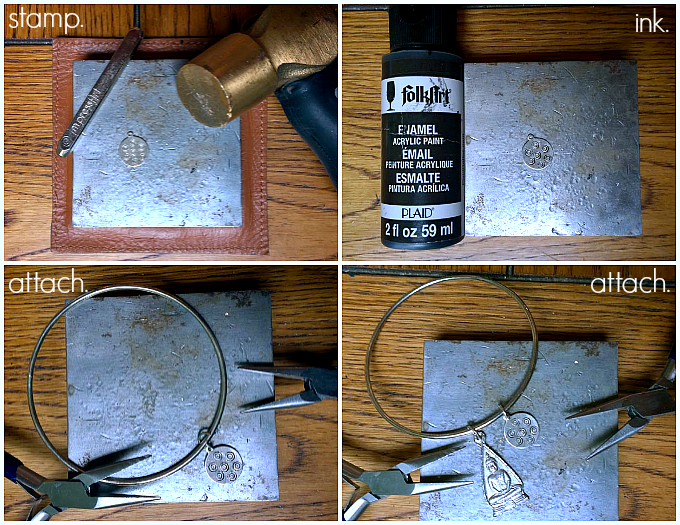
Stamped Charm Bangles

Step one: Use a design stamp to stamp a random pattern on the front of your blank. Hold the stamp firmly and strike it hard dead center with the hammer. Make sure the stamp is straight up and down to get a full impression. Step two: Use a cotton swab to add enamel paint to the stamped areas of the blank. Wipe off excess with a paper towel. Step three: Attach the stamped charm to the bangle with a jump ring, make sure you close the ring with tension so it’s secure. Step four: Add other charms, beaded dangles, whatever you like!
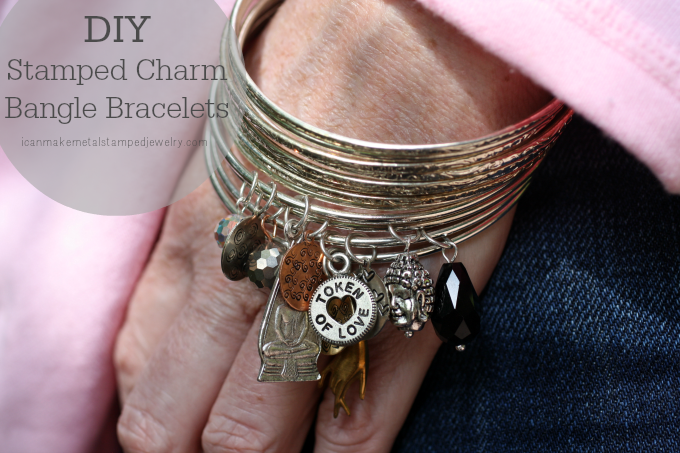
DIY Stamped Charm Bangle Bracelets Three

Stamped Charm Bangle Beauty LS Text

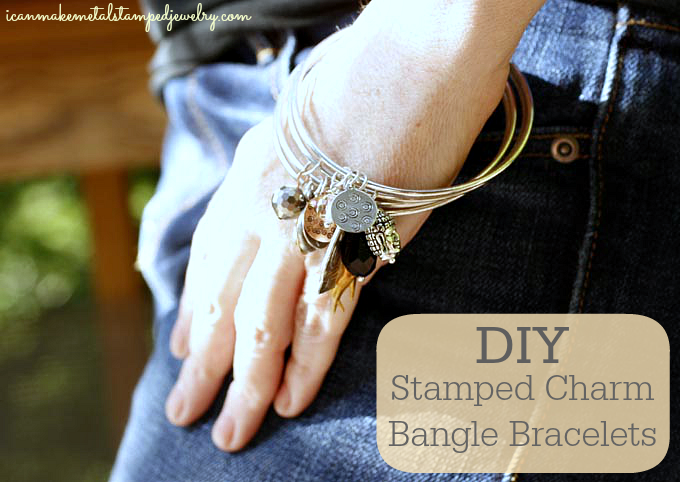
Don’t stop at just one! Make an armful, these look great stacked up by the bunch. We’d love to know what you’re going to put on your DIY Stamped Charm Bangle Bracelets. Let us know in the comments and if you make one, we’d love to see it! We’re knee deep in moving this month, so the posts may not be as frequent, but if you want to be sure you don’t miss any, sign up via email in the sidebar on the right or follow us on Bloglovin’!

Happy stamping,
Margot and Avalon

*DIY Project Policy: Our tutorials are meant for your creative inspiration. Feel free to make and gift or wear these designs. Please make sure that you give credit to us as the designer if you make and share these designs on your blog or social sites. Please do not make and sell copies of our designs or sell them as kits. Please do not teach these designs as classes for profit. This is how we make our living and we ask that you respect our creativity and the time it takes to design, photograph and write these free tutorials. You may use a single photograph from each project online in blog round-ups or blog posts ONLY if you include a direct link back to our tutorial. Any use of these designs for retail sale for profit online in places like Etsy or eBay or in retail bricks and mortar, flea markets or outdoor fairs is not permitted. Thank you!

(FTC DISCLOSURE: *This post contains affiliate links, if you click on a link and make a purchase we get a small percentage of the sale. The blogger is employed by ImpressArt, but this is her personal blog. All opinions are 100% her own!)
Filed Under: Diy Tagged With: 10 minute craft, DIY Bangle Bracelets, DIY hand stamped jewelry, DIY jewelry, DIY metal stamped jewelry, DIY stamped charms, hand stamped charms, metal stamped bracelets, metal stamped charms, metal stamped jewelry, quick and easy crafts, Stamped Charm Bangle Bracelets

Hand Stamped DIY Christmas Ornaments

February 22, 2025 by decey Leave a Comment

Let It Snow Ornament Small

We’ve been planning our holiday gifts at Casa de Potter. With a little trial and error, I came up with two festive hand stamped ornament ideas. Ornaments make present toppers and gifts. Get the tutorials to make your own DIY Christmas Ornaments below. Let’s hand make the season merry and bright!

Let it Snow Ornament

You will need:

ImpressArt, Circle, Nickel Silver, 7/8″ Circle
ImpressArt, Washer Stamping Blank, Nickel Silver, 1″ circle
ImpressArt, Nickel Silver Washer 1.25″ circle
4 Silver-plated Brass, 6mm Round Jump Rings
German Style Round Wire Silver Plated, 20 Gauge
ImpressArt Lollipop Uppercase Alphabet Metal Stamps Set
Asterisk Stamp
Lowercase Handwritten Alphabet Letters 3mm
Wood Handle Scratch Awl
Folk Art Enamel Acrylic Paint, Licorice
ImpressArt Stamping Hammer, 1-Pound, Brass Metal
ImpressArt Face Chasing Hammer, 1-Inch
ImpressArt 4 by 4-Inch Steel Block, Large
Stamping Block Pad
Eurotool EuroPunch 1.25mm Round Hole Punch Pliers for Sheet Metal
1.5″ dowel
Cotton Swab
Soft Cloth or Paper Towel

Amazon.com Widgets

Amazon.com Widgets

1-4 DIY Christmas Ornament

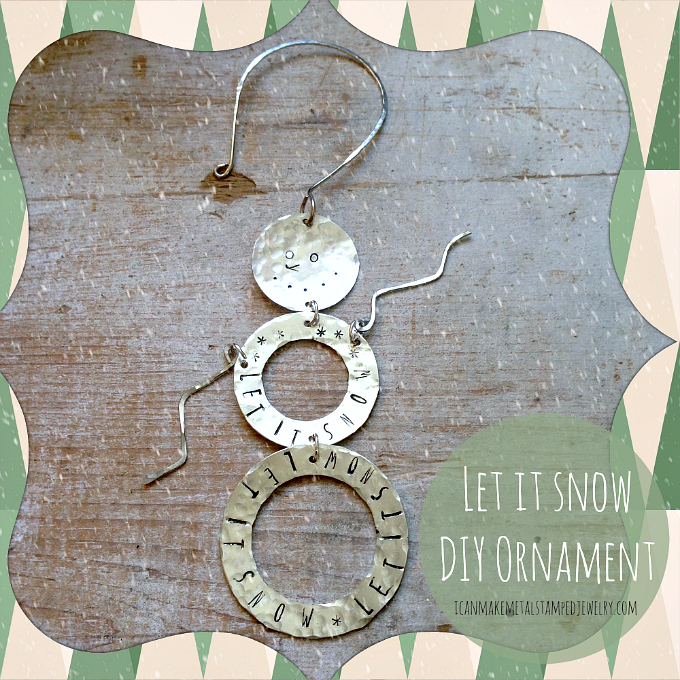
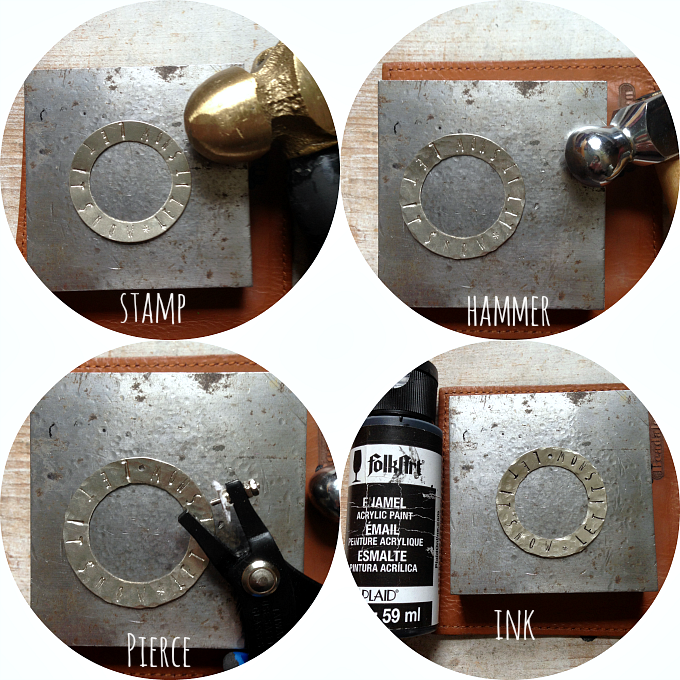
Stamp the words LET IT SNOW LET IT SNOW around the edges of the largest open circle shape in an arc. It’s easier to keep the letters straight if you turn the blank so it is facing you as you stamp each letter.  Add some snowflake style accents using the asterisk stamp.

Use round end of ball peen hammer to add texture to blank.

Pierce hole in top of blank.

Use paint to give the stamped areas definition. Dab on with a cotton swab and wipe off with a soft cloth.

Repeat this process to make the center blank stamping LET IT SNOW one time. The center blank needs a hole in the top and bottom center.

5-8 DIY Christmas Ornaments

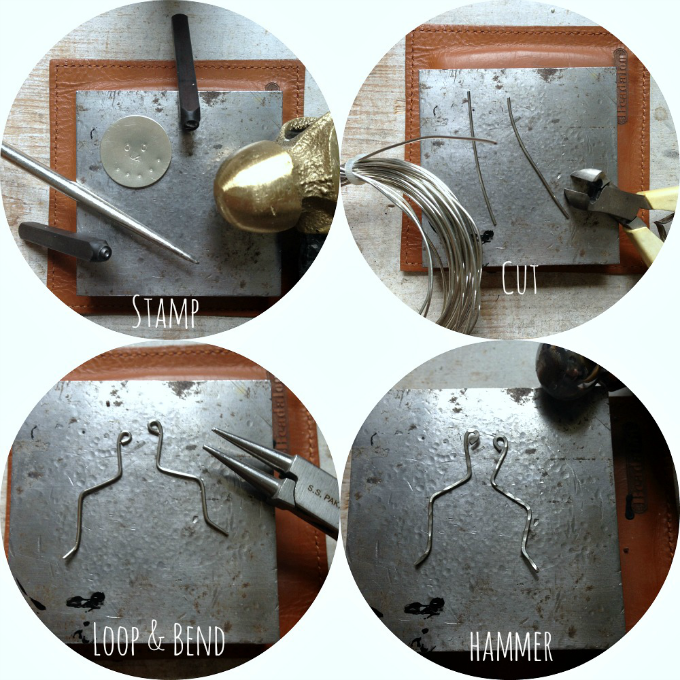
Stamp the snow man’s face. Start with two ‘o’s for eyes, a y for the nose use an awl to make the dots for the mouth.

Use wire to create arms. Cut 2 2″ wire sections.

Bend a loop in one end of each wire. Bend wire as shown.

Use chasing hammer to flatten and texture wire.

Steps 9-12 DIY Christmas Ornament

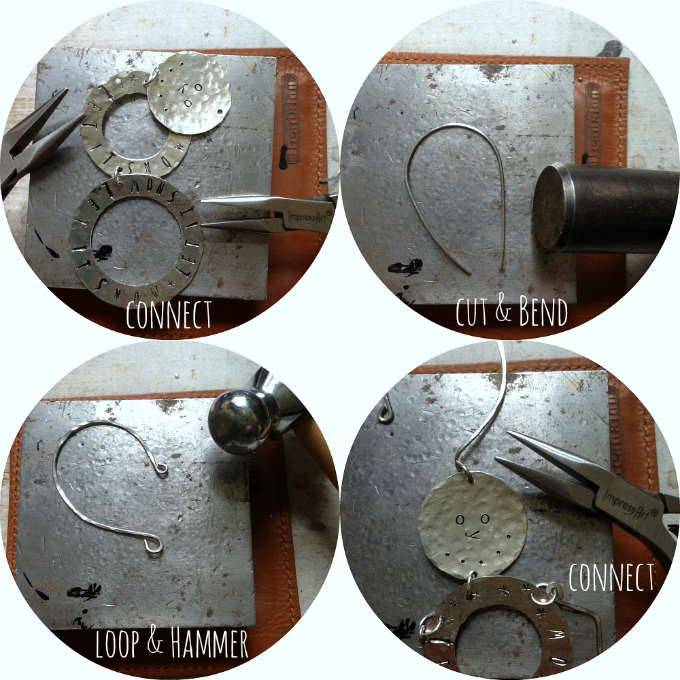
Use the hole punch tool to add a hole to the top and bottom center of the solid blank. Connect these all together with the jump rings.

You can use a pre-made hook or make your own. Just bend a 3-4″ section of wire around a larger dowel.

Use round nose plies to add a loop to both ends. Hammer this to work harden the wire and add texture.

Connect the hook to the top of the snowman, you should bend the loop so the hook hangs sideways and the ornament will face forward when hanging on the tree.

Twinkle DIY Christmas Ornament Small

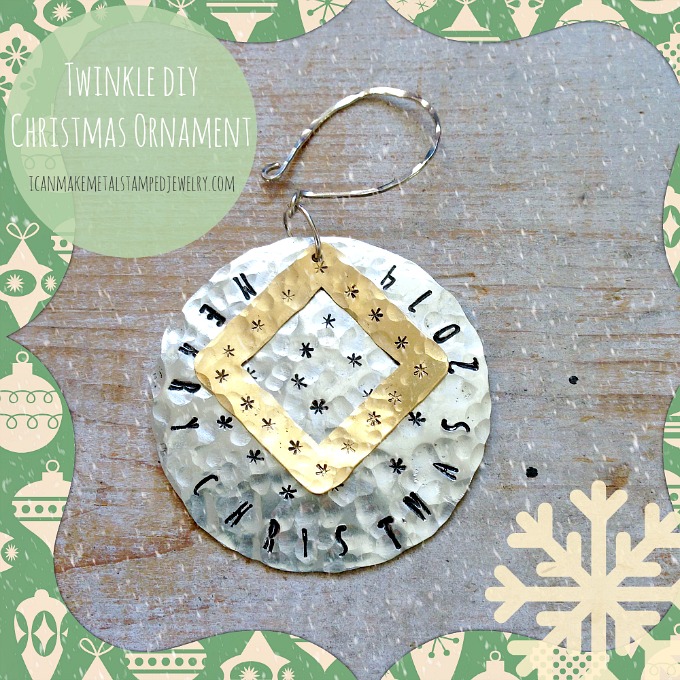
Twinkle Ornament

This one is a little simpler, just two shapes layered on top of each other.  Easy peasy, you got this!

You will need:

3″ Aluminum stamping blank
ImpressArt, Square Washer Stamping Blanks, Brass, 1 1/8″
Beadalon German Style Round Wire Nickel-Free Silver Plated, 20 Gauge
10-MM Jump Ring, Nickel Free Silver Plate
Asterisk Stamp
ImpressArt Lollipop Uppercase Alphabet Metal Stamps Set
Folk Art Enamel Acrylic Paint, Licorice
ImpressArt Stamping Hammer, 1-Pound, Brass Metal
ImpressArt Face Chasing Hammer, 1-Inch
ImpressArt 4 by 4-Inch Steel Block, Large
Eurotool EuroPunch 1.25mm Round Hole Punch Pliers for Sheet Metal
1.5″ dowel
Cotton Swab
Soft Cloth or Paper Towel

Amazon.com Widgets

Twinkle All Steps

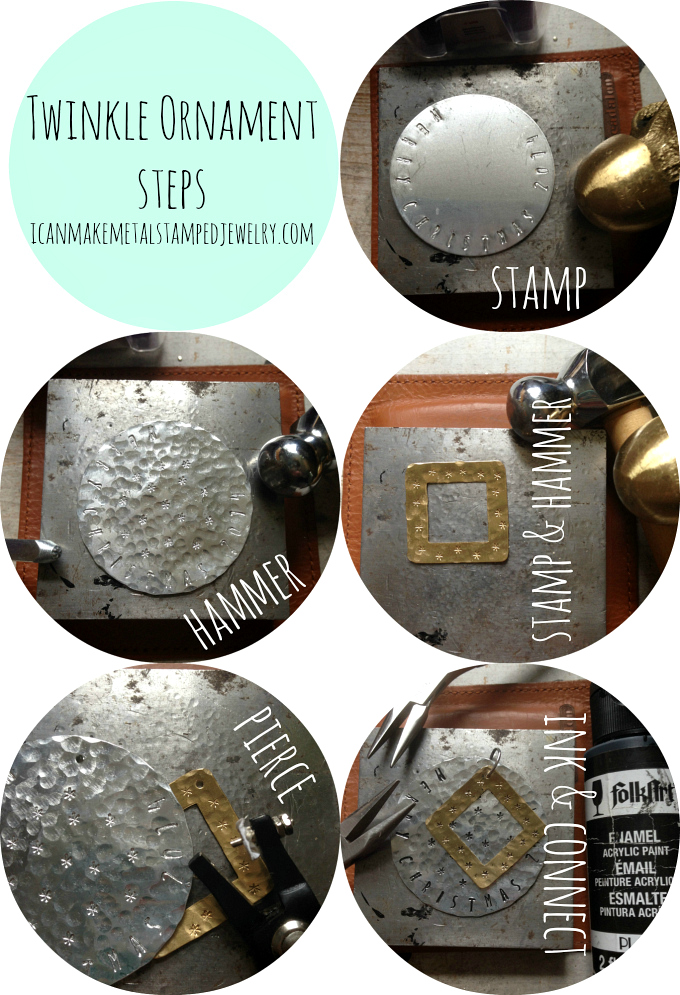
Stamp MERRY CHRISTMAS 2014 around the edge of the blank.

Use the asterisk stamp to add accents in the center of the blank, add texture with ball peen hammer.

Stamp the asterisk around the edge of the brass blank, varying placement. Texture with ball peen hammer.

Use the hole punch to pierce the top center of both blanks.

Add paint to give the stamped areas definition, dab on, wipe off. Connect them together with a large jump ring.

Use a pre-made hook or make your own as before.

That’s it! Heartfelt and handmade DIY Christmas Ornaments.

Cheers,
Margot and Avalon


Filed Under: Diy Tagged With: Christmas Crafts, DIY Christmas, Easy Ornaments, Hand Stamped Ornaments, Metal Stamped Christmas ornaments, Snowman Ornaments

Artist Spotlight: Barbe Saint John

February 13, 2025 by decey Leave a Comment

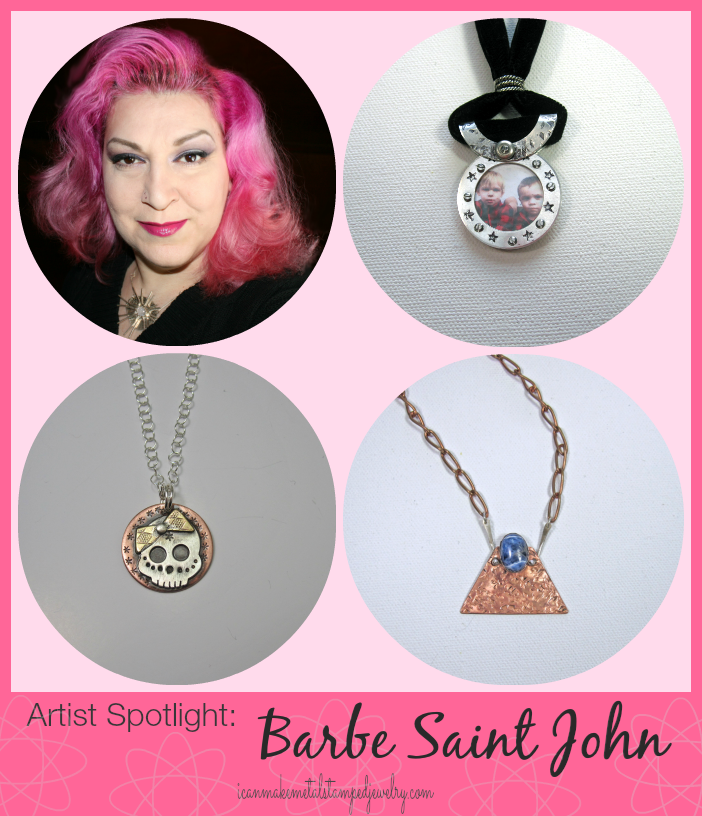
Artist Spotlight Barbe SaintJohn

Meet metal smith and jewelry artist Barbe Saint John! Barbe has recently launched a new line of mid-century modern inspired jewelry that is exceptional in design and artistry. Her former line, Saints and Sinners was on the cutting edge of the mixed media/assemblage jewelry trend. We’ve been fans of her work for years and we were tickled pink when she agreed to answer our Five Easy Questions! Here are here insightful replies!

When did you start making jewelry and why?

I got started being creative at an early age-I was making very simple Barbie dresses with my Mom when I was 4, and my Grandmother taught me to crochet when I was 5. My Grandmother was very into fashion and jewelry. It was her love of adornment that got me interested. She would give me her broken bead necklaces to string my own, and brought me a bead loom back from Arizona when I was about 8 yrs old. I’ve been making jewelry ever since.

What is your favorite source for jewelry making inspiration?

I have a great deal of diverse interests and hobbies so those are often my main inspirations. I currently have two lines of work. With my mixed media jewelry and art; my core inspirations are vintage fashions, science, archeology, Egyptology, and all things paranormal, weird or a bit mad. On the other hand, my modern jewelry line is inspired by mid-century art, artists and pop culture.

What advice do you have for folks just starting out?

First and foremost-buy the best tools you can afford. You don’t have to immediately invest in jeweler quality tools, but having good quality/mid-price range tools will save you frustration. Also, they will last you for years and you can slowly upgrade them to better tools over time. Also, practice and play with your materials often! Students and beginners get upset they didn’t make a “perfect” piece on their first try. It’s by practicing and playing, that you learn the skills and dexterity needed for jewelry making and you also will start to hone your own style/voice that way too.

What tips or tricks can you share for successful metal stamping?

The Stamp Straight Tape""” target=”_blank” rel=”nofollow”>Stamp Straight Tape has been a godsend for me!! I use to use multiple layers of duct tape, but that’s time consuming and leaves gummy residue on your block. Stamp Straight tape is thick enough you can “feel” it when you position your stamp and you don’t have to layer it. It’s sticky enough to hold but doesn’t leave a gummy residue on your block or blank. Also-practice makes perfect! Save your blanks and get a small sheet of 22g copper from a hobby or craft store. Lay down a few strips of Stamp Straight Tape and start hammering. You’ll quickly learn how to feel for the tape with your stamp, what the best distance between letters is, etc.

Where can our readers find you?

You can find me online at my website, blog, Etsy, Facebook, Twitter, Pinterest and Modern Metal’s Pinterest.

Take a moment to visit Barbe Saint John and show her a little love. I guarantee you are going to be impressed with her work!  Tune in Monday for a new DIY metal stamping tutorial!

Happy Stamping,
Margot and Avalon

(*This post contains an affiliate link, if you click on the link and make a purchase we get a small percentage of the sale.)

Filed Under: Diy Tagged With: artist spotlight, barbe saint john, DIY hand stamped jewelry, DIY jewelry, DIY metal stamped jewelry, metal stamping artist, metal stamping tips

Boo-tiful DIY Bracelets

December 7, 2024 by decey Leave a Comment

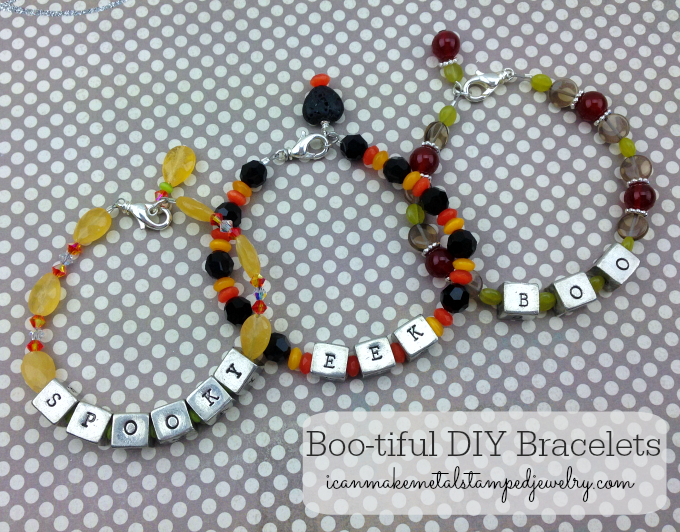
Bootiful DIY Bracelets

I guess it’s obvious that I really love Hallowe’en. When I saw these new SoftStrike pewter cubes from ImpressArt, I knew exactly what I wanted to do with them. You can stamp on all four sides! How cool is that?! Write words, dates, pictograms…they open up a whole new dimension in metal stamping…literally! I dug through my bead stash to find fall friendly color combos for these Boo-tiful DIY Bracelets. You can use any beads you like here and of course, any words. I plan to wear this trio together. Scare up a wrist full for you or your family and friends!

Bootiful Two Text

What you need:

Beads
Folk Art Enamel Acrylic Paint, Licorice
ImpressArt SoftStrike Small Cubes
14mm Lobster Clasp
2 6mm Jump Rings, Silver Plate
2 Crimp Tubes
Beadalon 19-Strand .015-Inch Wire
Impressart 1/2 Lb Brass Hammer
ImpressArt Steel Stamping Block
ImpressArt Premium Newsprint Uppercase Letter Stamps
Beadalon Bead Crimp Tool, Standard
Beadalon Flush Cutter
Beadalon Chain Nose Pliers
Bead Board
Cotton Swab
Paper Towel

Amazon.com Widgets

Amazon.com Widgets

Boo-tiful Bracelets Steps

Step one: Stamp letters on your cubes. You don’t have to hit these very hard, too much pressure and you may mar your metal. Stamp letter on all four sides. Use enamel paint to ink letters, swipe on with a cotton swab and wipe off with a paper towel. This is a little messy, so work where you don’t have to worry about making a mess!  Step two: Measure your wrist. Use a bead board to lay out your beads, leave enough room for the clasp and jump ring in your plan so your bracelet isn’t too big. You don’t want to loose it! Cut wire with about 2″ extra. Thread it into the crimp tube, the clasp and back into the crimp tube. The loop should be about 1/4″, too small and it will create friction when you wear the bracelet and this will begin to cut the wire. Step three: Make sure the wires are uncrossed. Compress the tube with the front oval section of the pliers. This makes the round tube into an oval, so it is easier to crimp. Move tube back to the heart shaped section of the pliers. Compress the tube, separating the wires into separate openings. It should look like a heart! Face the smooth side of the crimped tube towards the jaw of your crimp pliers and in the front oval opening. Press the ends together tightly. Check to be sure it is secured. Cut off the wire tail. The key to beading is making sure your wire fills the holes in the beads, this is why I don’t recommend threading the tail into the beads, if you can do that then your wire is too thin. Adjust the wire thickness you use to fill your beads! Now you can bead! Step four: String your beads on the wire. When you reach the final bead, slide a crimp tube on around a jump ring like you did at the start. Before you crimp, attach the clasp to the jump ring. This will keep your bracelet rounded to allow for play between the beads. This keeps it from being to stiff and breaking later. Use chain nose pliers to pull the wire through the crimp tube. Crimp using the same steps from before. Cut excess wire.  Make more!

Bootiful One

How about a little candy corn inspiration?

Bootiful Four

Or maybe Indian corn? Yup, I’m feeling corny, folks. I made a little boo boo here…do you see it? Oh well, pobody’s nerfect.

Bootiful Three

That’s it! If you make some Boo-tiful DIY Bracelets, we’d love to see them! Happy Hallowe’en!

Cheers,
Madge

*DIY Project Policy: Our tutorials are meant for your creative inspiration. Feel free to make and gift or wear these designs. Please make sure that you give credit to us as the designer if you make and share these designs on your blog or social sites. Please do not make and sell copies of our designs or sell them as kits. Please do not teach these designs as classes for profit. This is how we make our living and we ask that you respect our creativity and the time it takes to design, photograph and write these free tutorials. You may use a single photograph from each project online in blog round-ups or blog posts ONLY if you include a direct link back to our tutorial. Any use of these designs for retail sale for profit online in places like Etsy or eBay or in retail bricks and mortar, flea markets or outdoor fairs is not permitted. Thank you!

Filed Under: Diy Tagged With: DIY bracelets, DIY Halloween, DIY jewelry, DIY Metal stamping, easy DIY jewelry, Easy Halloween Jewelry, Halloween Crafts, Halloween Jewelry, metal stamped jewelry

DIY Tassel and Stamped Charm Bracelets

September 8, 2024 by decey Leave a Comment

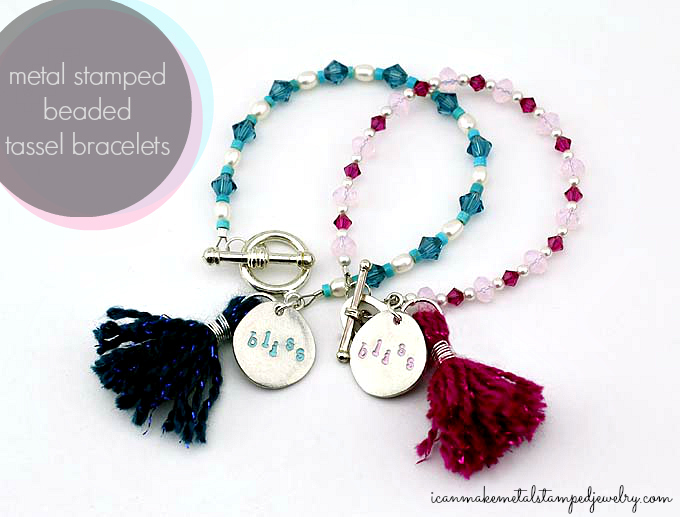
Bliss Metal Stamped Tassel Bracelets Two Text

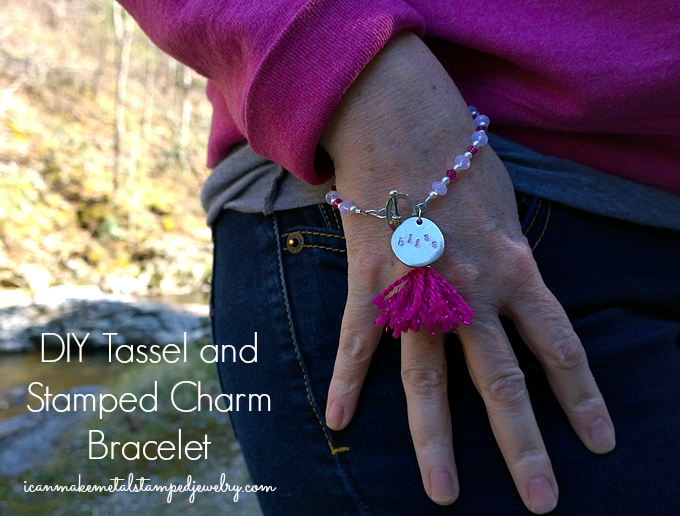
Just in time for warmer weather, pretty beaded bracelets get a kicky update with stamped charms and handmade tassels. Make your own DIY Tassel and Stamped Charm Bracelets in an array of colors and you’ll be in style bliss. We’re loving the Boho appeal here, try changing up the beads, colors and message to suit your own style. Speaking of which, how would you style these? We’d love to know!  Big love to the amazingly talented Ms. Pattie Wilkinson for sending us her fabulous *PattieWack tassel tools!  They make quick and easy work of making gorgeous tassels. 

You will need:

ImpressArt, Pewter Stamping Blanks, River Stone, 3/4″
3-4mm Swarovski Crystal Beads
4mm gemstone beads
3-4mm Freshwater Pearls
Beadalon 19-Strand Bead Stringing Wire, 0.018
Beadalon Toggle Clasps Small Silver Plated
2 Tube Crimp, Silver -2x2mm
3 Beadalon Jump Rings 6mm Silver Plated
Beadalon 10mm Jump Ring Silver Plated
German Style Wire, Round, Silver Plated, 24 gauge
Lion Brand Yarn Bonbons Yarn, Brights
Folk Art Enamel 2-Ounce Acrylic Paint
ImpressArt Newsprint Lowercase Alphabet Metal Stamps
ImpressArt 2 by 2-Inch Steel Block
ImpressArt Stamp Straight Tape
Ergo-Angle Metal Stamping Hammer
Pattiewack Designs Mini Tassel Maker
ImpressArt Chain Nose Pliers
ImpressArt Bent Nose Pliers
ImpressArt Flush Cutters
Beadalon Beading Scissors

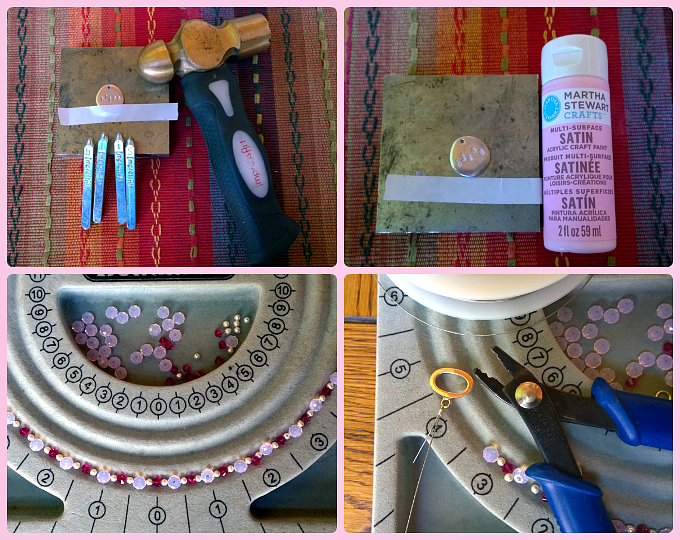
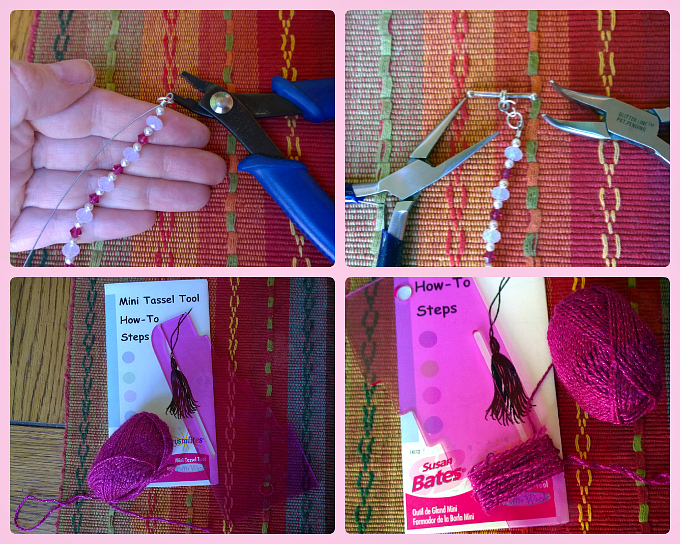
Tassell Bracelet 1-4

One: Tape blank to bench block. Stamp ‘bliss’, alternating placement of letters. Design tip: Start with the ‘i’ in the center and work to both sides. Two: Wipe multi-surface paint on blank. Wipe paint from surface. Three: Place beads on board in a pattern, build beads up to numbers on side to fit your wrist. Add the two numbers together to get the finished length in inches. Our bracelet is 7″ including the clasp. Four: Thread wire into crimp bead. Thread wire back through clasp end and back into crimp tube. Hold wires uncrossed to crimp. Check out this video to learn how to crimp correctly!

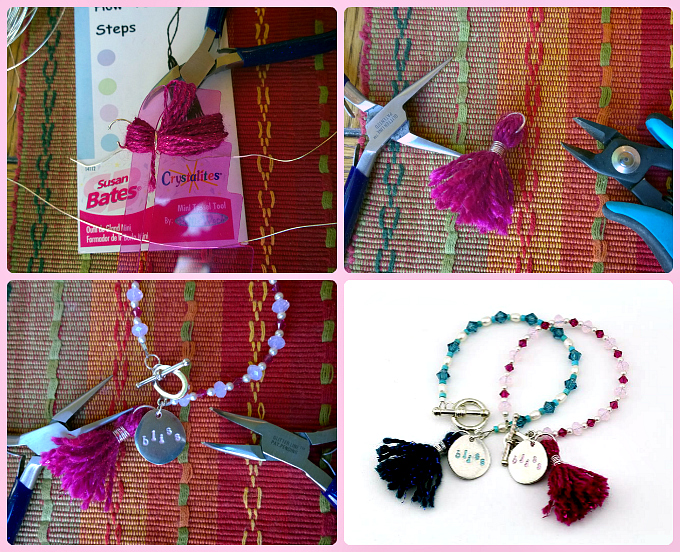
Tassell Bracelet 5-8

Five: Finish bracelet with crimp bead attached to jump ring. Design tip: Make sure bracelet is rounded to allow a little space between your beads, this keeps the bracelet from being too stiff when worn. Six: Attach finished bracelet to bar side of toggle clasp with a second jump ring. This makes it easy for the bar to fit into the circle element of the clasp. Seven: Get your yarn and mini-tassell tool ready! Eight: Wrap the yarn around the second notch on the tassel tool as in photo.

Tassell Bracelet 9-12

Nine: Follow instructions for tassel tool.  Instead of using yarn to tie off the top and bottom, we’re using a large jump ring and wire. Thread jump ring into top of tassel. Wrap wire tightly several times around center of tassel.  Cut bottom of tassel with scissors into fringe. Side tassel from tool. Use scissors to even tassel ends. Ten: Finish wrapping tassel tightly with wire, cut off excess. Tuck ends into tassel with chain nose pliers. Eleven: Attach tassel and tool to circle side of toggle using a smaller jump ring as in picture. Twelve: Make more!

DIY Tassel and Stamped Charm Bracelet LS Text

That’s it, fun, fast and fabulous DIY Tassel and Stamped Charm Bracelets, make an arm full!

Cheers,
Margot and Avalon

FTC DISCLOSURE: Bloggers were provided with samples for use in this project.  All opinions are 100% their own!

*DIY Project Policy: Our tutorials are meant for your creative inspiration. Feel free to make and gift or wear these designs. Please make sure that you give credit to us as the designer if you make and share these designs on your blog or social sites. Please do not make and sell copies of our designs or sell them as kits. Please do not teach these designs as classes for profit. This is how we make our living and we ask that you respect our creativity and the time it takes to design, photograph and write these free tutorials. You may use a single photograph from each project online in blog round-ups or blog posts if you include a direct link back to our tutorial. Any use of these designs for retail sale for profit online in places like Etsy or eBay or in retail bricks and mortar, flea markets or outdoor fairs is not permitted. Thank you!

Filed Under: Diy Tagged With: DIY hand stamped jewelry, DIY jewelry, DIY metal stamped jewelry, how to make metal stamped jewelry, how to make tassels, metal stamped jewelry, metal stamping basics, PattieWack tassel tool

  • « Go to Previous Page
  • Page 1
  • Interim pages omitted …
  • Page 3
  • Page 4
  • Page 5
  • Page 6
  • Page 7
  • Interim pages omitted …
  • Page 15
  • Go to Next Page »

Pages

  • About Us
  • Contact Us
  • Privacy Policy

Copyright © 2026 · Aspire Theme on Genesis Framework · WordPress · Log in