• Skip to main content

I can make metal stamped jewelry

What You Need to Get Started Metal Stamping

May 12, 2021 by decey Leave a Comment

What You Need to Get Started Metal Stamping

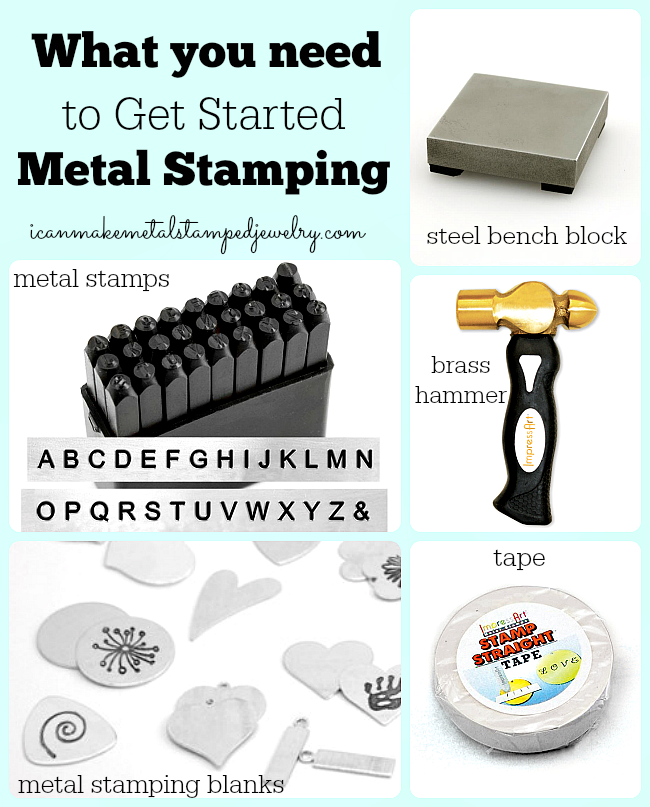
If you are thinking about what it takes to get started metal stamping, there are a handful of essential tools. Here’s a list of our ‘must haves’ for success. You don’t have to buy all of these items, but we think having good tools is the best way to ensure good results. Nothing can turn you off faster than the frustration that comes from using bad tools and making big messes. We’ve talked about the technique basics before, but this is an in depth look at the tools and materials.

Metal Letter Stamps

Yes, it seems rather obvious that you’ll need metal stamps to get started metal stamping, but there are so many different metal stamps on the market that knowing which ones to buy can be confusing. If you’re just starting out and you aren’t ready to make a big investment, a good set of quality economy stamps with an easy to read font in 3mm size is a great place to start. I like to have lower case, upper case and numbers at hand. If you think metal stamping is something you’re going to really love, I’d suggest plated stamps that are also rated higher on the Rockwell Scale. This scale measures the indentation hardness of a metal, meaning this will tell you how deep the impressions will be from your metal stamp. This all depends on the surface you’re stamping and the force with which you stamp.  It’s important that you know if you’re stamping into a softer metal like aluminum (a great place to start) or something very hard like stainless steel (this material can wear down your metal stamps over time, so you need stamps designed to handle it.) We published a metal stamping blank hardness chart last week. In the carousel below you’ll find links to a variety of stamps from economy to branded to premium. The prices are significantly different, so if your budget is tight, start with economy stamps and see where they take you. If you really get into stamping, you can also explore Design Stamps, something we’ll talk about in a future post.

Steel Bench Block

We highly suggest that you purchase a steel bench block for metal stamping. Yes, you can stamp on concrete or wood, but you’re not going to get the same quality results. Concrete will scratch and mar the back of your blanks and wood is too soft. You need something hard, smooth, sturdy and flat, a steel block fits the bill! They come in an array of sizes, but a small 2″x2″ block will work fine when you’re starting out. I highly recommend getting a pad to put under your bench block, not a towel. A rubber mat or leather bench pad will work best. You want to be sure the surface stays flat so you get even impressions. The pad will also help keep the noise down, as you can imagine, metal stamping is very, very loud. Our doggies do not like it at all.

Brass Hammer

Yes, you can use a steel hammer, but the problem with steel is that the energy of your hits will transfer back into the hammer. This can cause the hammer to bounce back when you strike and create skipped or ghost impressions. Brass is softer than steel, it will take the impact of the hit and transfer the energy into the blank, helping you make deeper impressions. We love the ImpressArt Brass 1 Pound Hammer, not just because we work with ImpressArt, but because it’s a brilliant design. The short, stubby, grip friendly handle makes it easy to swing and keeps the momentum where it belongs, in the hammer head.

Metal Stamping Blanks

When you’re first starting out, metal stamping blanks are the best place to hone your technique. Eventually if you really get into stamping, you will probably start looking for other things to stamp like pennies, silverware, tin cans…or whatever else you think will make for great metal stamped jewelry or decor. Metal stamping blanks come in a wide array of sizes, shapes and metals. For the novice, we think aluminum is your best starting point. It’s very easy to stamp and very inexpensive. As your stamping improves you can move up to pewter, copper, brass and nickel silver. If you want to take things to another level you can try sterling silver or alkeme (a less expensive sterling alternative.) You can buy sheets of metal for practice if you want to just get a feel for the swing of the hammer and the force you need to make impact. We suggest starting with basic shapes like circles, ovals, sticks and squares and then working your way to washers and other shapes.

Tape

One of the biggest challenges in metal stamping is planning and aligning your words and letters. We have found that using masking or white plastic tape is a huge help in getting things lined up properly and securing your blanks to prevent them from slipping when you hit them. You can use a marker and a ruler to plan placement of your letters. You can also use the top of the tape to keep the letters in your words all at the same level. Try Stamp Straight Tape from ImpressArt, we love it!

There are lots of other fun tools and materials you can add to your arsenal if you get deeper into metal stamping, but this is the best place to get started metal stamping. We’ve included image and text links to products you can buy. Just an FYI, we use affiliate marketing on our site so if you click on a link and make a purchase you get a small percentage of the sale. This is how we can afford to give away our tutorials and articles for free. Within the next few months, we’ll have products and kits you can buy from us directly, stay tuned. We’re excited and we hope you are too!

Happy Stamping,
Margot and Avalon
Filed Under: Uncategorized Tagged With: DIY metal stamped jewelry, get started metal stamping, getting started metal stamping, metal stamping 101, metal stamping basics, metal stamping essentials, metal stamping products, metal stamping tools, what you need to get started metal stamping

Artist Spotlight: Lisa Pace

March 23, 2021 by decey Leave a Comment

Lisa Pace Artist Spotlight

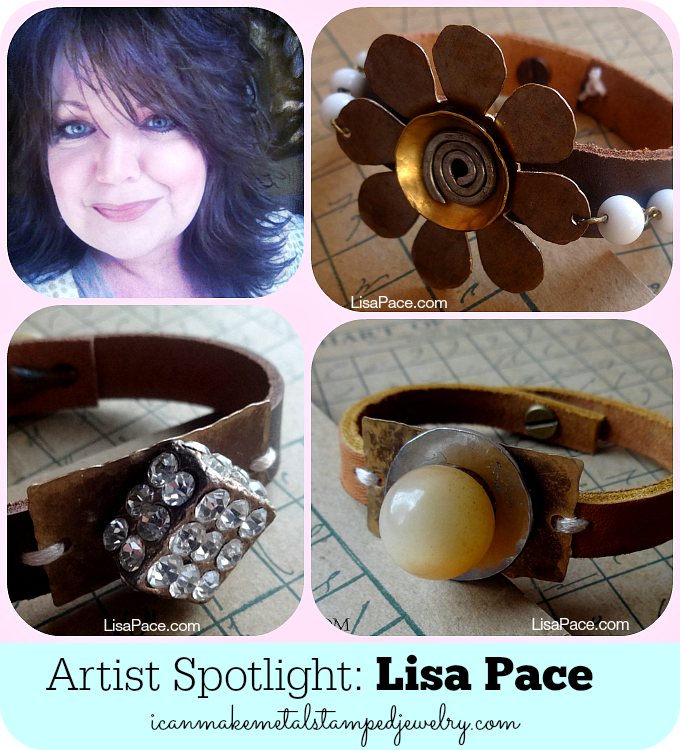
We’re thrilled to shine a big, bright spotlight on the multi-talented mixed media artist Lisa Pace. A best selling author, Lisa has a popular website where she shares tutorials and design inspiration. She has her own line of gorgeous rubber stamps and an array of wonderful vintage inspired kits, supplies and e-classes. You can find her stunning metal stamped designs in her Etsy Shop.  We asked Lisa our Five Easy Questions and here are her answers.

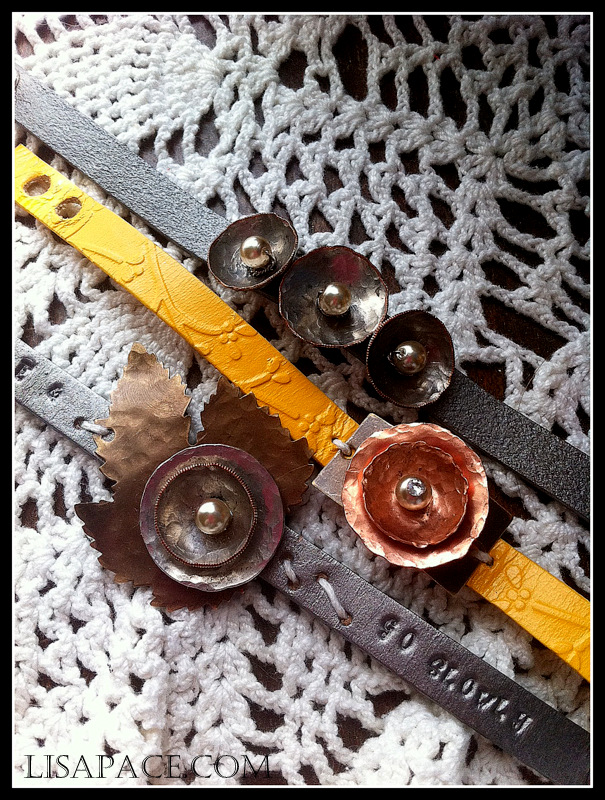
1. When did you start making jewelry and why? I have been metal stamping off and on for several years but just recently started making jewelry. I have a true love for unique items especially bracelets. So I decided to give jewelry making a try. I really enjoy making cuffs and charm bracelets that incorporate my love of vintage treasures with a little modern twist. My latest book Delight In The Art of Collage has several metal stamped items that accent projects as well as a simple step by step tutorial on basic metal stamping.

photo 1 (2)-001

2. What is your favorite source for jewelry making inspiration? I find inspiration for jewelry making from all over. I find unique color combinations and designs from of all things, junk mail and of course magazines but I find that Mother Nature is one of my favorite sources. Nature is filled with all kinds of amazing colors, designs and textures.

3. What advice do you have for folks just starting out? The best thing you can do for yourself when starting to create jewelry is to spend that little extra money on quality tools. In the long run these tools will save you money and hours of frustration. My favorite stamping go to keep handy tools are a Brass Stamping Hammer, Large Jeweler’s Solid Steel Bench Block , ImpressArt 2-Hole Punch and of course Stamp Straight Tape. With these tools you are set to create beautiful metal stamped jewelry.

Amazon.com Widgets

4. What tips or tricks can you share for successful metal stamping? My best tip for metal stamping is to use Stamp Straight Tape. This tape is a life saver and a blanks saver. Promise! Not only does Stamp Straight Tape help you accurately stamp onto metal but it doesn’t leave a sticky mess on your steel block.

5. Where can our readers find you? Readers can find me online via my website/blog, Etsy and Social Media.

Facebook
Instagram
Twitter
Pinterest
LinkedIn

Please visit Lisa Pace, like and follow her pages and show her a little love! Stay tuned for more featured artists. Thanks for taking time to visit our little corner of the Blogiverse.

Happy stamping,
Margot and Avalon

Filed Under: Uncategorized Tagged With: artist spotlight, DIY jewelry, hand stamped jewelry, lisa pace, metal stamping basics, metal stamping tips

DIY Hammered Metal Stamped Necklace

February 22, 2021 by decey Leave a Comment

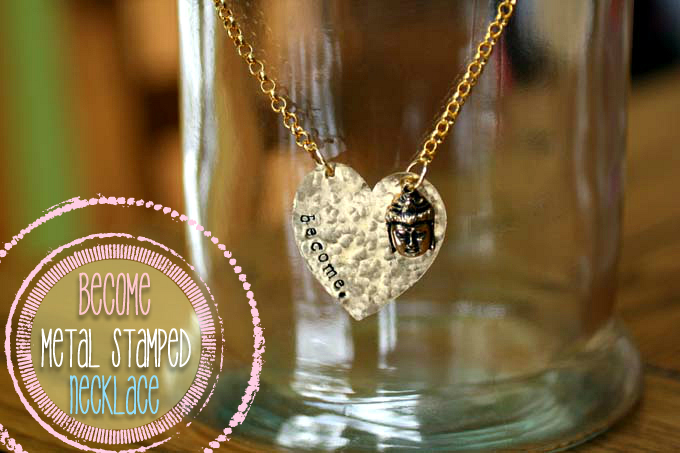
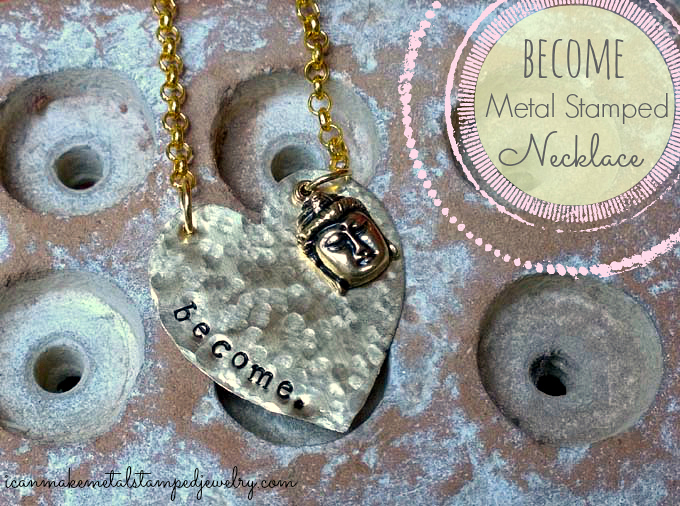
Become Hammered Metal Stamped Necklace

(*FTC DISCLOSURE BELOW)

“What we think, we become.” Buddha

Base metal stamping blanks can look a little, well, cheap.  Adding texture helps take them from meh to marvelous, and it’s very easy to do.  The concept for this hammered metal stamped necklace started with some gold Buddha charms we found on clearance at a big craft chain. We love positive, uplifting jewelry.  Plus, it’s pretty!  You’ll learn how to add texture, stamp along the edge and add holes at the top of the heart to turn this into a necklace.

What you need:
ImpressArt, Heart, Brass, 1 1/2″ Stamping Blank
Antique Brass Buddha Head Charms
2 8″ segments 22K Gold Plated Slim Rolo Chain
10mm Gold Plated Clasp
4 10mm 6mm Jump Rings
Folk Art Enamel Acrylic Paint, Licorice
Cloth or paper towel
Wood Handle Scratch Awl
Beadalon Ball Pein Hammer
ImpressArt Metal Stamping Kit- Newsprint Lowercase
ImpressArt Stamp Straight Tape
ImpressArt Hole Punch Pliers
Marker

Steps 1-2

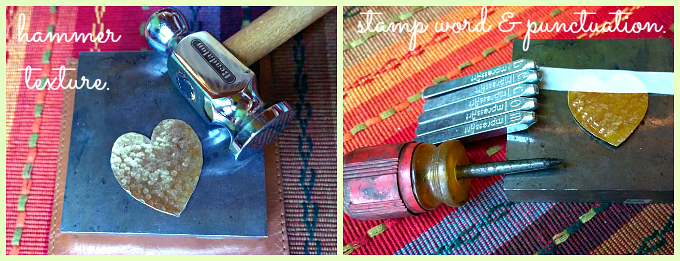
Step one: Place your blank on the bench block and use the round or ball end of a ball pein hammer to add texture.  Strike it all over, including along the sides to create a hammered finish.  Don’t hit it too hard, or too soft, somewhere in between.  The blank may start to curl a little as you hammer, but don’t worry.  When you finish you can turn it over and use the flat side of the ball peen hammer or the brass hammer to flatten it.  Step two: Tape the hammered blank down to the bench block.  Stamp along the curve of the left edge.  Space your stamps out evenly as you go.  I didn’t mark these, but you can use a ruler and a pencil to help mark even placement.  Finish by adding a period using an awl or a period punctuation stamp.  Strike the top of the awl with your brass hammer, don’t overdo this or you could pierce the blank.

Steps 3-4

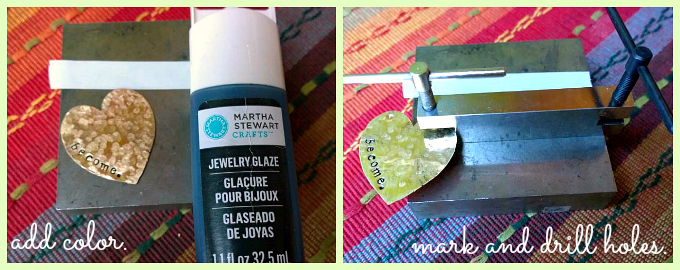
Step three: Wipe some Martha Stewart jewelry glaze across the letters.  Let it sit for a few seconds, then wipe it off with a paper towel or cloth.  Step four: The drill holes should be placed at the top center of both sides of the heart.  You can use a marker and a ruler or you can eyeball this.  Use the smaller side of the 2-hole punch, twisting it down until you feel it pierce the metal, then twisting it back up to remove it from the tool.  You don’t have to screw the tool all of the way down, that can potentially scratch or mar the metal.  Just twist until you feel that release and then remove it.

Steps 5-6

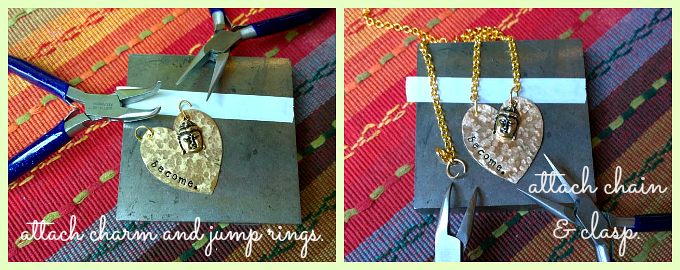
Step five: Use chain and bent nose pliers to attach the charm and the jump rings to the pendant.  (Here’s a video to help if you’ve never done this before.)  Step six: Attach the chain to the jump rings on your pendant and attach a jump ring to one open end and a jump ring and clasp to the other.

Become Metal Stamped Necklace

Make a hammered metal stamped necklace and become…fabulous!  We love adding texture to our metal pieces, even without adding text it gives them an artisan appeal.  You can do so much with this technique, try only hammering the edges, or half of the blank or mix hammered and polished pieces in one design.  So much to love here!  Just so you know, as you are hammering a piece of metal you are actually changing the molecular structure.  This is called work hardening.  The key is not to over hammer, or the metal can become brittle.  Softer metals can be strengthened by hammering, it works very well on soft jewelry wire when making findings like ear wires or clasps.  Stay tuned, because we’ll be showing you how to make your own findings in upcoming posts.

Cheers,
Margot and Avalon

(*FTC DISCLOSURE: Post contains affiliate links, if you click on a link and make a purchase we get a small percentage of the sale.  That’s how we keep the lights on, folks!)

*DIY Project Policy: Our tutorials are meant for your creative inspiration. Feel free to make and gift or wear these designs. Please make sure that you give credit to us as the designer if you make and share these designs on your blog or social sites. Please do not make and sell copies of our designs or sell them as kits. Please do not teach these designs as classes for profit. This is how we make our living and we ask that you respect our creativity and the time it takes to design, photograph and write these free tutorials. You may use a single photograph from each project online if you include a direct link back to our tutorial. Any use of these designs for retail sale for profit online in places like Etsy or eBay or in retail bricks and mortar, flea markets or outdoor fairs is not permitted. Thank you!

Don’t miss a post! Follow us with Bloglovin’:

Follow on Bloglovin

Filed Under: Uncategorized Tagged With: DIY metal stamped jewelry, get started metal stamping, hammered metal jewelry, how to hammer metal, how to make metal stamped jewelry, metal stamped jewelry, metal stamping 101, metal stamping basics

ImpressArt Metal Stamping Kit GIVEAWAY

November 16, 2020 by decey Leave a Comment

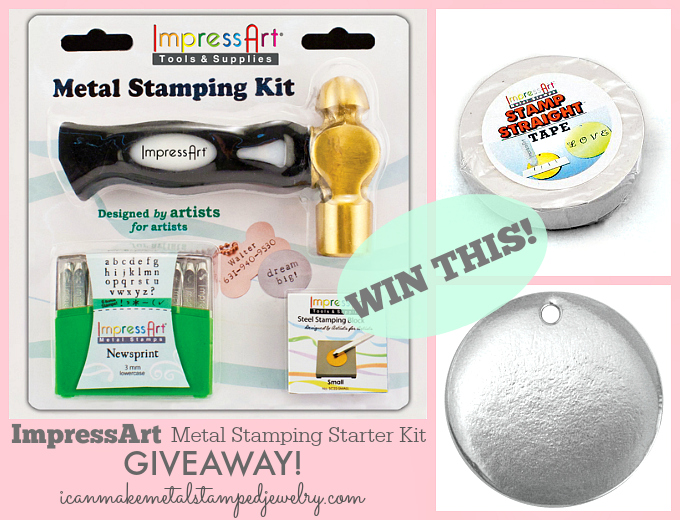
ImpressArt Metal Stamping Starter Kit Giveaway

THIS GIVEAWAY IS NOW CLOSED!

Hello, Friday!

Usually we have a big round-up post here on Fridays, but today we’re all about giving back. As in, giving you the chance to win everything you need to get started metal stamping. We’re thrilled to announce this *ImpressArt Metal Stamping Kit Giveaway! Can we get a what, what?

What, what?

We love sharing our passion for metal stamping with our readers and we’re thrilled to be able to offer this giveaway.  Having the right tools makes all of the difference when you’re getting started and this set has them all. If you’ve been on the fence about metal stamping or if you’ve dipped your toes into stamping but lack terrific tools, we’ve got you covered! The kit includes the ImpressArt Metal Stamping Kit with Newsprint stamps in lowercase, one package of StampStraight tape and 6 15/16″ SoftStrike pewter circle metal stamping blanks!  That’s a retail value of: $84.00!

Contest is open to US residents only. (The shipping costs are prohibitive, so we’re sorry we can’t ship overseas.) Enter with our Rafflecopter form below. Leave a comment here telling us what story you want to tell with your ImpressArt Metal Stamping kit. Like the ImpressArt Facebook page for an extra chance to win! Then, if you would be so kind, help us spread the word.

a Rafflecopter giveaway

That’s it! We’ll pick a winner of our ImpressArt Metal Stamping Kit giveaway next Friday. Don’t forget to visit ImpressArt to check out their amazing metal stamping products!

Happy stamping!

Cheers,
Margot Potter

(*This Blogger is being provided with product for giveaway and has a professional relationship with ImpressArt.)

Filed Under: Uncategorized

DIY Runs with Scissors Bracelet

November 12, 2020 by decey Leave a Comment

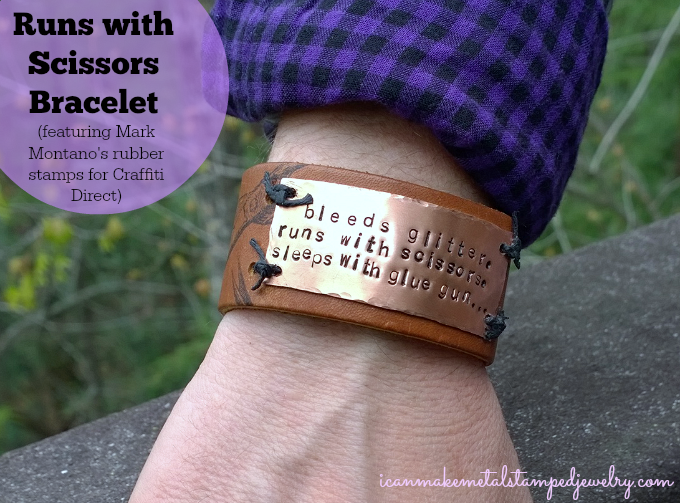
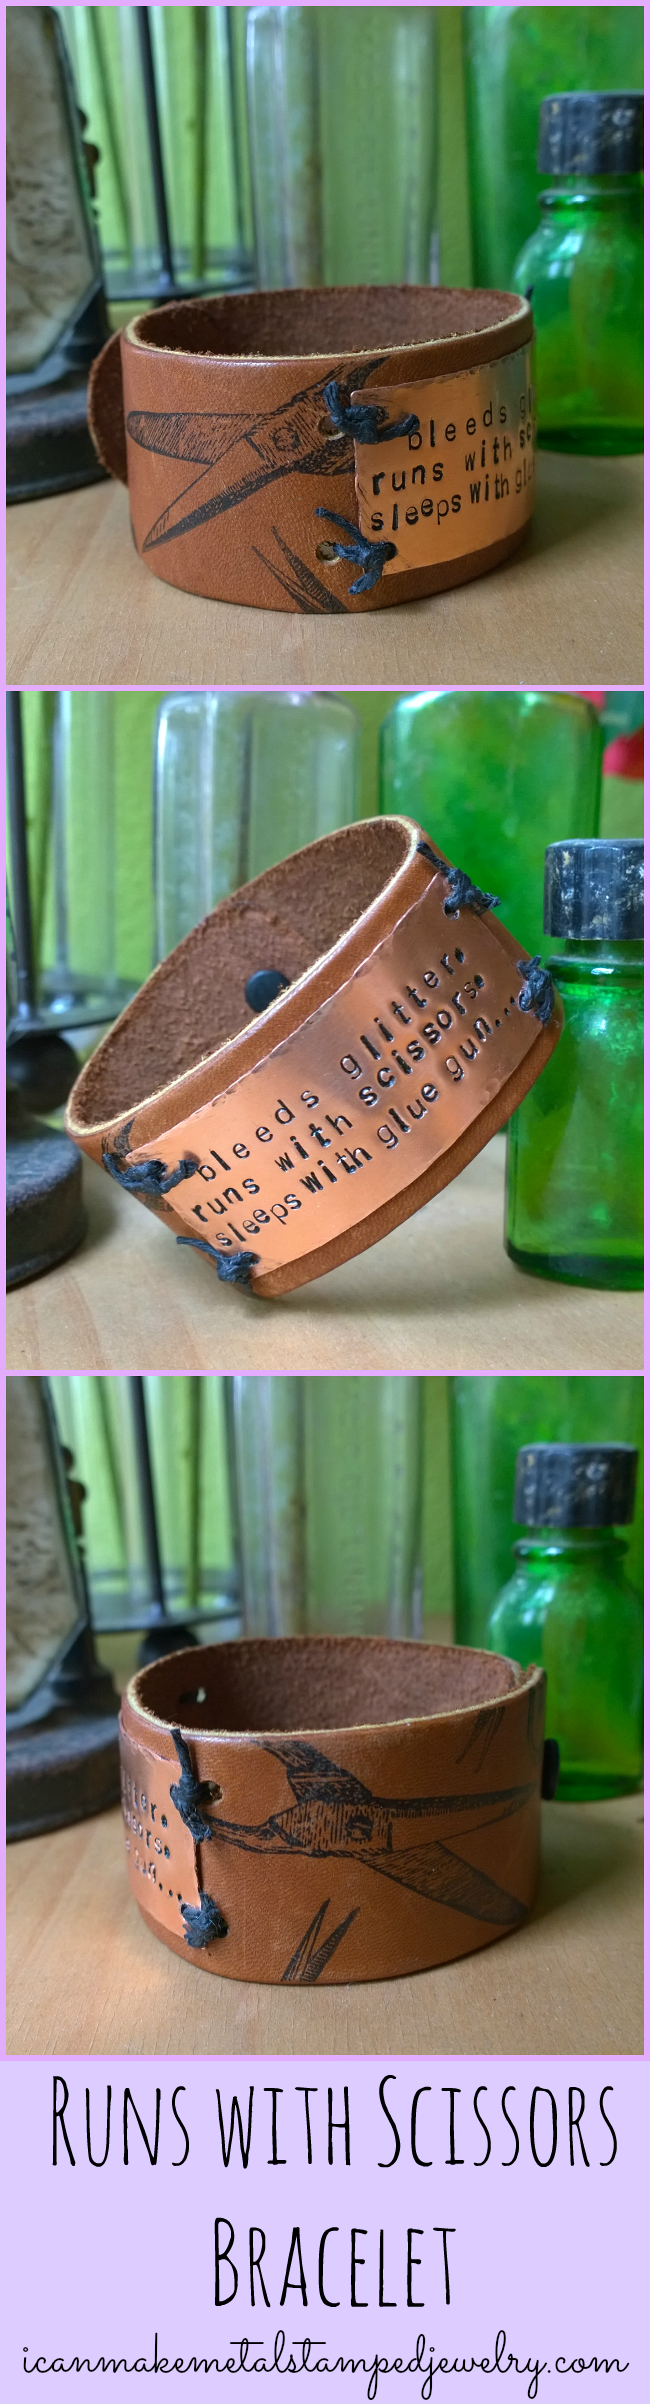
Runs with Scissors Bracelet

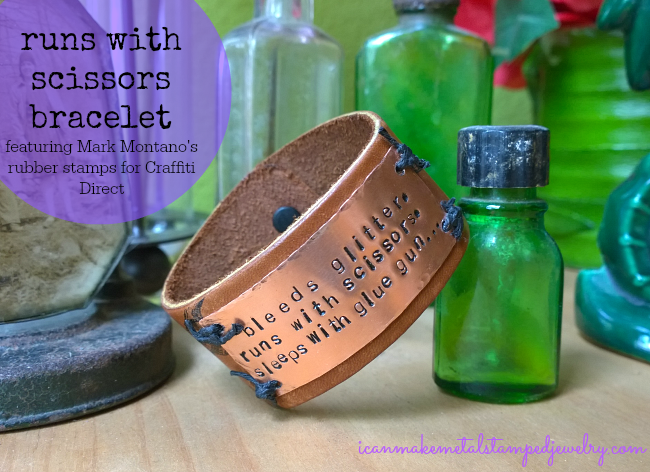
We had so much fun making this Runs with Scissors Bracelet with Mark Montano’s stunning new rubber stamps line for Craffiti Direct. Mark is one of our favorite people on the planet and he’s an amazing designer. Mark and Craffiti Direct *sent us two sets of vintage scissor stamps and we immediately knew what we wanted to do with them. The graphics are so rich and detailed that they looked fabulous on the tobacco brown leather wrist band.  Plus clear stamps are so much easier to use because you can see where you’re placing the images before you stamp. This is a uni-sex idea, you can change up the text to reflect the person for whom you’re making this. We wanted a rustic, funky vibe, so this is not perfectly stamped. Feel free to stamp more perfectly if that’s your thang. It’s your thang, do whatcha wanna do.

PicMonkey Collage

Just a few caveats before we get started: You need to be sure to use a permanent ink like Ranger Archival or Staz-On. Make sure you that you file or sand the edges of your metal thoroughly if you cut it yourself. These shears are designed for use with 20 gauge or thinner sheet metal.  They won’t work on thicker metal.  Be very careful if you decide to use them as they’re sharp enough to cut through metal so they’re definitely sharp enough to do some damage to you. Being craftastrophe prone, I take my time when working with tools like these. We also provided links below to metal parts that are pre-cut so you can get right to stamping!

Level: Intermediate

Skills: rubber stamping, metal stamping, meta

You will need:

leather wristband with snaps(to make it deeper brown use leather dye)
24 Gauge Copper Sheet OR Copper Tag with Holes
Vintage Scissors Stamps
Waxed Linen Cord Black
Ranger Archival Ink Black
Folk Art Enamel Acrylic Paint, Licorice
Impressart 3mm Lowercase Economy Metal Stamp Set
ImpressArt Metal Shears
ImpressArt Nylon Jaw Bracelet Bending Plier
ImpressArt 2-Hole Punch
Leather Hole Punch or Crop-A-Dile
ImpressArt Metal Stamping Hammer
Chasing Hammer
ImpressArt Steel Stamping Block
Impress Art Stamp Straight Tape
Black marker
Ruler
Cotton swab
Paper towel

Amazon.com Widgets

Amazon.com Widgets

1-4

Step one: If you are cutting your own piece from sheet metal or a strip, measure and mark a 1″x2 1/4″ piece. Step two: Cut carefully using the metal shears. IMPORTANT: USE A METAL FILE OR HEAVY GRIT SAND PAPER TO SAND EDGES! Step three: Mark and punch holes in all four corners with 2-hole punch. Step four: Hammer around the edges with the ball end of your chasing hammer.

5-8

Step five: Use the holes in your cut metal piece to mark the placement of the first set of holes in your leather. Punch 1/16″ holes using an awl, leather punch or Crop-a-dile.  Step six: Use permanent ink and small scissors stamps to stamp handles and blades of scissors on your leather as shown. Step seven: You are stamping three lines into the blank using 16mm stamps. I started with the top and shortest line, counting the number of letters and spaces to find the center. Then I work out from there. This first line has a space in the center. The next two lines have A LOT of letters, so I started at the far left and worked my way over. You will need two pieces of tape to secure the blank. The lines are: bleeds glitter, runs with scissors, sleeps with glue gun… I used punctuation stamps to add commas and the ellipses. Step eight: Swipe across letters with black enamel paint on a cotton swab. Let the paint sit for 30-60 seconds. Wipe off excess with a paper towel.

9-12

Step nine: Use the bracelet bending pliers to create a slight arc in your stamped metal tag. Step ten: Mark the placement of your second set of holes so that you can lace the tag to the front of the bracelet. Use a leather punch, awl or Crop-a-dile to punch 1/16″ holes.  Step eleven: Lace tag to front of bracelet with waxed linen as shown. Thread linen cord ends through the top of the bracelet.  One goes into the tag hole and leather and the other through the leather.  Then cross the threads underneath and thread each one through the hole on the opposite side. Don’t tighten then down. Do this for all four sides.  Step twelve: Knot each one securely. Cut off ends leaving a little bit of excess as in photo.

Runs with Scissors

Phew! You did it!

We hope you love this DIY Runs with Scissors Bracelet as much as we do. Check out Mark’s YouTube Channel, he dishes up TWO divine DIY videos every week. Tell ’em Madge sent ya.

Happy Stamping,
Margot and Avalon
*DIY Project Policy: Our tutorials are meant for your creative inspiration. Feel free to make and gift or wear these designs. Please make sure that you give credit to us as the designer if you make and share these designs on your blog or social sites. Please do not make and sell copies of our designs or sell them as kits. Please do not teach these designs as classes for profit. This is how we make our living and we ask that you respect our creativity and the time it takes to design, photograph and write these free tutorials. You may use a single photograph from each project online if you include a direct link back to our tutorial. Any use of these designs for retail sale for profit online in places like Etsy or eBay or in retail bricks and mortar, flea markets or outdoor fairs is not permitted. Thank you!

(Disclosure: Blogger was provided product for post, all opinions 100% her own. Post contains affiliate links, if you click on a link and make a purchase, we get a small percentage of the sale.)

*DIY Project Policy: Our tutorials are meant for your creative inspiration. Feel free to make and gift or wear these designs. Please make sure that you give credit to us as the designer if you make and share these designs on your blog or social sites. Please do not make and sell copies of our designs or sell them as kits. Please do not teach these designs as classes for profit. This is how we make our living and we ask that you respect our creativity and the time it takes to design, photograph and write these free tutorials. You may use a single photograph from each project online in blog round-ups or blog posts ONLY if you include a direct link back to our tutorial. Any use of these designs for retail sale for profit online in places like Etsy or eBay or in retail bricks and mortar, flea markets or outdoor fairs is not permitted. Thank you!

Filed Under: Uncategorized Tagged With: DIY hand stamped jewelry, DIY jewelry, DIY leather bracelet, DIY unisex bracelet, how to make metal stamped jewelry, man's bracelet, metal stamped bracelet, metal stamped cuff bracelet, rubber stamping on leather

  • « Go to Previous Page
  • Page 1
  • Interim pages omitted …
  • Page 11
  • Page 12
  • Page 13
  • Page 14
  • Page 15
  • Go to Next Page »

Copyright © 2026 · Aspire Theme on Genesis Framework · WordPress · Log in