(*FTC DISCLOSURE BELOW)
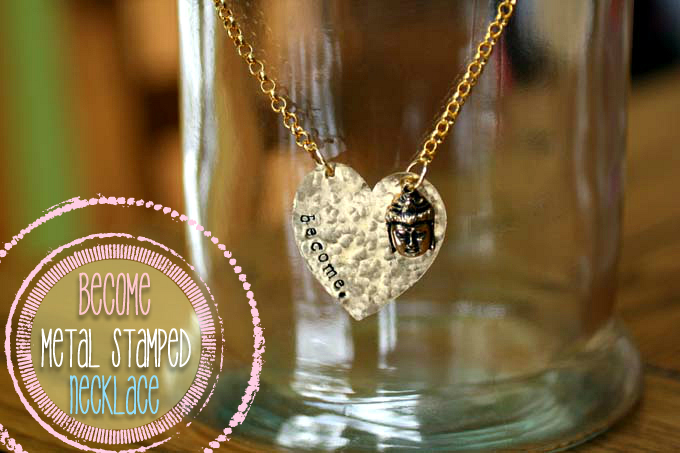
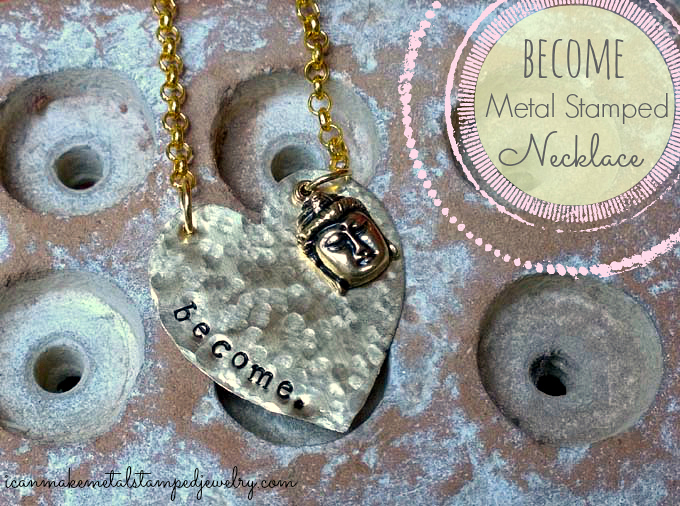
“What we think, we become.” Buddha
Base metal stamping blanks can look a little, well, cheap. Adding texture helps take them from meh to marvelous, and it’s very easy to do. The concept for this hammered metal stamped necklace started with some gold Buddha charms we found on clearance at a big craft chain. We love positive, uplifting jewelry. Plus, it’s pretty! You’ll learn how to add texture, stamp along the edge and add holes at the top of the heart to turn this into a necklace.
What you need:
ImpressArt, Heart, Brass, 1 1/2″ Stamping Blank
Antique Brass Buddha Head Charms
2 8″ segments 22K Gold Plated Slim Rolo Chain
10mm Gold Plated Clasp
4 10mm 6mm Jump Rings
Folk Art Enamel Acrylic Paint, Licorice
Cloth or paper towel
Wood Handle Scratch Awl
Beadalon Ball Pein Hammer
ImpressArt Metal Stamping Kit- Newsprint Lowercase
ImpressArt Stamp Straight Tape
ImpressArt Hole Punch Pliers
Marker
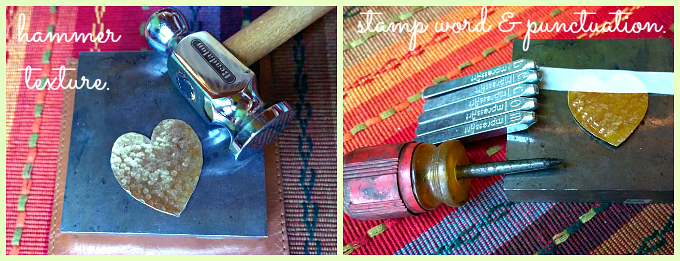
Step one: Place your blank on the bench block and use the round or ball end of a ball pein hammer to add texture. Strike it all over, including along the sides to create a hammered finish. Don’t hit it too hard, or too soft, somewhere in between. The blank may start to curl a little as you hammer, but don’t worry. When you finish you can turn it over and use the flat side of the ball peen hammer or the brass hammer to flatten it. Step two: Tape the hammered blank down to the bench block. Stamp along the curve of the left edge. Space your stamps out evenly as you go. I didn’t mark these, but you can use a ruler and a pencil to help mark even placement. Finish by adding a period using an awl or a period punctuation stamp. Strike the top of the awl with your brass hammer, don’t overdo this or you could pierce the blank.
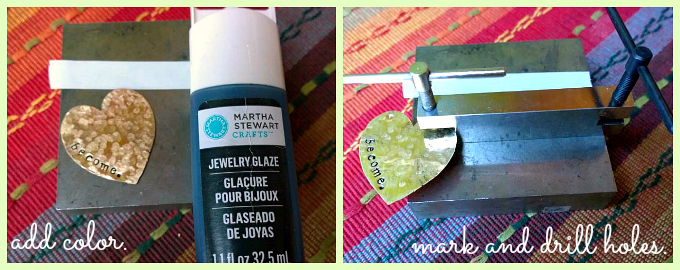
Step three: Wipe some Martha Stewart jewelry glaze across the letters. Let it sit for a few seconds, then wipe it off with a paper towel or cloth. Step four: The drill holes should be placed at the top center of both sides of the heart. You can use a marker and a ruler or you can eyeball this. Use the smaller side of the 2-hole punch, twisting it down until you feel it pierce the metal, then twisting it back up to remove it from the tool. You don’t have to screw the tool all of the way down, that can potentially scratch or mar the metal. Just twist until you feel that release and then remove it.
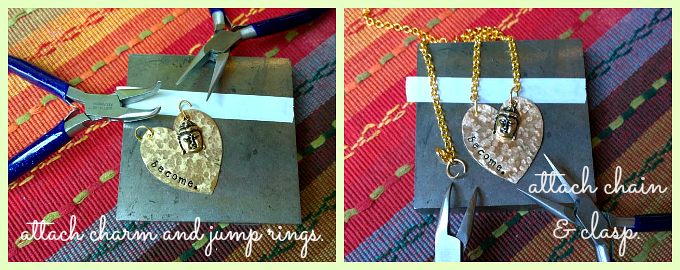
Step five: Use chain and bent nose pliers to attach the charm and the jump rings to the pendant. (Here’s a video to help if you’ve never done this before.) Step six: Attach the chain to the jump rings on your pendant and attach a jump ring to one open end and a jump ring and clasp to the other.
Make a hammered metal stamped necklace and become…fabulous! We love adding texture to our metal pieces, even without adding text it gives them an artisan appeal. You can do so much with this technique, try only hammering the edges, or half of the blank or mix hammered and polished pieces in one design. So much to love here! Just so you know, as you are hammering a piece of metal you are actually changing the molecular structure. This is called work hardening. The key is not to over hammer, or the metal can become brittle. Softer metals can be strengthened by hammering, it works very well on soft jewelry wire when making findings like ear wires or clasps. Stay tuned, because we’ll be showing you how to make your own findings in upcoming posts.
Cheers,
Margot and Avalon
(*FTC DISCLOSURE: Post contains affiliate links, if you click on a link and make a purchase we get a small percentage of the sale. That’s how we keep the lights on, folks!)
*DIY Project Policy: Our tutorials are meant for your creative inspiration. Feel free to make and gift or wear these designs. Please make sure that you give credit to us as the designer if you make and share these designs on your blog or social sites. Please do not make and sell copies of our designs or sell them as kits. Please do not teach these designs as classes for profit. This is how we make our living and we ask that you respect our creativity and the time it takes to design, photograph and write these free tutorials. You may use a single photograph from each project online if you include a direct link back to our tutorial. Any use of these designs for retail sale for profit online in places like Etsy or eBay or in retail bricks and mortar, flea markets or outdoor fairs is not permitted. Thank you!
Don’t miss a post! Follow us with Bloglovin’:


)