Tag: Halloween Crafts

  • DIY Eyeball Necklace

    I on U Necklace Text

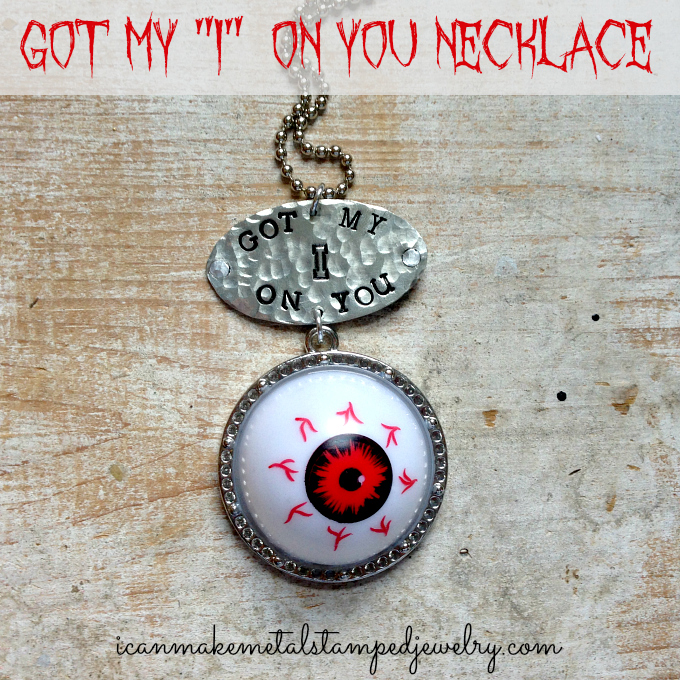
    Hallowe’en is approaching and the stores are filled with an array of all manner of gruesome and goolishly good items. We found these ping pong ball eyeballs at Dollar Tree. You get a whole bag for a buck! Woot! (If you don’t have a Dollar Tree nearby, we have a link to buy them on Amazon below, but they’re more expensive there.) We had to think about the best way to turn these into jewelry, and when we realized they fit a bezel when sawed in half, this DIY Eyeball Necklace came together.

    There are all sorts of things you could stamp on your blank, but we decided on ‘Got My I On You’, then realized maybe it should have been ‘Got My I on U’, but we’re happy with how this turned out and we have a bag full of eyeballs so we can make more!

    You will need:

    (The links below are affiliate links, if you click on a link and buy something we get a very small percentage of the sale. That’s how we keep the lights on!)

    Plastic Eyeballs
    Circle Pendant Base-39.3-Millimeters
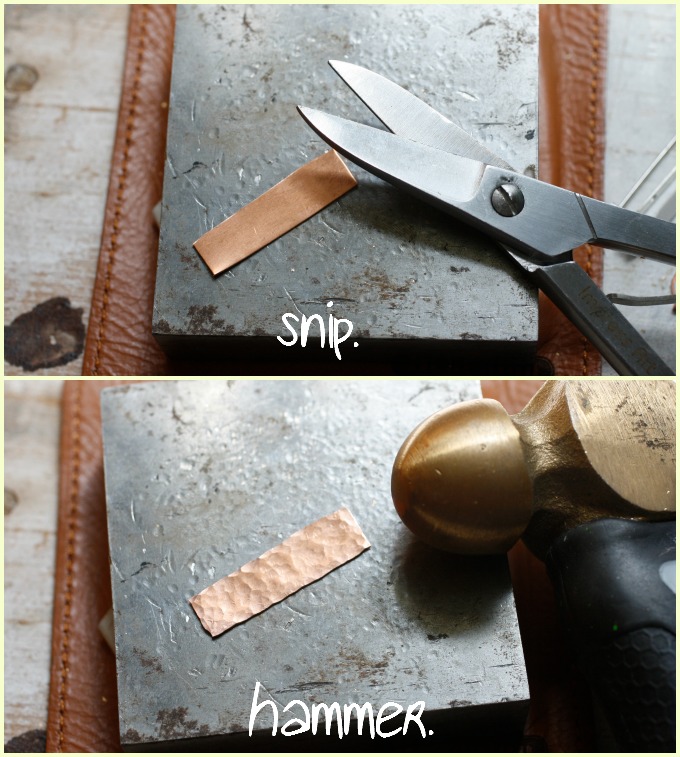
    7/8″ X 1 3/8″ Oval, Aluminum Stamping Blank
    Aleene’s Max Tacky Adhesive
    Folk Art Enamel Acrylic Paint, Licorice
    Aluminum 1/8 Inch Hollow Rivets 1/16 Inch Diameter
    2 Beadalon 6mm Jump Rings
    Ball Chain with Connectors
    Beadsmith EZ-Rivet Piercing and Setting Tool
    ImpressArt 2-Hole Punch
    ImpressArt Varsity Uppercase Letter Metal Stamps Set
    ImpressArt Premium- Newsprint Lowercase Letter Stamps
    ImpressArt 1-lb Brass Stamping Hammer
    ImpressArt Steel Stamping Block
    2 pairs Beadalon Slim Chain Nose Pliers
    Serrated Sharp Knife
    Cotton Swab
    Paper Towel

    Amazon.com Widgets

    Amazon.com Widgets

    1-2

    Step One: Cut eyeball in half, carefully, using a serated knife. Step Two: Use a thick metal friendly adhesive like Max Tacky and get a generous coating in the bezel. Press eyeball into glue and let it dry overnight.

    3-4

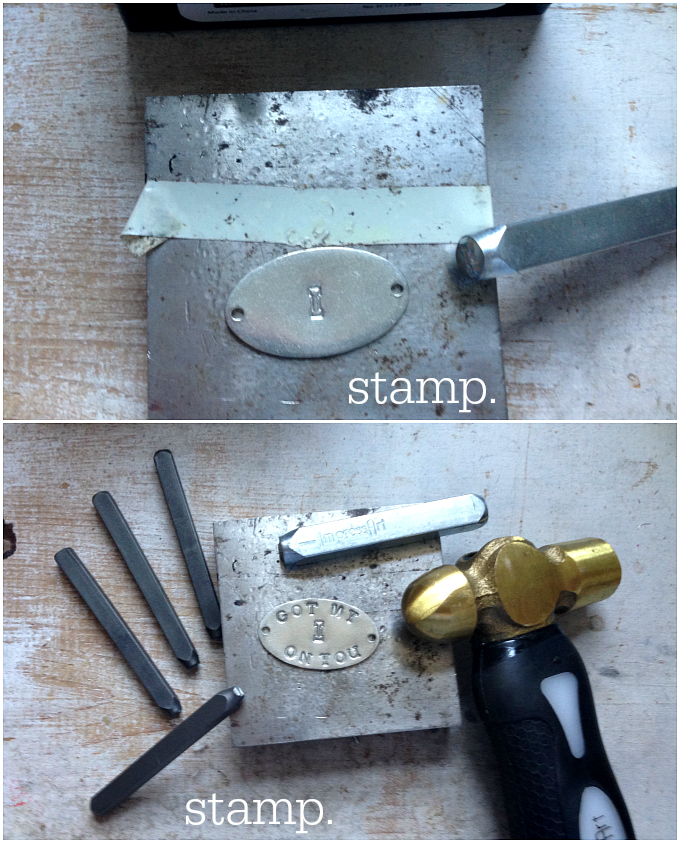
    Step three: Stamp the letter I in the center of your blank using the Varsity letter set. Step four: Add Got My and On You on the top and bottom of the blank. Make sure you stamp around the arc so the words curve around the edges. We have a tutorial for that here. Add texture with the round end of your hammer.

    5-6

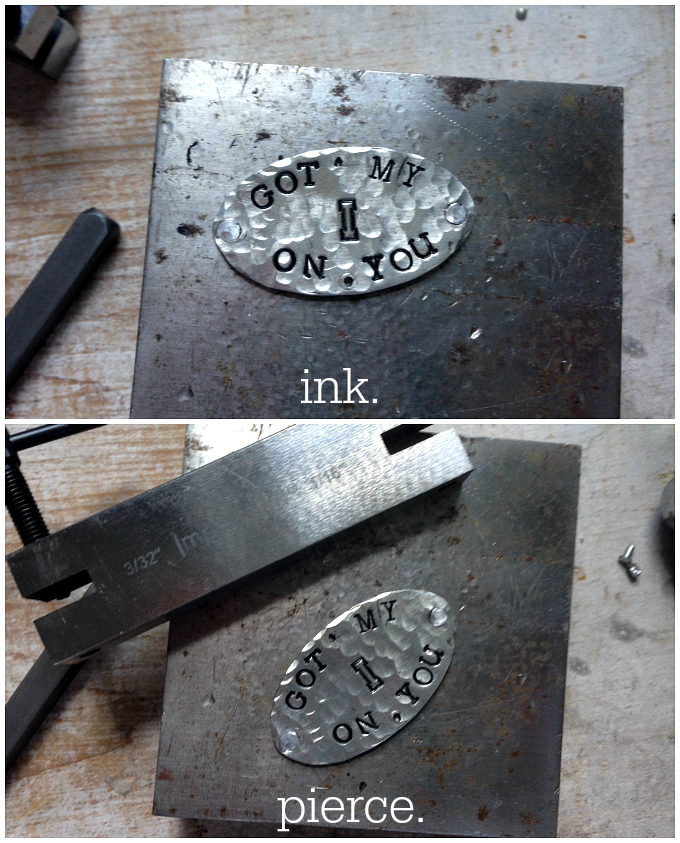
    Step five: Use the cotton swab to swipe the paint across the letters. Wipe off excess with a paper towel. Step six: Use the 2-hole punch to add holes to top and bottom center of blank.

    7-8

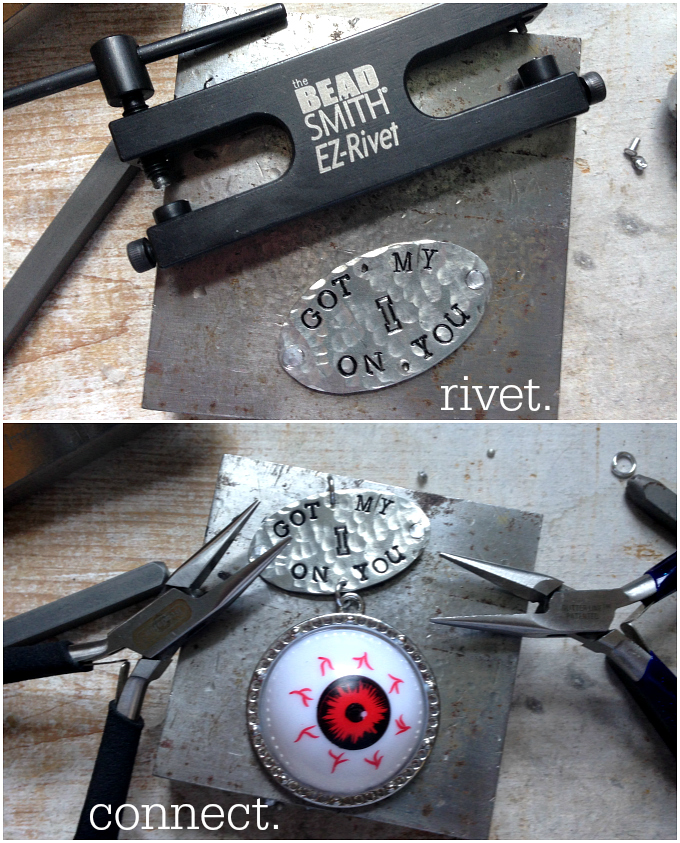
    Step seven: Use the riveting tool to add rivets to the large holes on the left and right side of the blank. They were a little loose, so I decided to use the hammer and flatten them and then add more texture with the ball peen hammer. If you get blanks without the drill holes on the sides, you can skip this step. Step eight: Use chain nose pliers to connect eyeball to stamped blank with a jump ring. Attach a jump ring to the top center hole in the stamped blank. Slide your chain into the jump ring to make a necklace!

    Eyeball Text 2

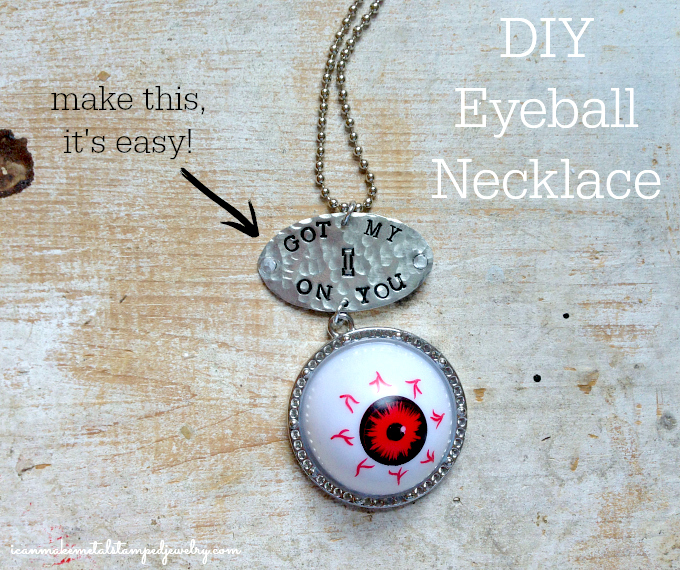
    Fun, fast and faBOOLous! Make a DIY Eyeball Necklace and all eyes will be on you!

    Cheers,
    Margot and Avalon

    *DIY Project Policy: Our tutorials are meant for your creative inspiration. Feel free to make and gift or wear these designs. Please make sure that you give credit to us as the designer if you make and share these designs on your blog or social sites. Please do not make and sell copies of our designs or sell them as kits. Please do not teach these designs as classes for profit. This is how we make our living and we ask that you respect our creativity and the time it takes to design, photograph and write these free tutorials. You may use a single photograph from each project online in blog round-ups or blog posts ONLY if you include a direct link back to our tutorial. Any use of these designs for retail sale for profit online in places like Etsy or eBay or in retail bricks and mortar, flea markets or outdoor fairs is not permitted. Thank you!

  • Boo-tiful DIY Bracelets

    Bootiful DIY Bracelets

    I guess it’s obvious that I really love Hallowe’en. When I saw these new SoftStrike pewter cubes from ImpressArt, I knew exactly what I wanted to do with them. You can stamp on all four sides! How cool is that?! Write words, dates, pictograms…they open up a whole new dimension in metal stamping…literally! I dug through my bead stash to find fall friendly color combos for these Boo-tiful DIY Bracelets. You can use any beads you like here and of course, any words. I plan to wear this trio together. Scare up a wrist full for you or your family and friends!

    Bootiful Two Text

    What you need:

    Beads
    Folk Art Enamel Acrylic Paint, Licorice
    ImpressArt SoftStrike Small Cubes
    14mm Lobster Clasp
    2 6mm Jump Rings, Silver Plate
    2 Crimp Tubes
    Beadalon 19-Strand .015-Inch Wire
    Impressart 1/2 Lb Brass Hammer
    ImpressArt Steel Stamping Block
    ImpressArt Premium Newsprint Uppercase Letter Stamps
    Beadalon Bead Crimp Tool, Standard
    Beadalon Flush Cutter
    Beadalon Chain Nose Pliers
    Bead Board
    Cotton Swab
    Paper Towel

    Amazon.com Widgets

    Amazon.com Widgets

    Boo-tiful Bracelets Steps

    Step one: Stamp letters on your cubes. You don’t have to hit these very hard, too much pressure and you may mar your metal. Stamp letter on all four sides. Use enamel paint to ink letters, swipe on with a cotton swab and wipe off with a paper towel. This is a little messy, so work where you don’t have to worry about making a mess!  Step two: Measure your wrist. Use a bead board to lay out your beads, leave enough room for the clasp and jump ring in your plan so your bracelet isn’t too big. You don’t want to loose it! Cut wire with about 2″ extra. Thread it into the crimp tube, the clasp and back into the crimp tube. The loop should be about 1/4″, too small and it will create friction when you wear the bracelet and this will begin to cut the wire. Step three: Make sure the wires are uncrossed. Compress the tube with the front oval section of the pliers. This makes the round tube into an oval, so it is easier to crimp. Move tube back to the heart shaped section of the pliers. Compress the tube, separating the wires into separate openings. It should look like a heart! Face the smooth side of the crimped tube towards the jaw of your crimp pliers and in the front oval opening. Press the ends together tightly. Check to be sure it is secured. Cut off the wire tail. The key to beading is making sure your wire fills the holes in the beads, this is why I don’t recommend threading the tail into the beads, if you can do that then your wire is too thin. Adjust the wire thickness you use to fill your beads! Now you can bead! Step four: String your beads on the wire. When you reach the final bead, slide a crimp tube on around a jump ring like you did at the start. Before you crimp, attach the clasp to the jump ring. This will keep your bracelet rounded to allow for play between the beads. This keeps it from being to stiff and breaking later. Use chain nose pliers to pull the wire through the crimp tube. Crimp using the same steps from before. Cut excess wire.  Make more!

    Bootiful One

    How about a little candy corn inspiration?

    Bootiful Four

    Or maybe Indian corn? Yup, I’m feeling corny, folks. I made a little boo boo here…do you see it? Oh well, pobody’s nerfect.

    Bootiful Three

    That’s it! If you make some Boo-tiful DIY Bracelets, we’d love to see them! Happy Hallowe’en!

    Cheers,
    Madge

    *DIY Project Policy: Our tutorials are meant for your creative inspiration. Feel free to make and gift or wear these designs. Please make sure that you give credit to us as the designer if you make and share these designs on your blog or social sites. Please do not make and sell copies of our designs or sell them as kits. Please do not teach these designs as classes for profit. This is how we make our living and we ask that you respect our creativity and the time it takes to design, photograph and write these free tutorials. You may use a single photograph from each project online in blog round-ups or blog posts ONLY if you include a direct link back to our tutorial. Any use of these designs for retail sale for profit online in places like Etsy or eBay or in retail bricks and mortar, flea markets or outdoor fairs is not permitted. Thank you!