Tag: how to make metal stamped jewelry

  • Stamped Metal Necklace

    Stamped Metal and Leather Necklace One

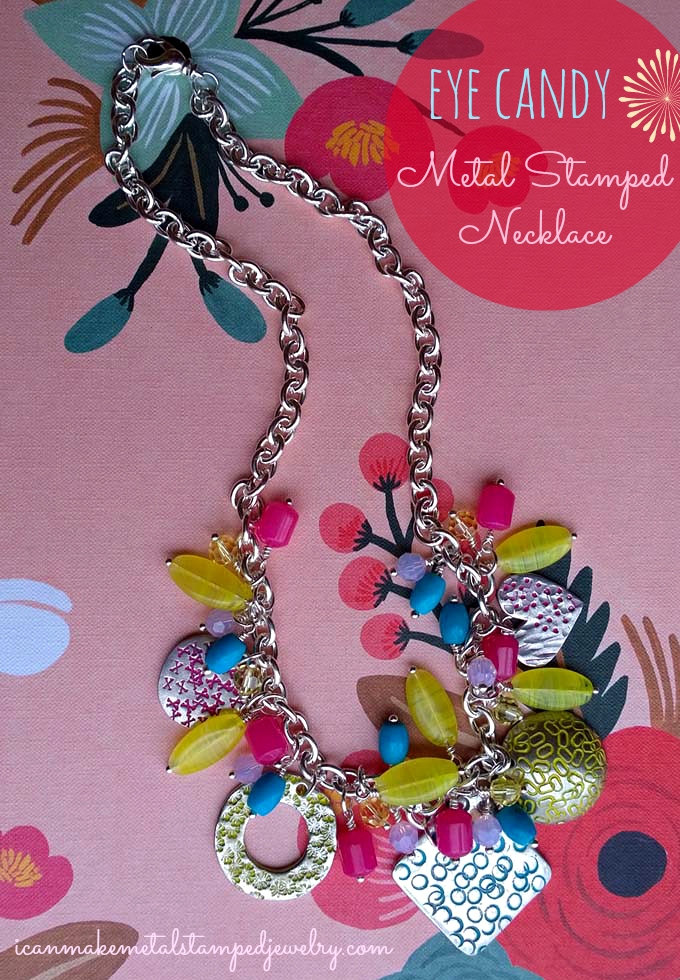
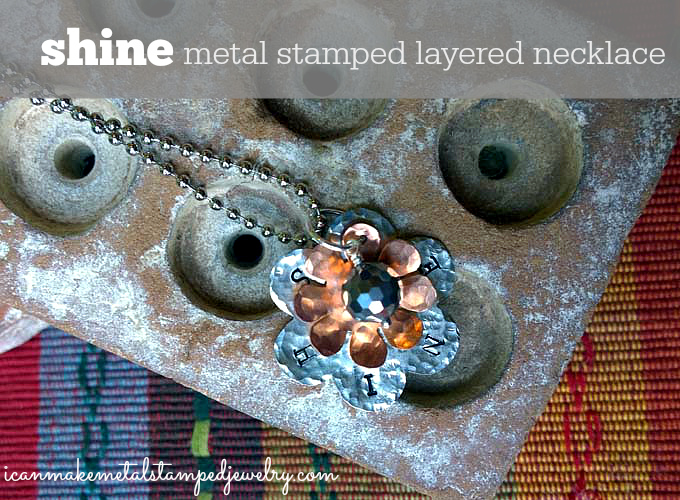
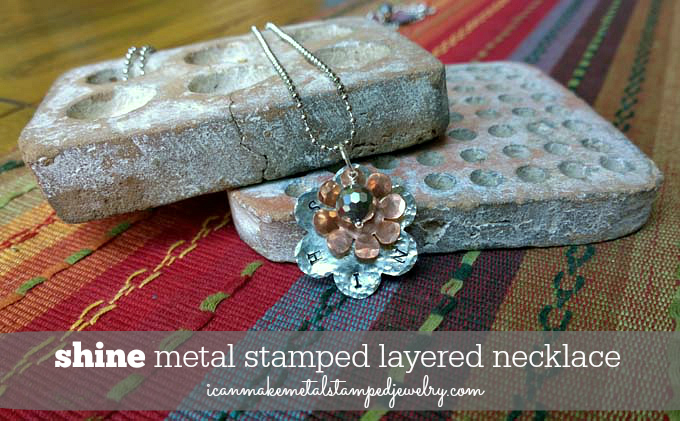
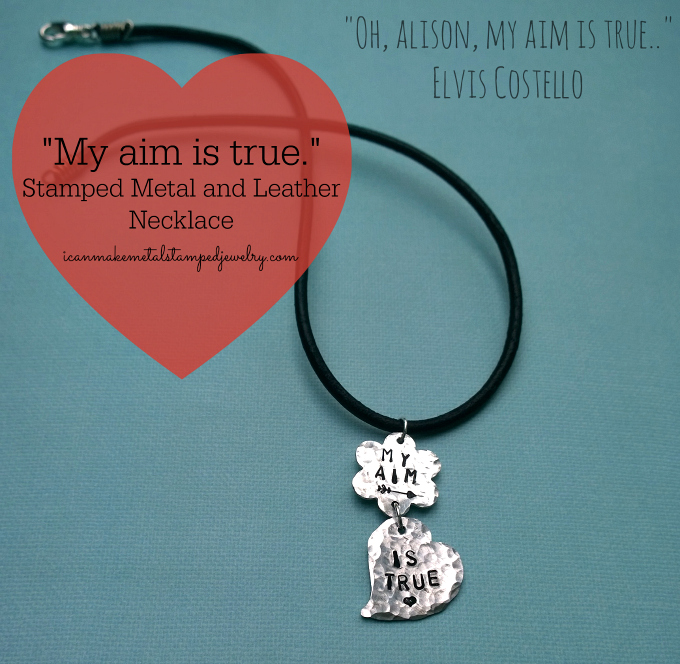
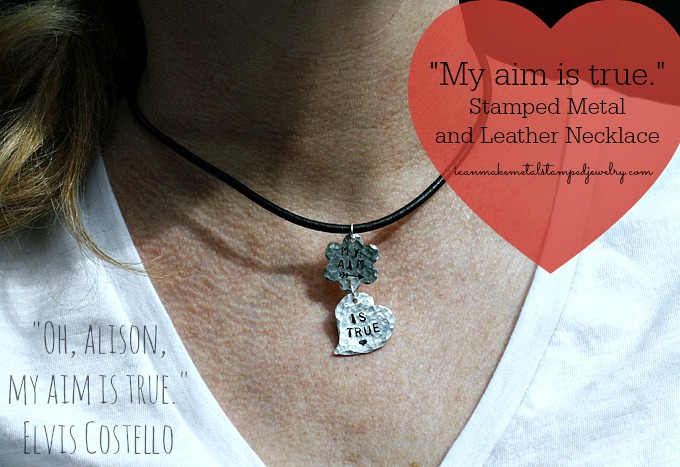
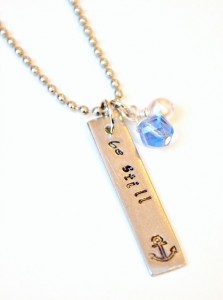
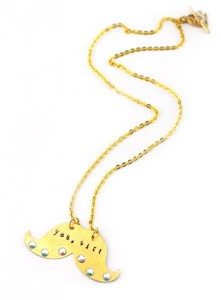
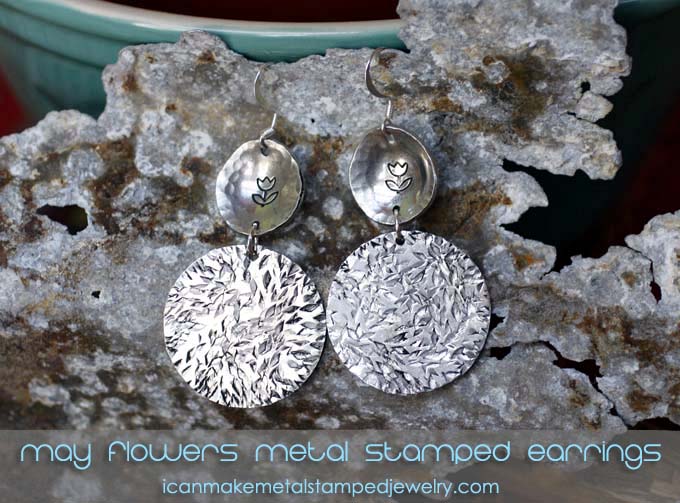
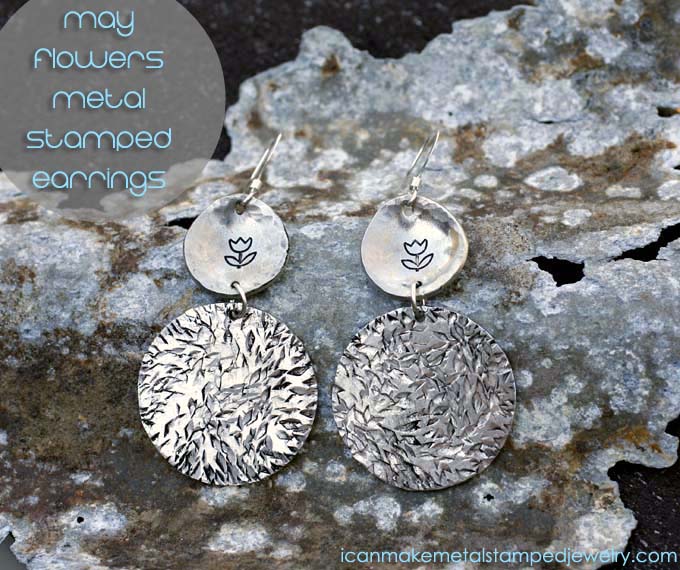
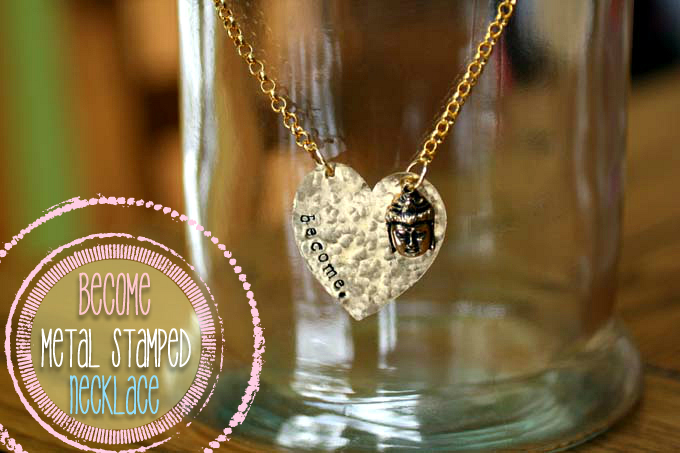
    This week’s DIY is a stamped metal necklace on a leather cord. You’ll learn how to stamp, ink, make a two part pendant and turn leather cord into a necklace with 20 gauge plated craft wire.  We love leather cord for guys and gals to give your jewelry a more casual, laid back appeal.

    My sister-in-law Alison was visiting us this weekend for her birthday. I had just *received the new arrow and heart stamps from Beaducation along with their fabulous new beginner’s metal stamp kit and an array of blanks and this design came together from there. One of the best things about hand stamped jewelry is that you can easily share a personalized message using images, numbers and letters. Aluminum blanks are soft and very easy to stamp, I like them best hammered to give them texture and make them look more like precious metal. This is a very easy design to execute and Beaducation has everything you need in their beginner’s kit. In fact, I’ll be giving this kit away on Wednesday, so make sure you come back to enter for the chance to win! (US Residents only.)

    You will need:

    Beaducation aluminum blanks in flower and heart
    2 4.5mm jump rings
    Black leather cord
    20 gauge silver plated copper wire
    Lobster clasp
    OR Black leather finished necklace
    Beaducation Stamping on Metal Starter Kit: Includes bench block, economy stamps in 1/8″ size, 1.5mm hole punch pliers, Sharpie marker, printed instructions, video tutorial CD, copper sheet, ball chain necklace, copper blanks, stamping tape, pro polish pads
    Heart Arrow Stamp
    Tiny Fat Lined Heart Stamp
    1 pound brass stamping hammer
    Chasing hammer
    Black acrylic paint dabber
    Round nose pliers
    Chain nose pliers
    Flush cutters
    Paper towel

    1-4

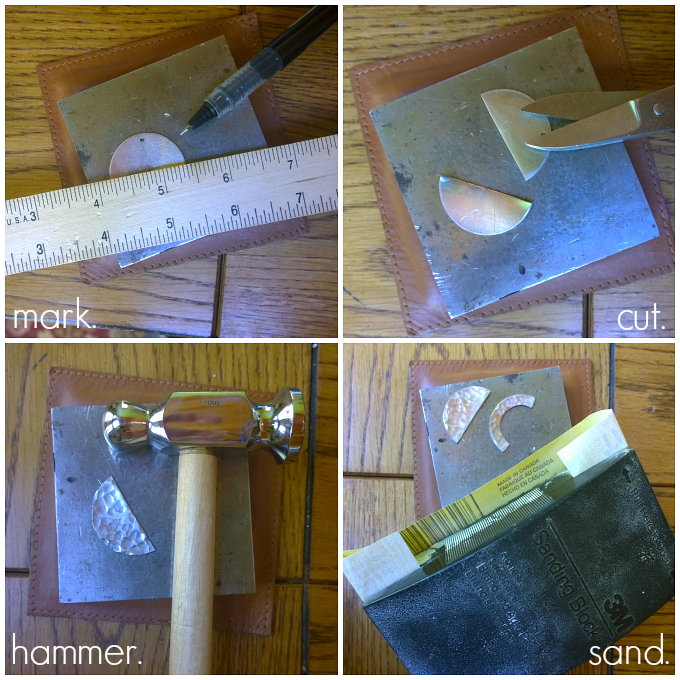
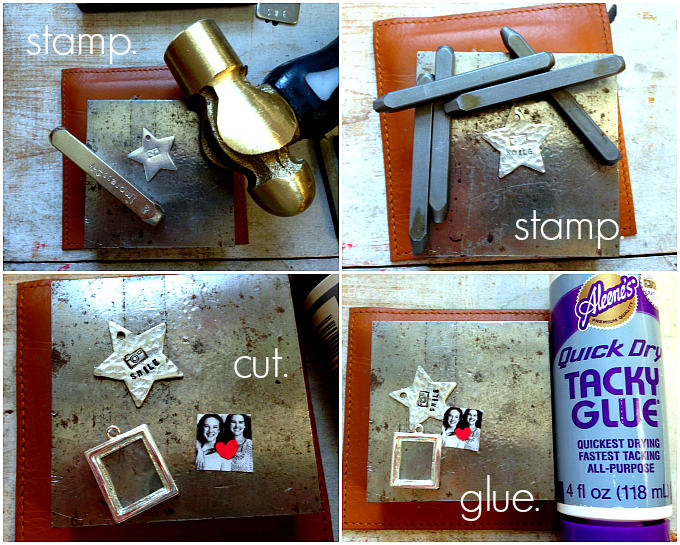
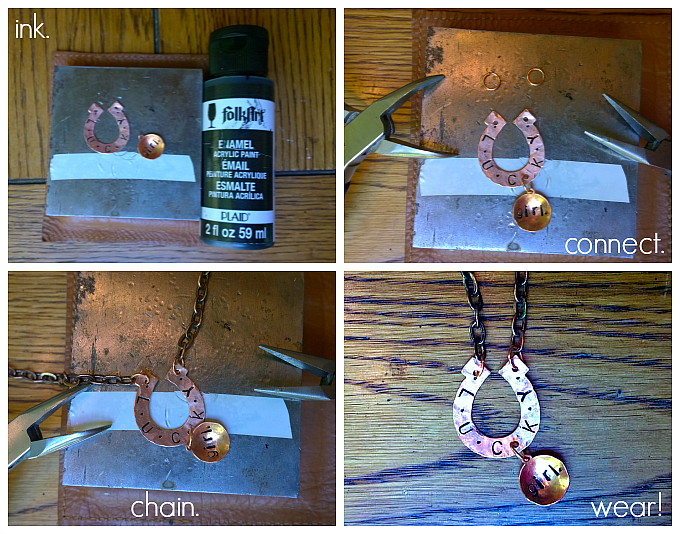
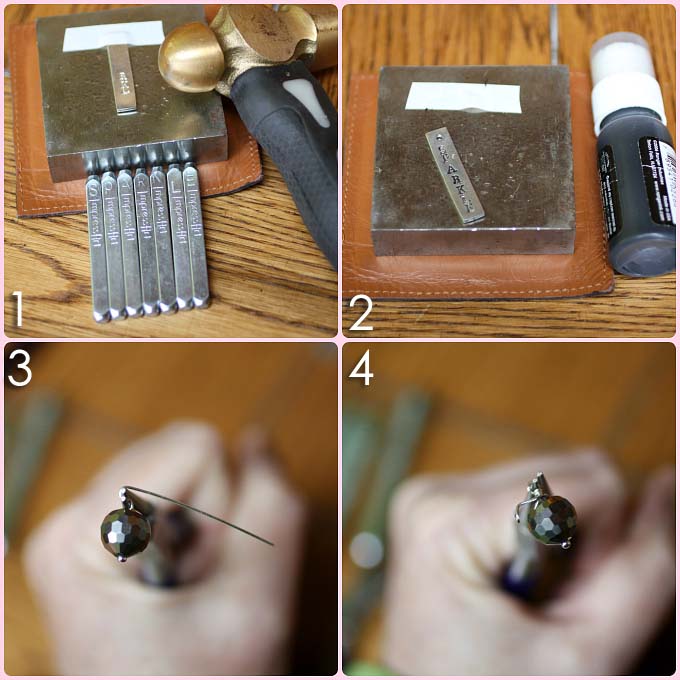
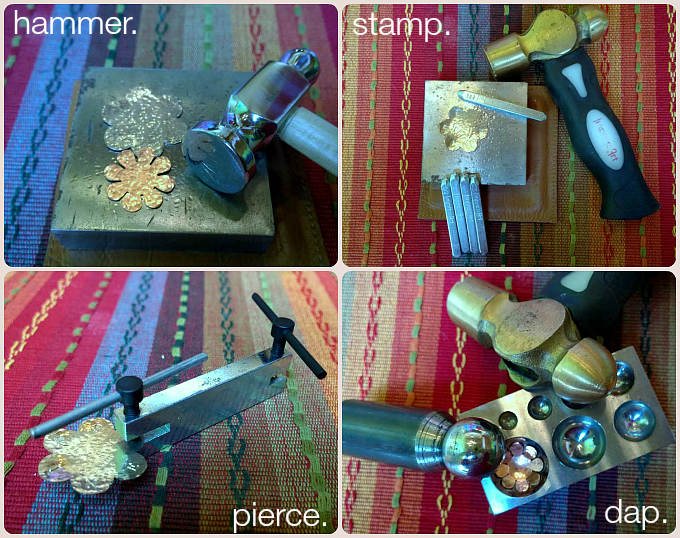
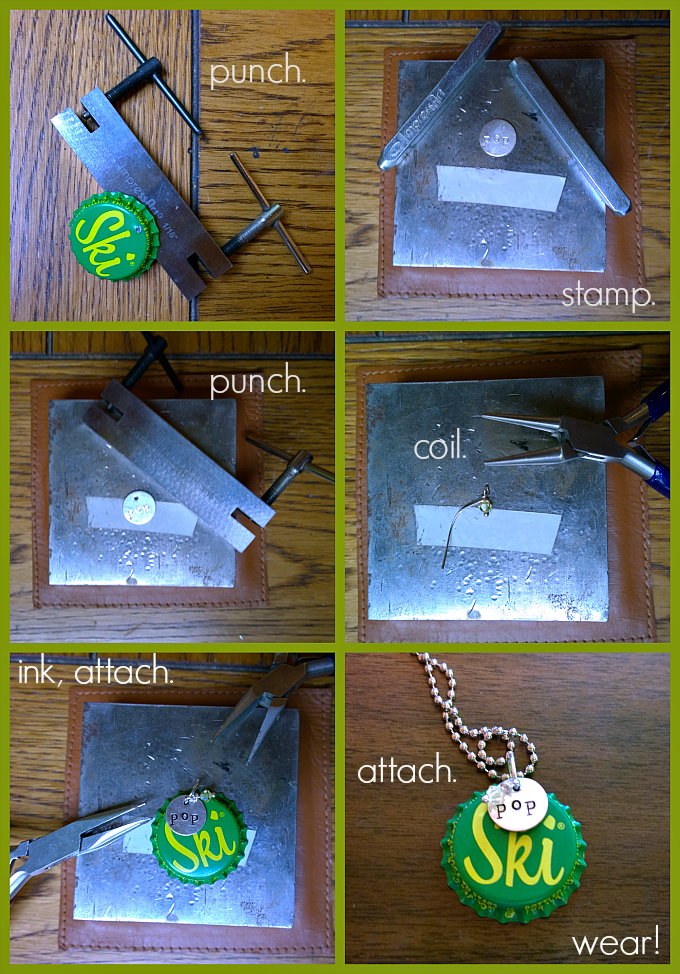
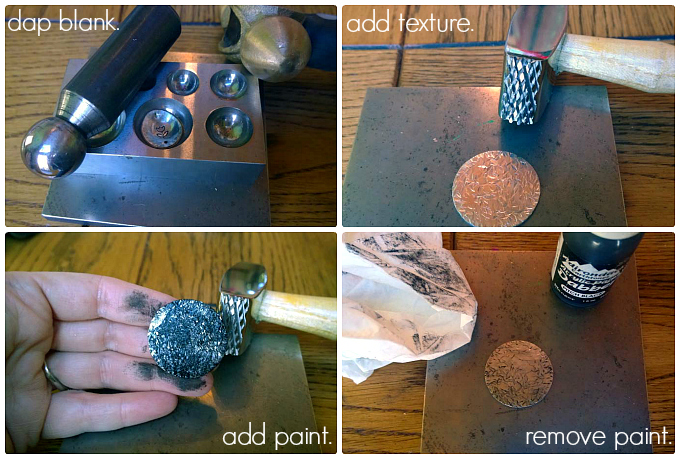
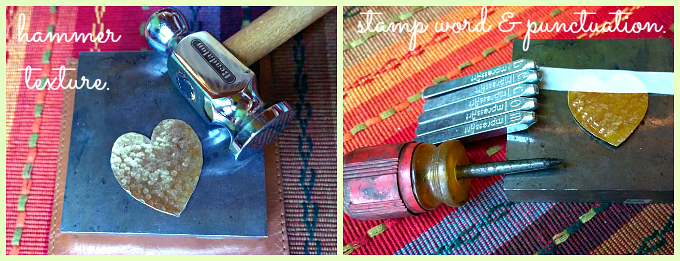
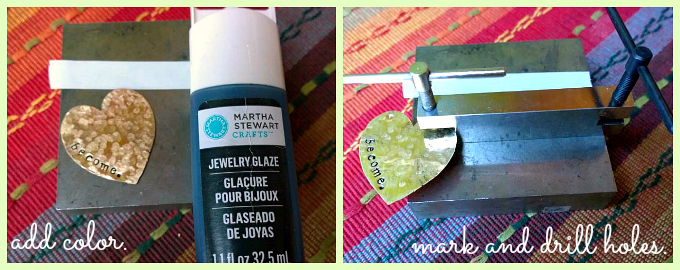
    Step one: Use round end of chasing hammer to hammer texture on surface of both blanks. Step two: Stamp MY AIM and arrow on flower blank as shown. Step three: Stamp IS TRUE and heart on heart blank as shown. Step four: Use pliers to pierce a hole at the top and bottom petal of flower and top of the larger side of the heart blank as shown.

    5-8

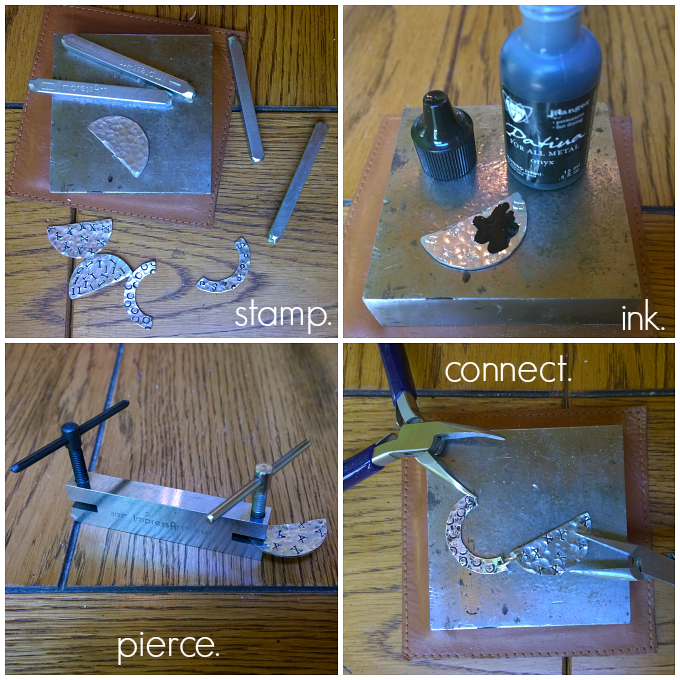
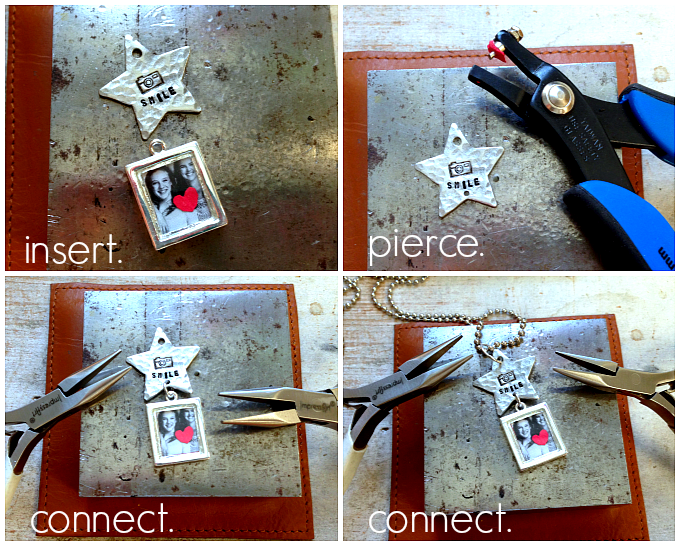
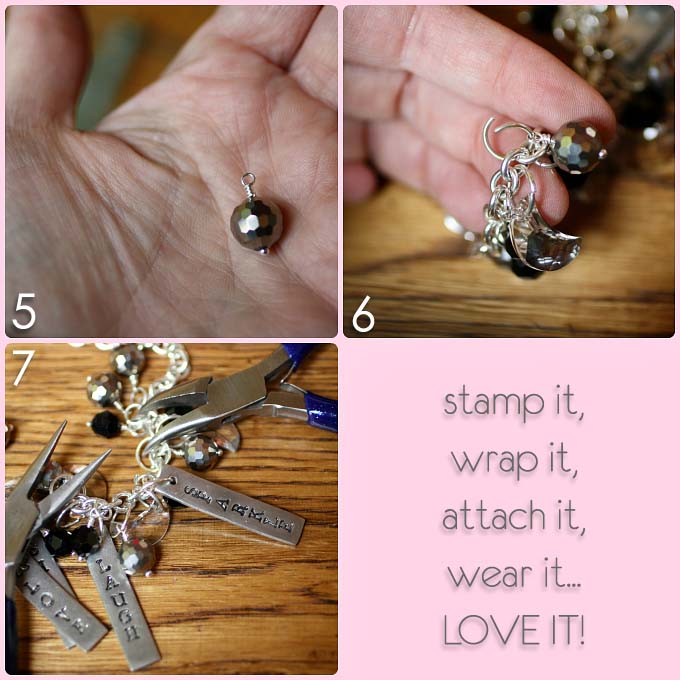
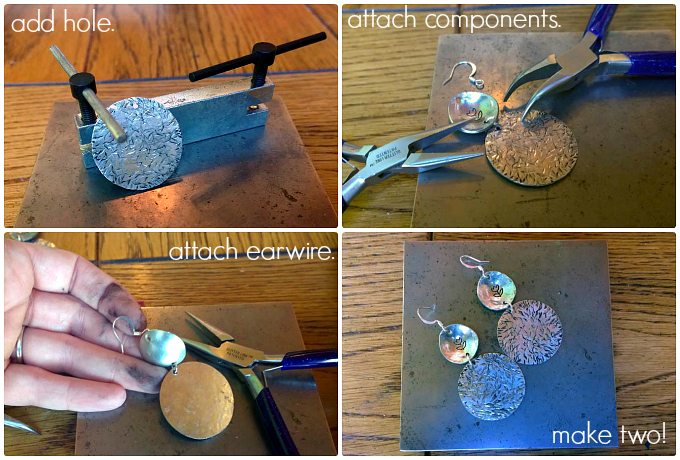
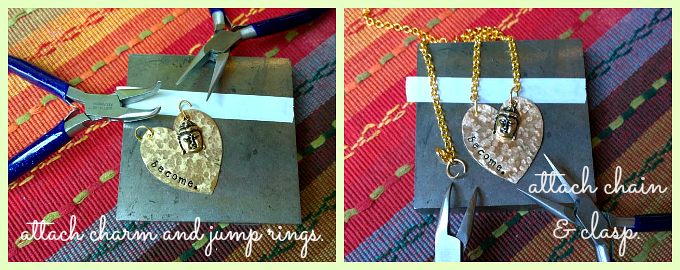
    Step five: Dab paint into stamped areas of blanks. Wipe off excess with paper towel. Step six: Connect the two blanks with a jump ring. Attach a second jump ring to the top hold in the flower blank. Step seven: Cut leather to desired length. Step eight: Use round nose pliers to create a small loop in the end of your wire coil.

    9-13

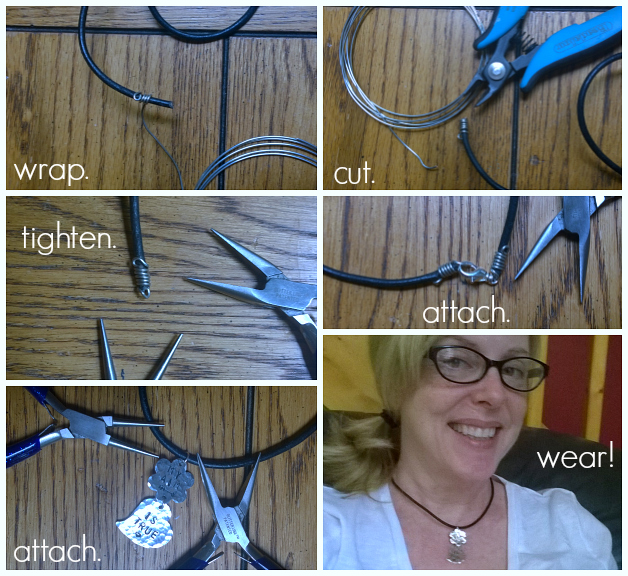
    Step nine: Wrap wire around leather, working up from turned loop. You will need to leave about 1/4″ of leather on the tail and will coil approximately 5 times. Make sure you wrap this tightly and take your time so it’s neatly coiled. Step ten: Cut the end from wire when you have almost reach the end of the leather. Use cutters to remove excess leather. Step eleven: Grasp the final coil and turn it up to create a loop using your chain nose pliers. Adjust the loop, making sure it’s flush to the top of the leather end with your round nose pliers. Use the chain nose pliers to gently compress the coils together to remove any gaps. Do this on both sides of your leather. Step twelve: Gently open one end loop to attach a clasp. Step thirteen: Attach the pendant to the front of the leather using pliers. Step thirteen: Wear!

    My Aim is True LS No Burst

    What song lyrics would you use for this stamped metal necklace? Let us know in the comments! Don’t forget to come back on Wednesday for the GIVEAWAY!

    Cheers,
    Margot and Avalon

    (*FTC DISCLOSURE: Blogger was provided product for this post and the giveaway, all opinions and instructions are 100%  her own.)

    *DIY Project Policy: Our tutorials are meant for your creative inspiration. Feel free to make and gift or wear these designs. Please make sure that you give credit to us as the designer if you make and share these designs on your blog or social sites. Please do not make and sell copies of our designs or sell them as kits. Please do not teach these designs as classes for profit. This is how we make our living and we ask that you respect our creativity and the time it takes to design, photograph and write these free tutorials. You may use a single photograph from each project online in blog round-ups or blog posts ONLY if you include a direct link back to our tutorial. Any use of these designs for retail sale for profit online in places like Etsy or eBay or in retail bricks and mortar, flea markets or outdoor fairs is not permitted. Thank you!

  • Welcome to Metal Stamping!

    Stamp it Pretty

    Welcome to metal stamping!  It’s fun, it’s easy and it’s a great way to create personalized jewelry for yourself, your family and your friends.  We’re going to be sharing tutorials, tips, tricks, tools and everything you need to get started and explore making metal stamped jewelry.  Yes, it may seem a little daunting swinging a one pound brass hammer at your hand, but with practice and perseverance you’ll be a pro in no time at all.

    We’ll show you how to stamp letters, words, messages and images into metal blanks.  We’ll share techniques for hammering, dapping, texturing and coloring the metal.  We’ll show you how to turn your stamped metal blanks into stylish and chic jewelry using a variety of simple jewelry making techniques. We’ll give you the best information in detail and depth, because we want you to succeed.  We’ll have videos, step by step tutorials and a lot of eye candy for inspiration.  We work with metal stamps on a regular basis and we LOVE stamping.  We think you’re going to love it too.

    Get ready to ‘get hammered’ with us and soon enough you’ll be able to say, “I can make metal stamped jewelry!”

    How cool is that?

    Welcome to metal stamping, we think you’re going to love it.  (PS: If you love the design above, you can find the tutorial here!)

    Follow us on Bloglovin’:

    Follow on Bloglovin

  • 12 Terrific DIY Metal Stamped Pendants

    12 Terrific DIY Metal Stamped Pendants

    This week’s metal stamping round up features plenty of inspiration with 12 Terrific DIY Metal Stamped Pendants.  Some of our favorite DIY bloggers have done it again with a plethora of pretty pendants.  I love the variety here in styles, mediums and metals.  Get the links to these projects below and be sure you visit these talented ladies and say hello!

    01.4

    Learn how to stamp and rivet with this tutorial from Happy Hour Projects.

    01.23

    Here’s another stunner from Happy Hour Projects, with a combination of copper and silver that’s sure to please!

    anchor1

    Anchors away!  Get in on the nautical trend with this layered stamped design from One Artsy Mama.

    04.21

    It’s a twofer, with fabulous stamped framed pendants from Happy Hour Projects.

    beachnecklace5

    More nautical themed loveliness with this starfish and stamped charm embellished set from One Artsy Mama for Angela Strand.

    bloomnecklace

    Get that spring feeling with this lovely bloom pendant from One Artsy Mama.

    grandmanecklace1

    Give grandma a gift she’s sure to treasure with this stamped washer pendant from One Artsy Mama.

    impressart10b

    Here’s a lovely reminder to be still from One Artsy Mama.

    metal201-12

    Feeling a little more, shall we say, cheeky?  Try this ‘fml’ pendant from Hands Occupied.

    Necklace

    Love, family and home, three things to cherish in this simply striking stamped pendant from Happy Hour Projects.

    key

    Stamp a key shaped blank to make a stunning one of a kind design with One Artsy Mama.

    yes-sir-necklace

    And last, but surely not least, here’s our ‘yes, sir’ mustache pendant for ImpressArt!

    There you go,  12 Terrific DIY Metal Stamped Pendants!  Which one is your favorite?  Let us know in the comments!

    Cheers,
    Margot and Avalon

  • 10 Minute Craft: Bottle Cap Necklaces

    Bottle Cap Necklaces Two

    These adorable little Bottle Cap Necklaces can be made in under 10 minutes so they’re perfect for the short attention span crafter! They make a fun project for teen parties, ‘girl’s night in’ gatherings or even summer camp art projects. You can find the pre-crimped bottle caps at craft stores and online. Just add a stamped metal blank and a sparkling SWAROVSKI crystal and you’re ready to rock and roll, baby. Good times!

    You will need:

    Vintage Bottle Caps
    ImpressArt Circle 1/2″ Stamping Blanks
    10-MM Jump Rings
    Ball Chain with Connector
    Beadalon Ball Pin Medium Head Pin
    Folk Art Enamel Acrylic Paint, Licorice
    ImpressArt Stamp Straight Tape
    ImpressArt- Basic Metal Stamp Set, Lowercase, 3mm
    Ergo-Angle Metal Stamping Hammer
    ImpressArt 2 by 2-Inch Steel Block
    ImpressArt 2-Hole Punch Kit
    Round Nose Pliers for Jewelry Making
    2 pairs ImpressArt Chain Nose Pliers
    ImpressArt Flush Cutters
    Cotton swab
    Paper towel

    Bottlecap Necklace Steps

    Step one: Use 2-hole punch to make a hole in the top center of bottle cap. Step two: Stamp “p o p” into blank. (You could also stamp ‘s o d a’ or ‘c o l a’.) Step three: Punch hole in top of blank. Step four: Slide crystal on head pin and coil top. Cut off excess wire, tuck under. Step five: Swipe ink across surface of blank with cotton swab, wipe off excess with paper towel. Attach bottle cap, blank and crystal together with jump ring. Step six: Slide pendant on ball chain.

    Bottle Cap Necklace Two

    Watch me share this project on our local NBC Affiliate here:

    That’s it! Fun fast and fabulous Bottle Cap Necklaces! Stamp up a six pack to go!

    Cheers,
    Margot and Avalon

    *DIY Project Policy: Our tutorials are meant for your creative inspiration. Feel free to make and gift or wear these designs. Please make sure that you give credit to us as the designer if you make and share these designs on your blog or social sites. Please do not make and sell copies of our designs or sell them as kits. Please do not teach these designs as classes for profit. This is how we make our living and we ask that you respect our creativity and the time it takes to design, photograph and write these free tutorials. You may use a single photograph from each project online in blog round-ups or blog posts ONLY if you include a direct link back to our tutorial. Any use of these designs for retail sale for profit online in places like Etsy or eBay or in retail bricks and mortar, flea markets or outdoor fairs is not permitted. Thank you!

    (FTC DISCLOSURE: *This post contains affiliate links, if you click on a link and make a purchase we get a small percentage of the sale. The blogger is employed by ImpressArt, but this is her personal blog. All opinions are 100% her own!)

  • DIY Metal Stamped Earrings

    May Flowers Earrings Two Text copy

    April showers may bring May flowers, but you can bring them even sooner by making these pretty May Flowers DIY Metal Stamped Earrings!  Using a design stamp, texture hammer and ImpressArt‘s new SoftStrike blanks you can make stunning boutique chic jewelry in under 30 minutes.  You’ll be amazed how easy it is to make these earrings and we’re going to show you how!

    You will need:
    (*DISCLOSURE)

    2 ImpressArt, Pewter Stamping Blanks, River Stone
    2 ImpressArt Stamping Blank Circle, 1.25-Inch, Alkeme
    2 Beadalon Jump Ring 6mm Silver, Plated
    2 Dapped and Spring Ear Wire, Nickel Free Silver Plate
    Folk Art Enamel Acrylic Paint, Licorice
    Ergo-Angle Metal Stamping Hammer
    ImpressArt 2 by 2-Inch Steel Block
    Texturing Hammer
    ImpressArt Face Chasing Hammer
    Double Metal Punch, 1.5mm & 2mm
    ImpressArt- 6mm, Tulip Design Stamp
    8 Punch Dapping Block Set
    Paper towels

    Step one: Center your tulip stamp making sure the entire stamp is in contact with the pewter blank.  Strike top of stamp once with a firm tap.  (Design Tip Don’t hit the stamp more than once to prevent skipped or ghost impressions.)  Step two: Use the round end of a ball pein hammer to create texture around the edge of your blank.  Step three:  add a hole at the center bottom of your blank using the smaller side of the 2-hole punch.  Step four: Swipe black acrylic paint, multi-surface paint or jewelry glaze across surface of blank.  Allow it to set for a minute and then wipe clean with a paper towel.

    Steps 5-8

    Step five: Place blank in dapping block with stamped side facing up.  Strike top of dapping tool with your brass hammer, moving the tool around in the dapping block to curve or round your blank.  Step six: Strike the blank working from the edges into the center using the texture hammer.  Alternate the placement of the hammer so you get a nice variety of marks.  Step seven: Add paint.  Step eight: Remove paint.

    May Flowers 9-12

    Step Nine: Use smaller side of 2-hole punch to add a hole to the top of each of your textured blanks.  Step Ten: Attach the blanks together as shown using pliers to open and close jump ring securely.  Step Eleven: Attach ear wire to top of each earring.  Step Twelve: Make two!

    May Flowers One Banner copy

    Would you make and wear these May Flowers DIY Metal Stamped Earrings?  How would you style them?  Let us know in the comments!

    Cheers,
    Margot and Avalon

    (*FTC DISCLOSURE: There are affiliate links in this post, if you click on a link to make a purchase we get a small percentage of the sale. That’s how we keep the lights on, folks!)

    *DIY Project Policy: Our tutorials are meant for your creative inspiration. Feel free to make and gift or wear these designs. Please make sure that you give credit to us as the designer if you make and share these designs on your blog or social sites. Please do not make and sell copies of our designs or sell them as kits. Please do not teach these designs as classes for profit. This is how we make our living and we ask that you respect our creativity and the time it takes to design, photograph and write these free tutorials. You may use a single photograph from each project online if you include a direct link back to our tutorial. Any use of these designs for retail sale for profit online in places like Etsy or eBay or in retail bricks and mortar, flea markets or outdoor fairs is not permitted. Thank you!

    Design t-shirts online with CustomInk!

  • DIY Hammered Metal Stamped Necklace

    Become Hammered Metal Stamped Necklace

    (*FTC DISCLOSURE BELOW)

    “What we think, we become.” Buddha

    Base metal stamping blanks can look a little, well, cheap.  Adding texture helps take them from meh to marvelous, and it’s very easy to do.  The concept for this hammered metal stamped necklace started with some gold Buddha charms we found on clearance at a big craft chain. We love positive, uplifting jewelry.  Plus, it’s pretty!  You’ll learn how to add texture, stamp along the edge and add holes at the top of the heart to turn this into a necklace.

    What you need:
    ImpressArt, Heart, Brass, 1 1/2″ Stamping Blank
    Antique Brass Buddha Head Charms
    2 8″ segments 22K Gold Plated Slim Rolo Chain
    10mm Gold Plated Clasp
    4 10mm 6mm Jump Rings
    Folk Art Enamel Acrylic Paint, Licorice
    Cloth or paper towel
    Wood Handle Scratch Awl
    Beadalon Ball Pein Hammer
    ImpressArt Metal Stamping Kit- Newsprint Lowercase
    ImpressArt Stamp Straight Tape
    ImpressArt Hole Punch Pliers
    Marker

    Steps 1-2

    Step one: Place your blank on the bench block and use the round or ball end of a ball pein hammer to add texture.  Strike it all over, including along the sides to create a hammered finish.  Don’t hit it too hard, or too soft, somewhere in between.  The blank may start to curl a little as you hammer, but don’t worry.  When you finish you can turn it over and use the flat side of the ball peen hammer or the brass hammer to flatten it.  Step two: Tape the hammered blank down to the bench block.  Stamp along the curve of the left edge.  Space your stamps out evenly as you go.  I didn’t mark these, but you can use a ruler and a pencil to help mark even placement.  Finish by adding a period using an awl or a period punctuation stamp.  Strike the top of the awl with your brass hammer, don’t overdo this or you could pierce the blank.

    Steps 3-4

    Step three: Wipe some Martha Stewart jewelry glaze across the letters.  Let it sit for a few seconds, then wipe it off with a paper towel or cloth.  Step four: The drill holes should be placed at the top center of both sides of the heart.  You can use a marker and a ruler or you can eyeball this.  Use the smaller side of the 2-hole punch, twisting it down until you feel it pierce the metal, then twisting it back up to remove it from the tool.  You don’t have to screw the tool all of the way down, that can potentially scratch or mar the metal.  Just twist until you feel that release and then remove it.

    Steps 5-6

    Step five: Use chain and bent nose pliers to attach the charm and the jump rings to the pendant.  (Here’s a video to help if you’ve never done this before.)  Step six: Attach the chain to the jump rings on your pendant and attach a jump ring to one open end and a jump ring and clasp to the other.

    Become Metal Stamped Necklace

    Make a hammered metal stamped necklace and become…fabulous!  We love adding texture to our metal pieces, even without adding text it gives them an artisan appeal.  You can do so much with this technique, try only hammering the edges, or half of the blank or mix hammered and polished pieces in one design.  So much to love here!  Just so you know, as you are hammering a piece of metal you are actually changing the molecular structure.  This is called work hardening.  The key is not to over hammer, or the metal can become brittle.  Softer metals can be strengthened by hammering, it works very well on soft jewelry wire when making findings like ear wires or clasps.  Stay tuned, because we’ll be showing you how to make your own findings in upcoming posts.

    Cheers,
    Margot and Avalon

    (*FTC DISCLOSURE: Post contains affiliate links, if you click on a link and make a purchase we get a small percentage of the sale.  That’s how we keep the lights on, folks!)

    *DIY Project Policy: Our tutorials are meant for your creative inspiration. Feel free to make and gift or wear these designs. Please make sure that you give credit to us as the designer if you make and share these designs on your blog or social sites. Please do not make and sell copies of our designs or sell them as kits. Please do not teach these designs as classes for profit. This is how we make our living and we ask that you respect our creativity and the time it takes to design, photograph and write these free tutorials. You may use a single photograph from each project online if you include a direct link back to our tutorial. Any use of these designs for retail sale for profit online in places like Etsy or eBay or in retail bricks and mortar, flea markets or outdoor fairs is not permitted. Thank you!

    Don’t miss a post! Follow us with Bloglovin’:

    Follow on Bloglovin

  • DIY Runs with Scissors Bracelet

    Runs with Scissors Bracelet

    We had so much fun making this Runs with Scissors Bracelet with Mark Montano’s stunning new rubber stamps line for Craffiti Direct. Mark is one of our favorite people on the planet and he’s an amazing designer. Mark and Craffiti Direct *sent us two sets of vintage scissor stamps and we immediately knew what we wanted to do with them. The graphics are so rich and detailed that they looked fabulous on the tobacco brown leather wrist band.  Plus clear stamps are so much easier to use because you can see where you’re placing the images before you stamp. This is a uni-sex idea, you can change up the text to reflect the person for whom you’re making this. We wanted a rustic, funky vibe, so this is not perfectly stamped. Feel free to stamp more perfectly if that’s your thang. It’s your thang, do whatcha wanna do.

    PicMonkey Collage

    Just a few caveats before we get started: You need to be sure to use a permanent ink like Ranger Archival or Staz-On. Make sure you that you file or sand the edges of your metal thoroughly if you cut it yourself. These shears are designed for use with 20 gauge or thinner sheet metal.  They won’t work on thicker metal.  Be very careful if you decide to use them as they’re sharp enough to cut through metal so they’re definitely sharp enough to do some damage to you. Being craftastrophe prone, I take my time when working with tools like these. We also provided links below to metal parts that are pre-cut so you can get right to stamping!

    Level: Intermediate

    Skills: rubber stamping, metal stamping, meta

    You will need:

    leather wristband with snaps(to make it deeper brown use leather dye)
    24 Gauge Copper Sheet OR Copper Tag with Holes
    Vintage Scissors Stamps
    Waxed Linen Cord Black
    Ranger Archival Ink Black
    Folk Art Enamel Acrylic Paint, Licorice
    Impressart 3mm Lowercase Economy Metal Stamp Set
    ImpressArt Metal Shears
    ImpressArt Nylon Jaw Bracelet Bending Plier
    ImpressArt 2-Hole Punch
    Leather Hole Punch or Crop-A-Dile
    ImpressArt Metal Stamping Hammer
    Chasing Hammer
    ImpressArt Steel Stamping Block
    Impress Art Stamp Straight Tape
    Black marker
    Ruler
    Cotton swab
    Paper towel

    Amazon.com Widgets

    Amazon.com Widgets

    1-4

    Step one: If you are cutting your own piece from sheet metal or a strip, measure and mark a 1″x2 1/4″ piece. Step two: Cut carefully using the metal shears. IMPORTANT: USE A METAL FILE OR HEAVY GRIT SAND PAPER TO SAND EDGES! Step three: Mark and punch holes in all four corners with 2-hole punch. Step four: Hammer around the edges with the ball end of your chasing hammer.

    5-8

    Step five: Use the holes in your cut metal piece to mark the placement of the first set of holes in your leather. Punch 1/16″ holes using an awl, leather punch or Crop-a-dile.  Step six: Use permanent ink and small scissors stamps to stamp handles and blades of scissors on your leather as shown. Step seven: You are stamping three lines into the blank using 16mm stamps. I started with the top and shortest line, counting the number of letters and spaces to find the center. Then I work out from there. This first line has a space in the center. The next two lines have A LOT of letters, so I started at the far left and worked my way over. You will need two pieces of tape to secure the blank. The lines are: bleeds glitter, runs with scissors, sleeps with glue gun… I used punctuation stamps to add commas and the ellipses. Step eight: Swipe across letters with black enamel paint on a cotton swab. Let the paint sit for 30-60 seconds. Wipe off excess with a paper towel.

    9-12

    Step nine: Use the bracelet bending pliers to create a slight arc in your stamped metal tag. Step ten: Mark the placement of your second set of holes so that you can lace the tag to the front of the bracelet. Use a leather punch, awl or Crop-a-dile to punch 1/16″ holes.  Step eleven: Lace tag to front of bracelet with waxed linen as shown. Thread linen cord ends through the top of the bracelet.  One goes into the tag hole and leather and the other through the leather.  Then cross the threads underneath and thread each one through the hole on the opposite side. Don’t tighten then down. Do this for all four sides.  Step twelve: Knot each one securely. Cut off ends leaving a little bit of excess as in photo.

    Runs with Scissors

    Phew! You did it!

    We hope you love this DIY Runs with Scissors Bracelet as much as we do. Check out Mark’s YouTube Channel, he dishes up TWO divine DIY videos every week. Tell ’em Madge sent ya.

    Happy Stamping,
    Margot and Avalon

    *DIY Project Policy: Our tutorials are meant for your creative inspiration. Feel free to make and gift or wear these designs. Please make sure that you give credit to us as the designer if you make and share these designs on your blog or social sites. Please do not make and sell copies of our designs or sell them as kits. Please do not teach these designs as classes for profit. This is how we make our living and we ask that you respect our creativity and the time it takes to design, photograph and write these free tutorials. You may use a single photograph from each project online if you include a direct link back to our tutorial. Any use of these designs for retail sale for profit online in places like Etsy or eBay or in retail bricks and mortar, flea markets or outdoor fairs is not permitted. Thank you!

    (Disclosure: Blogger was provided product for post, all opinions 100% her own. Post contains affiliate links, if you click on a link and make a purchase, we get a small percentage of the sale.)

    *DIY Project Policy: Our tutorials are meant for your creative inspiration. Feel free to make and gift or wear these designs. Please make sure that you give credit to us as the designer if you make and share these designs on your blog or social sites. Please do not make and sell copies of our designs or sell them as kits. Please do not teach these designs as classes for profit. This is how we make our living and we ask that you respect our creativity and the time it takes to design, photograph and write these free tutorials. You may use a single photograph from each project online in blog round-ups or blog posts ONLY if you include a direct link back to our tutorial. Any use of these designs for retail sale for profit online in places like Etsy or eBay or in retail bricks and mortar, flea markets or outdoor fairs is not permitted. Thank you!

  • 12 Terrific Metal Stamped Projects

    Twelve Terrific Metal Stamped Projects

    It’s time for another round up of DIY Metal Stamped Projects for your creative inspiration! These mixed media ideas are big on kitsch and full of fun. After all, anyone can figure out how to stamp a word or a letter on a blank, why not take your metal stamped jewelry to another level? Add beads, tassels, charms, vials, rivets and decoupage! Get the scoop on these DIY delights below.

    Bliss Metal Stamped Tassel Bracelets Two Text

    Feel flirty and fabulous in our DIY Metal Stamped Beaded Tassel Bracelets!

    Eye Candy Three

    More color? More fun! Our DIY Eye Candy necklace features blanks textured with metal stamps and emblazoned with vibrant colors.

    DIY Candy Stash Three

    Who says candy can’t be jewelry? We surely don’t! Carry an emergency stash in this playful DIY Candy Stash Necklace. Delish!

    Longitude Latitude Necklace LS Two

    Commemorate your vacation with our metal stamped DIY Longitude/Latitude necklace.

    Hashtag Pins 3  Final

    Make some #awesome Metal Stamped Hashtag Pins and showcase your social media savvy!

    Lucky Girl Hand Stamped Necklace Three Text

    Feel lucky in our DIY Lucky Girl Hand Stamped Horseshoe Necklace!

    Bottle Cap Necklace Two

    Got ten minutes? Stamp up some DIY Bottle Cap Necklaces!

    Runs with Scissors

    Are you so crafty it hurts? Make our Runs With Scissors Bracelet!

    Atlas Model Closer Text

    Show the love for the place you call home with our DIY Metal Stamped Atlas Pendants.

    Wonder Woman Cuffs copy

    Feel like a super hero in our DIY Wonder Woman Inspired Cuffs.

    Eyeball Text 2

    Scare up some fun with our DIY Eyeball Necklace.

    Bootiful DIY Bracelets

    And last but surely not least, celebrate Halloween in style with our Boo-tiful DIY Bracelets.

    12 Terrific Metal Stamped Projects, folks. Happy Stamping! Oh, and if you want to know what you need to get started, we have a post for that.

    Cheers,
    Margot

    Craftsy

  • Metal Stamped Positive Affirmations Necklace

    Positive Affirmations Necklace Yellow Text

    Staying on the sunny side, seeing the glass half full, focusing on the blessings, choosing joy, however you want to frame it, positive affirmations really do work. We get that upon which we focus, so focus on the joy and let the rest fall away. Here’s a lovely metal stamped necklace you can wear to remind yourself of the good stuff. These rectangle blanks make it easy for the beginner to be successful stamping, no worrying about lining the letters up horizontally! Just start in the center and work your way up and down. Just one swift tap of your hammer and you’re good to go. Add some faceted glass and SWAROVSKI ELEMENTS beads to add sparkle and you’re sure to garner tons of compliments. I wore this design to a trade show and everyone loved it. Here’s how you can make a Metal Stamped Positive Affirmations Necklace (and some matching Yes, This earrings) of your own!

    You will need:
    9 ImpressArt, Pewter Stamping Blanks, Rectangle (7 for necklace, 2 for earrings)
    11 Preciosa Czech Fire 8mm Polished Glass Bead, Faceted Round, Half Coating Silver, 100-Pack
    12 Swarovski Crystal 5000 6mm Jet Faceted Round Beads
    8 SWAROVSKI ELEMENTS Crystal Moon Pendant #6722 20mm Crystal AB
    4 SWAROVSKI ELEMENTS Crystal #5000 4mm Round Beads Jet
    2 4mm Freshwater Pearl Beads
    43 Beadalon 10-MM Jump Rings Silver Plated
    18″ Beadalon Chain Rolo Large Silver Plated
    Beadalon Lobster Clasp Swivel
    2 Beadalon Dapped and Spring Ear Wire
    Beadalon Ball Tipped Head Pin
    ImpressArt- Basic Newsprint Uppercase Font Set
    ImpressArt Design Stamps, 6mm, Daisy
    Folk Art Enamel Acrylic Paint, Licorice
    Paper towel
    Ergo-Angle Metal Stamping Hammer
    ImpressArt 2 by 2-Inch Steel Block
    Beadalon Leather Pad For Block and Anvil
    ImpressArt Stamp Straight Tape
    ImpressArt Chain Nose Pliers
    ImpressArt Bent Nose Pliers
    Beadalon Round Nose Pliers

    Positive Affirmations 1-4

    1. Stamp words on blanks. Tape top of blanks to keep them stable and start in center working up and down blank. Stamp necklace blanks: create, sparkle, smile, give, love, create.  I added a daisy to the center ‘love’ blank for fun.  Stamp earring blanks: yes, this. 2. Use black paint or a Sharpie marker to ink letters.  Wipe clean.  3.  Make coiled top dangles with your beads.  Slide bead on wire, grasp top of wire with round nose pliers and bend wire flush to the top of bead as shown. 4. Move pliers 1/2 turn.  Use chain nose pliers or your fingers to coil wire tail tightly around core wire as in photo.  Cut off excess wire with flush cutters and tuck the little extra wire into the bottom of the coil with chain nose pliers.  (Here’s a link to my video that shows you how to make wrapped head pin beads if you’ve never done this before!)

    Positive Affirmations 5-7

    5.  This is how your coiled beads should look when finished! 6. Open jump rings to attach the beads and pendants starting at the center and moving side to side.  (Here’s a link to my video on how to open and close jump rings below in case you’ve never done this before!)  7. Attach the final beads.  Attach the clasp to once side of the chain and a jump ring to the other. To make matching earrings, coil the smaller beads and attach them along with the stamped pendants to your ear wires using jump rings.

    Positive Affirmations Necklace Pink

    Wear your Metal Stamped Positive Affirmations Necklace with pride because, you made it yourself!  Yes, this.

    Cheers,
    Margot and Avalon

    *DIY Project Policy: Our tutorials are meant for your creative inspiration. Feel free to make and gift or wear these designs. Please make sure that you give credit to us as the designer if you make and share these designs on your blog or social sites. Please do not make and sell copies of our designs or sell them as kits. Please do not teach these designs as classes for profit. This is how we make our living and we ask that you respect our creativity and the time it takes to design, photograph and write these free tutorials. You may use a single photograph from each project online in blog round-ups or blog posts if you include a direct link back to our tutorial. Any use of these designs for retail sale for profit online in places like Etsy or eBay or in retail bricks and mortar, flea markets or outdoor fairs is not permitted. Thank you!

    (This blog uses affiliates links, if you click on them and make a purchase, we get a small percentage of the sale.  That’s how we keep the lights on, folks!)

  • Shine DIY Metal Stamped Layered Necklace

    Shine Finished Four

    This Shine DIY Metal Stamped Layered Necklace is simple, striking, and layered with a lot of shine and sparkle. If you’re making this, you’ll be hammering, stamping, dapping and creating a coiled dangle, lots to learn and love! When you finish, you’ve got a little bauble that reminds you to shine your little light in the darkness. How cool is that?

    You will need:

    Folk Art Enamel Acrylic Paint, Licorice
    ImpressArt, 8 Petal Flower, Copper, 15/16″ Stamping Blank
    ImpressArt, 6 Petal Flower, Nickel Silver, 1″ Stamping Blank
    Preciosa Czech Fire 8mm Polished Glass Bead, Faceted Round, Full Coating Silver, 75-Pack
    Beadalon 10-MM Jump Ring, Nickel Free Silver Plate
    Head Pins Ball Ends Ball Tips
    Head Pins Ball Ends Ball Tips
    Jewelry Ball Chain Necklaces with Lobster Clasp, 18-Inch, Bright Silver
    ImpressArt Uppercase Alphabet Stamps ‘Newsprint’ 1/8 Inch (3mm) – 1 Set
    ImpressArt 1 Pound Metal Stamping Hammer
    ImpressArt 2 by 2-Inch Steel Block
    Metal 2 Hole Punch
    ImpressArt Stamp Straight Tape
    ImpressArt Chasing Hammer
    Round Nose Pliers
    Bent Chain Nose Pliers
    Flush Cutters
    Dapping Block Set
    Cotton swab
    Paper towel

    Steps 1-4

    Step one: Use the round end of your chasing hammer to strike the blanks repeatedly creating hammered texture. Step two: Stamp S H I N E on your larger blank, one letter per petal. This leaves one petal unstamped. Step three: Use two-hole punch to pierce a hole in the unstamped petal of your flower. Add a hole to one petal of the copper flower. To darken the letters, use black enamel paint. Use a cotton swab to wipe the paint into the letters. Wipe off excess with a paper towel. Step four: Place copper flower in dapping block and use corresponding punch and your brass hammer to curve the shape as in photo. Hammer flat end of punch while moving round end in form on each hit to get a rounded shape.

    Steps 5-8

    Step five: Make the coiled dangle. Insert head pin into bead. Grasp wire at top of bead with round nose pliers. Bend wire to a 90 degree angle. Step six: Move pliers 1/2 turn. Grasp wire and bend over top of pliers forming loop. Grasp wire tail with chain nose pliers and wrap tightly from bottom of loop to top of bead. Step seven: Nip off wire tail with wire cutters. Tuck remaining tail into bottom of coil with chain nose pliers. Step eight: Use chain and bent nose pliers to open jump ring. Thread large pendant, small pendant and bead on jump ring in that order. Close jump ring securely with tension.

    Shine Finished Five

    You’ll love the movement of this necklace when you wear it. The hammered metal and faceted bead give it lots of sparkle!

    Shine Finished Three

    That’s how you make our Shine DIY Metal Stamped Layered Necklace. Fun, fast and fabulous. You can change the words, fonts, colors of metals and beads to make this uniquely your own.  That’s the fun of metal stamping, you get to share your story. What story are you going to share?

    Happy stamping,
    Margot and Avalon

    *DIY Project Policy: Our tutorials are meant for your creative inspiration. Feel free to make and gift or wear these designs. Please make sure that you give credit to us as the designer if you make and share these designs on your blog or social sites. Please do not make and sell copies of our designs or sell them as kits. Please do not teach these designs as classes for profit. This is how we make our living and we ask that you respect our creativity and the time it takes to design, photograph and write these free tutorials. You may use a single photograph from each project online if you include a direct link back to our tutorial. Any use of these designs for retail sale for profit online in places like Etsy or eBay or in retail bricks and mortar, flea markets or outdoor fairs is not permitted. Thank you!