Tag: how to make metal stamped jewelry

  • DIY Tassel and Stamped Charm Bracelets

    Bliss Metal Stamped Tassel Bracelets Two Text

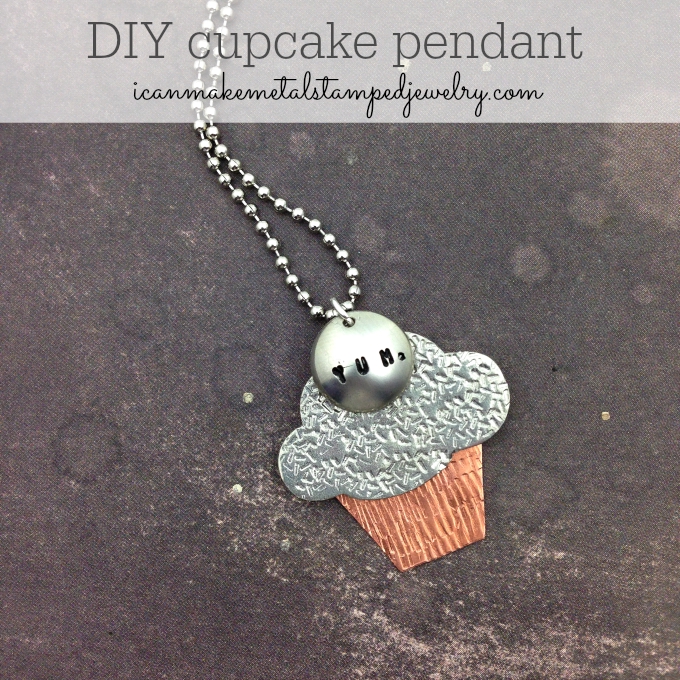
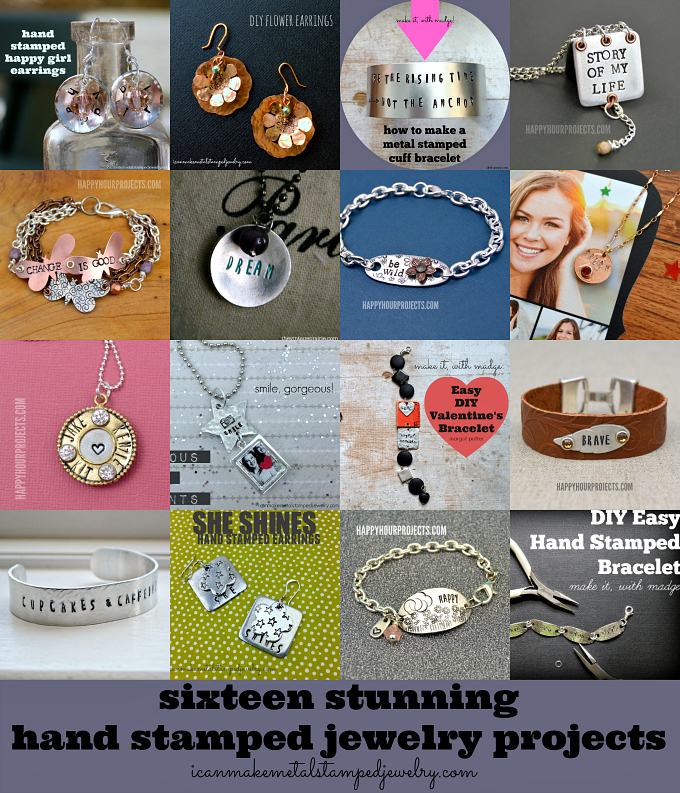
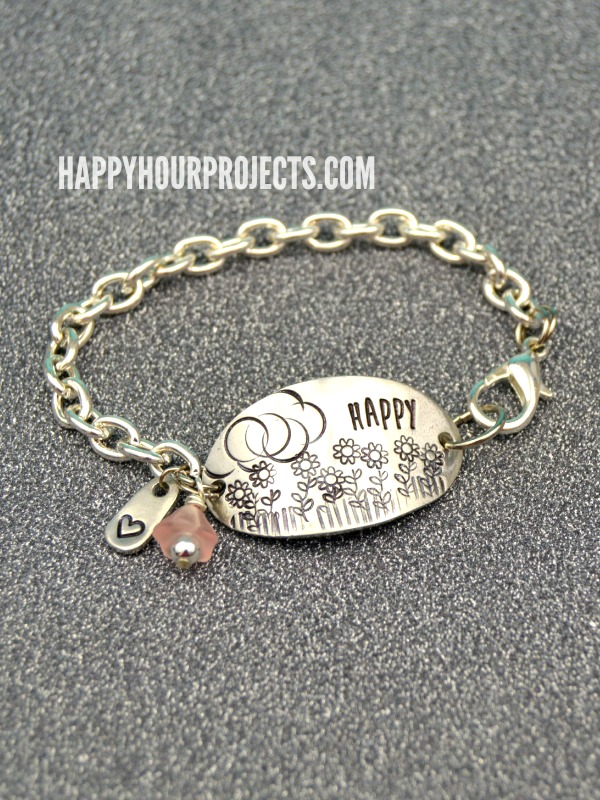
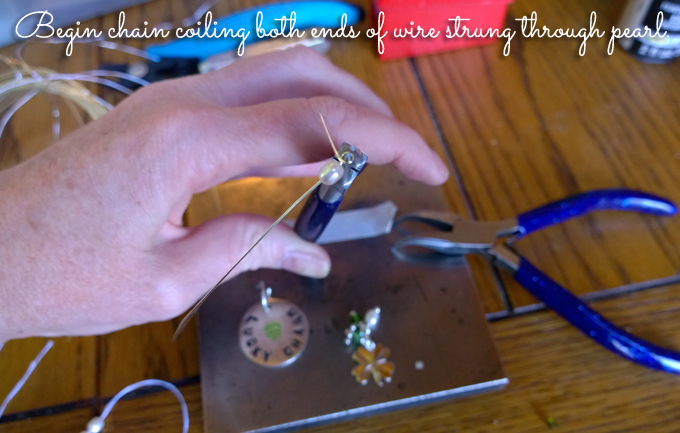
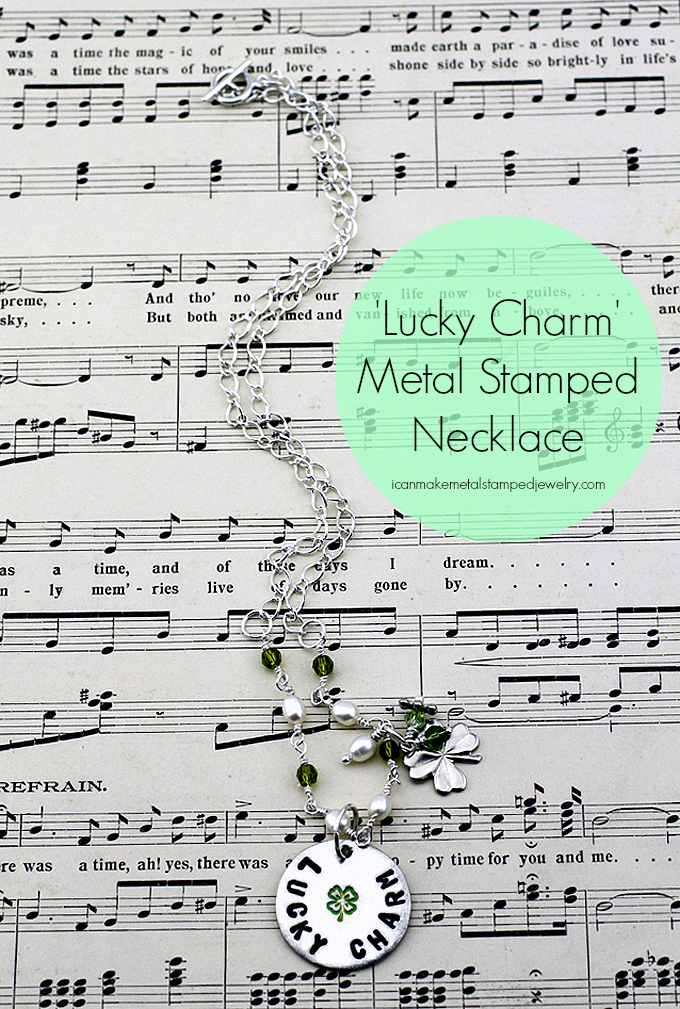
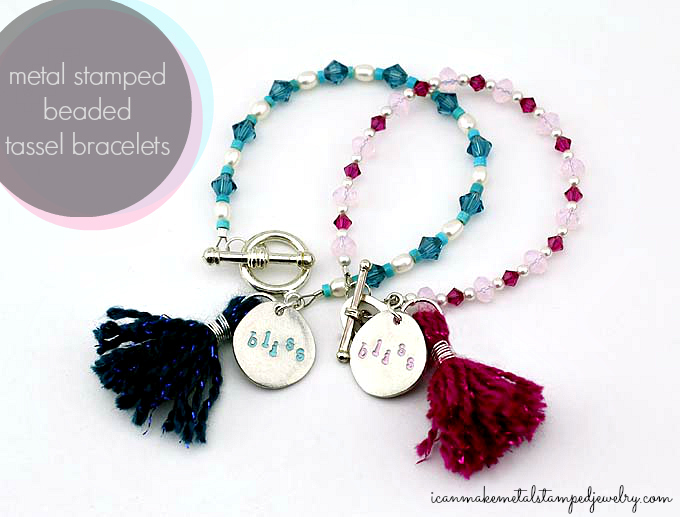
    Just in time for warmer weather, pretty beaded bracelets get a kicky update with stamped charms and handmade tassels. Make your own DIY Tassel and Stamped Charm Bracelets in an array of colors and you’ll be in style bliss. We’re loving the Boho appeal here, try changing up the beads, colors and message to suit your own style. Speaking of which, how would you style these? We’d love to know!  Big love to the amazingly talented Ms. Pattie Wilkinson for sending us her fabulous *PattieWack tassel tools!  They make quick and easy work of making gorgeous tassels. 

    You will need:

    ImpressArt, Pewter Stamping Blanks, River Stone, 3/4″
    3-4mm Swarovski Crystal Beads
    4mm gemstone beads
    3-4mm Freshwater Pearls
    Beadalon 19-Strand Bead Stringing Wire, 0.018
    Beadalon Toggle Clasps Small Silver Plated
    2 Tube Crimp, Silver -2x2mm
    3 Beadalon Jump Rings 6mm Silver Plated
    Beadalon 10mm Jump Ring Silver Plated
    German Style Wire, Round, Silver Plated, 24 gauge
    Lion Brand Yarn Bonbons Yarn, Brights
    Folk Art Enamel 2-Ounce Acrylic Paint
    ImpressArt Newsprint Lowercase Alphabet Metal Stamps
    ImpressArt 2 by 2-Inch Steel Block
    ImpressArt Stamp Straight Tape
    Ergo-Angle Metal Stamping Hammer
    Pattiewack Designs Mini Tassel Maker
    ImpressArt Chain Nose Pliers
    ImpressArt Bent Nose Pliers
    ImpressArt Flush Cutters
    Beadalon Beading Scissors

    Tassell Bracelet 1-4

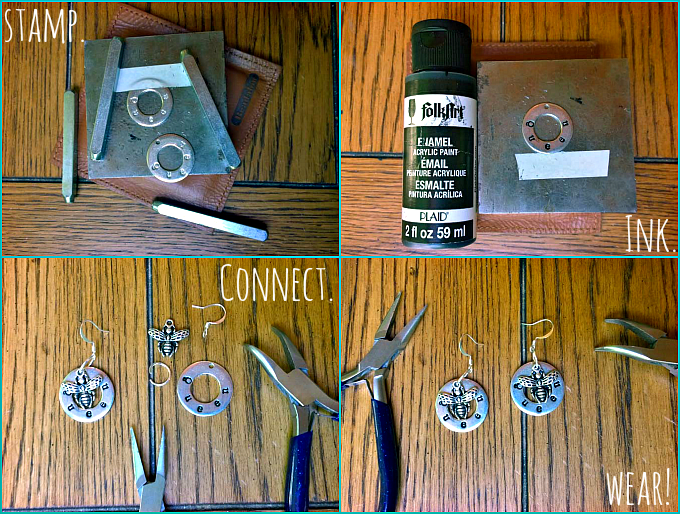
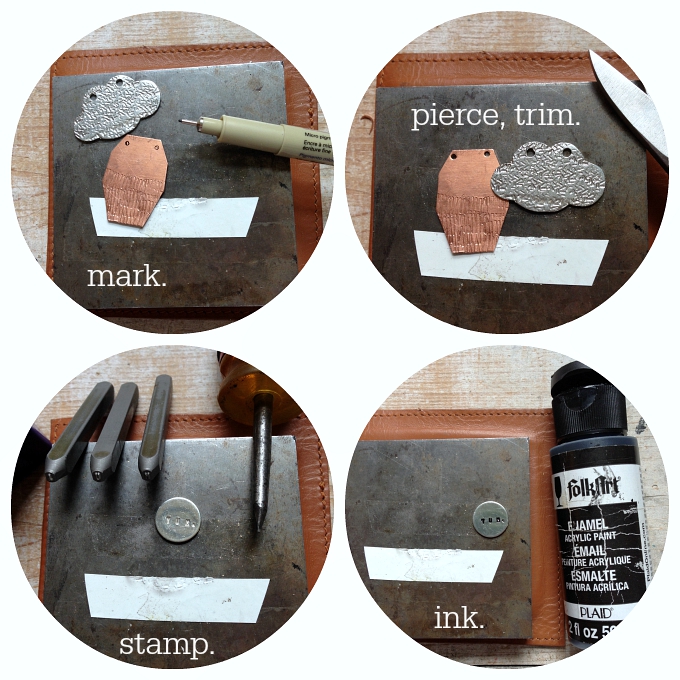
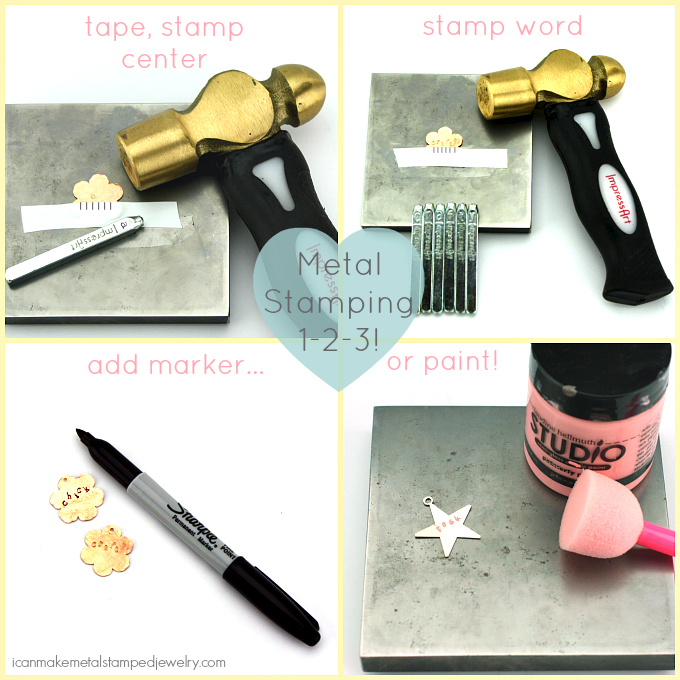
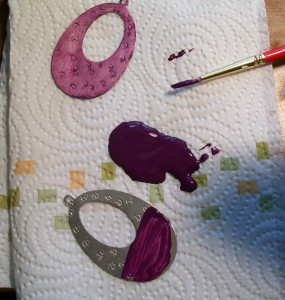
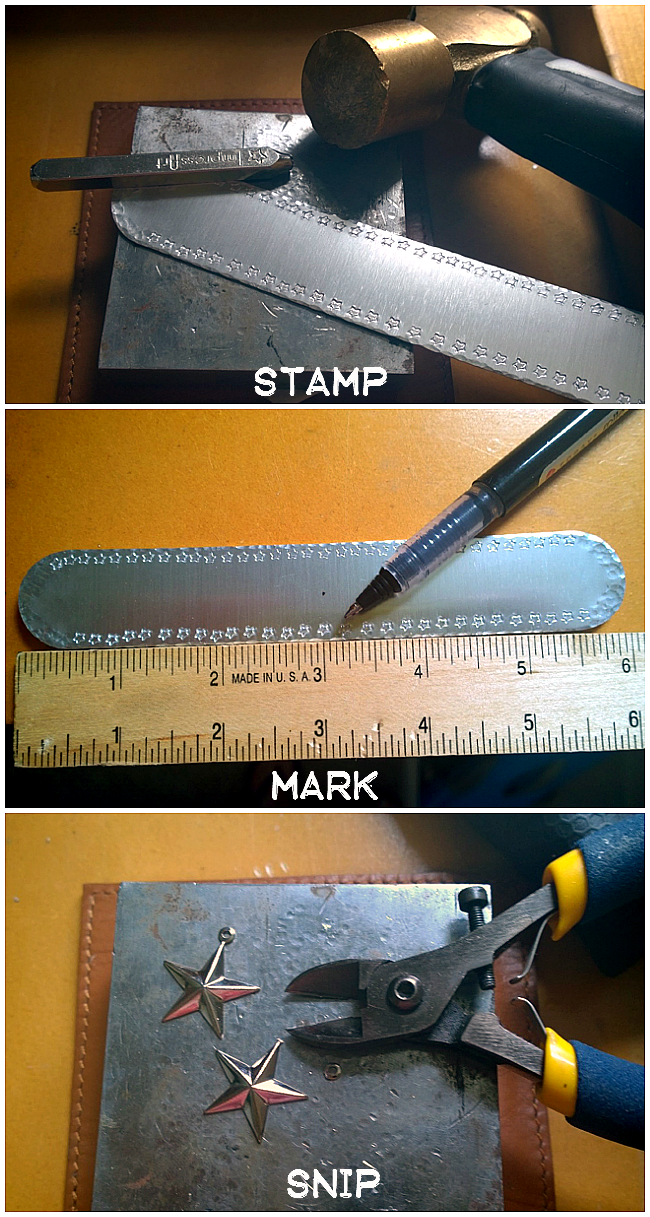
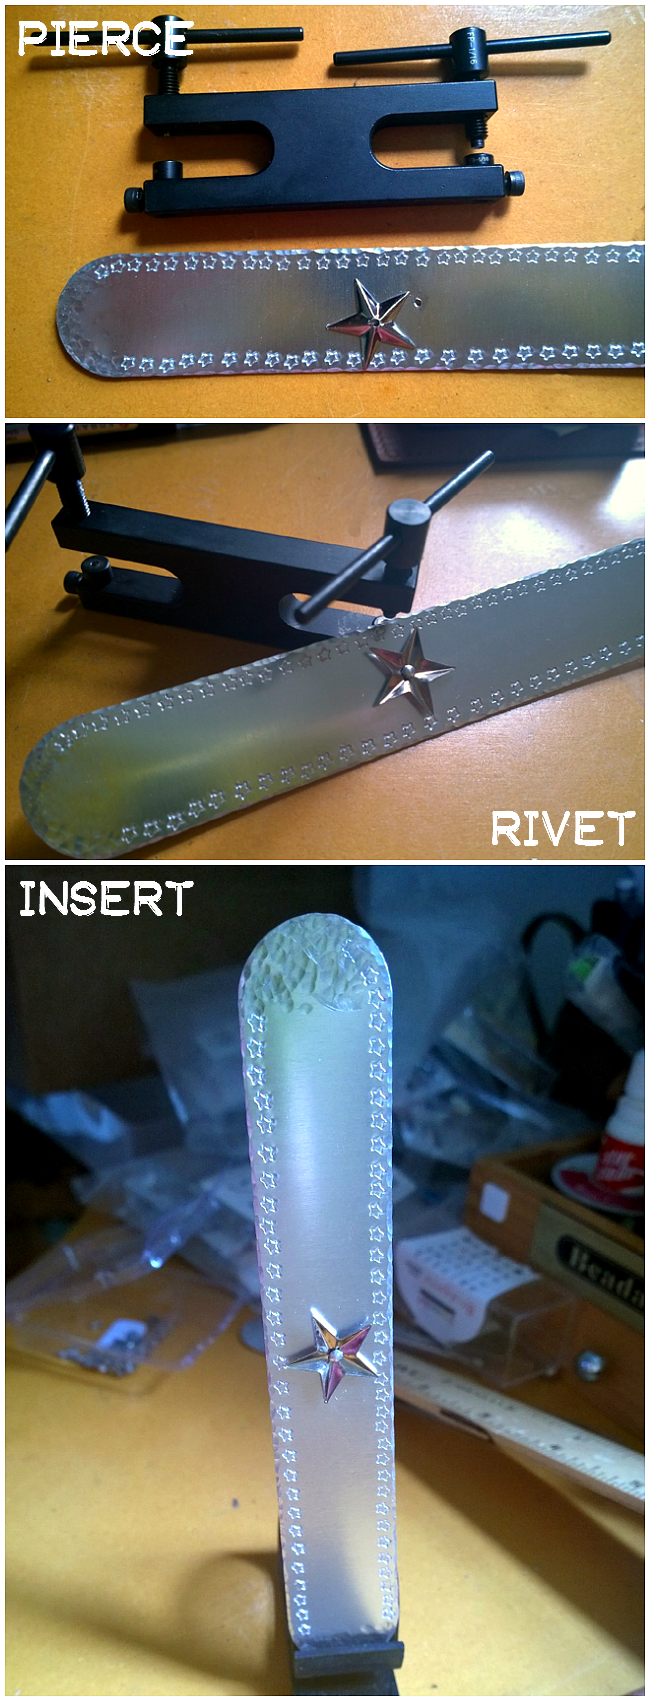
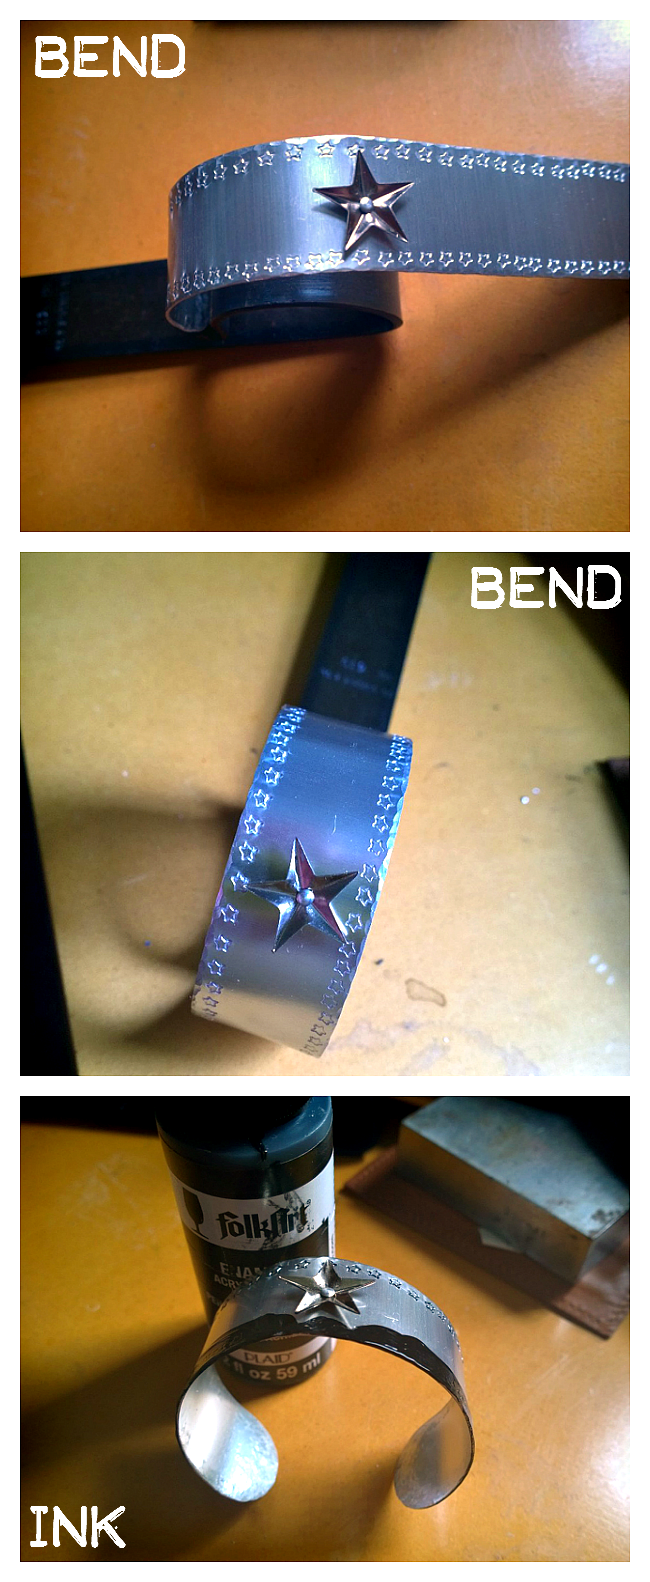
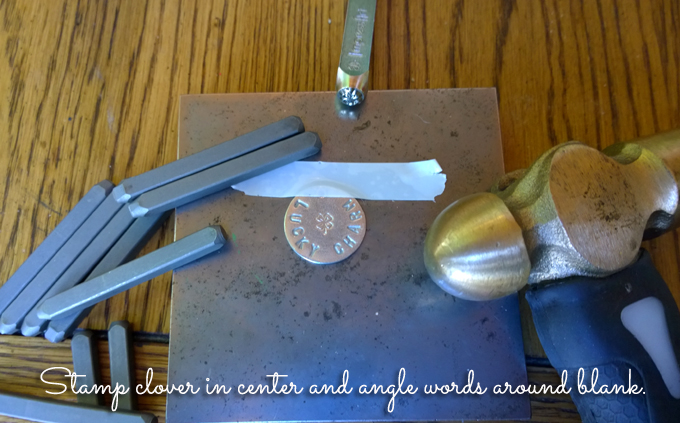
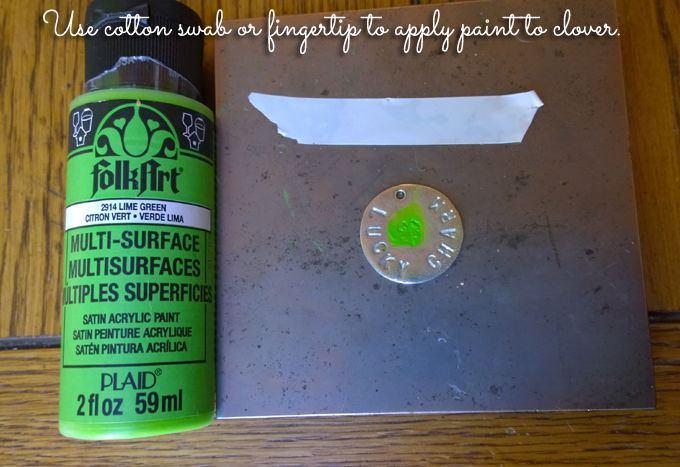
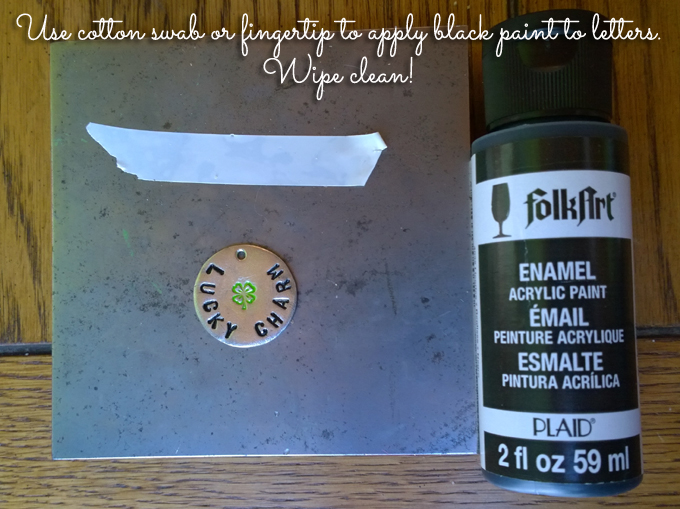
    One: Tape blank to bench block. Stamp ‘bliss’, alternating placement of letters. Design tip: Start with the ‘i’ in the center and work to both sides. Two: Wipe multi-surface paint on blank. Wipe paint from surface. Three: Place beads on board in a pattern, build beads up to numbers on side to fit your wrist. Add the two numbers together to get the finished length in inches. Our bracelet is 7″ including the clasp. Four: Thread wire into crimp bead. Thread wire back through clasp end and back into crimp tube. Hold wires uncrossed to crimp. Check out this video to learn how to crimp correctly!

    Tassell Bracelet 5-8

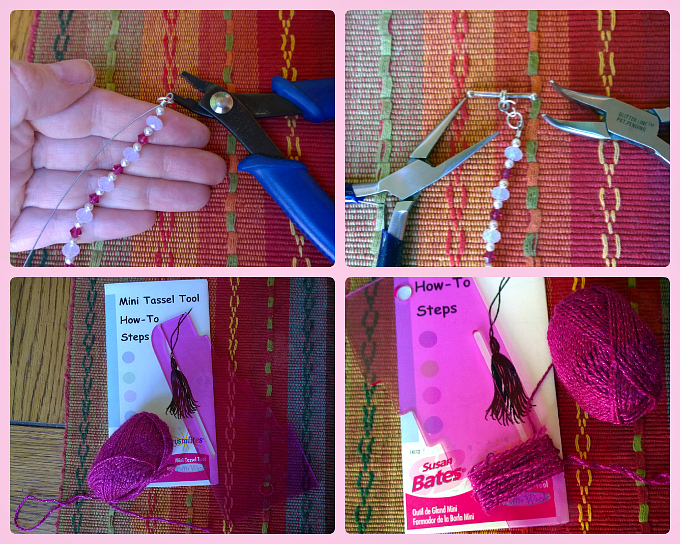
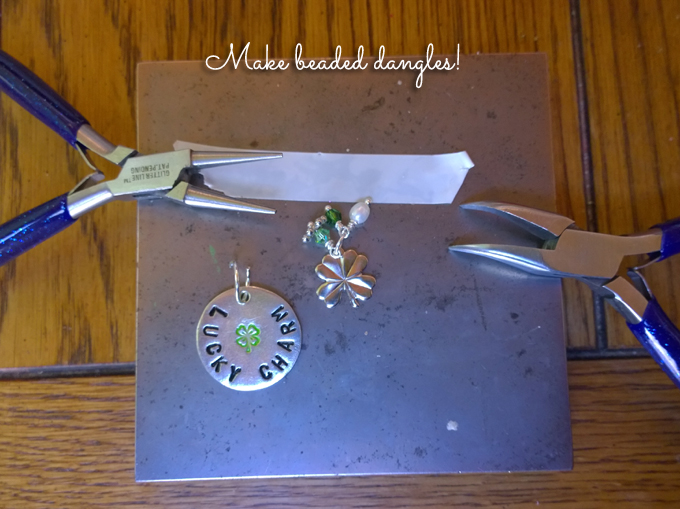
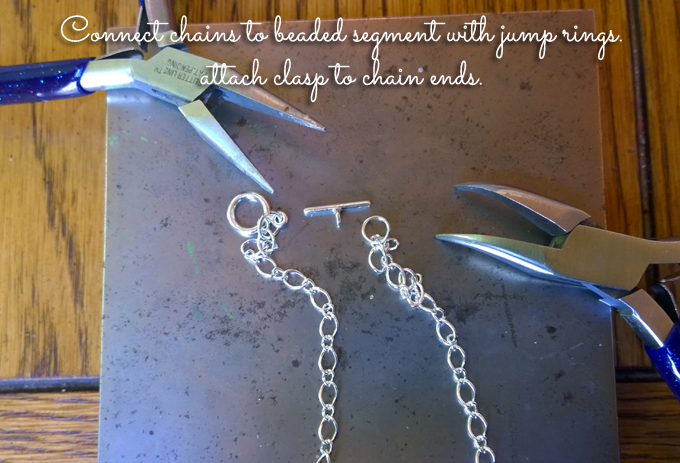
    Five: Finish bracelet with crimp bead attached to jump ring. Design tip: Make sure bracelet is rounded to allow a little space between your beads, this keeps the bracelet from being too stiff when worn. Six: Attach finished bracelet to bar side of toggle clasp with a second jump ring. This makes it easy for the bar to fit into the circle element of the clasp. Seven: Get your yarn and mini-tassell tool ready! Eight: Wrap the yarn around the second notch on the tassel tool as in photo.

    Tassell Bracelet 9-12

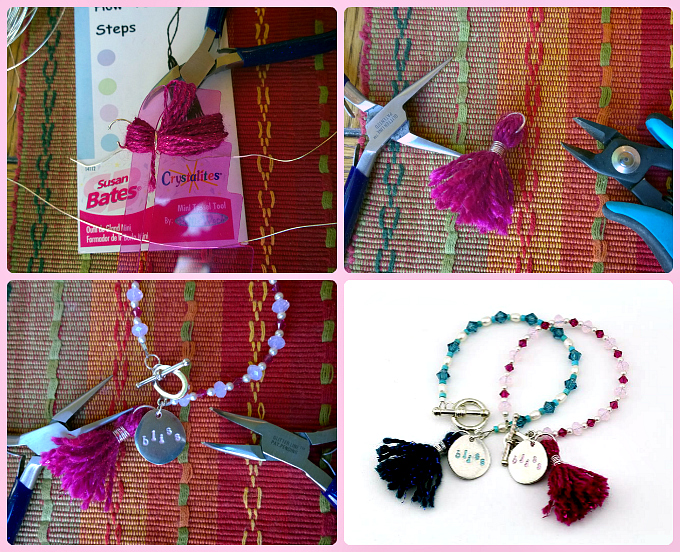
    Nine: Follow instructions for tassel tool.  Instead of using yarn to tie off the top and bottom, we’re using a large jump ring and wire. Thread jump ring into top of tassel. Wrap wire tightly several times around center of tassel.  Cut bottom of tassel with scissors into fringe. Side tassel from tool. Use scissors to even tassel ends. Ten: Finish wrapping tassel tightly with wire, cut off excess. Tuck ends into tassel with chain nose pliers. Eleven: Attach tassel and tool to circle side of toggle using a smaller jump ring as in picture. Twelve: Make more!

    DIY Tassel and Stamped Charm Bracelet LS Text

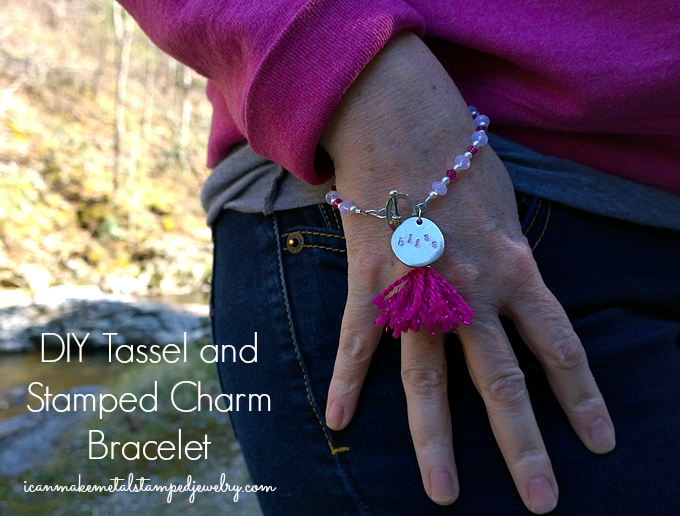
    That’s it, fun, fast and fabulous DIY Tassel and Stamped Charm Bracelets, make an arm full!

    Cheers,
    Margot and Avalon

    FTC DISCLOSURE: Bloggers were provided with samples for use in this project.  All opinions are 100% their own!

    *DIY Project Policy: Our tutorials are meant for your creative inspiration. Feel free to make and gift or wear these designs. Please make sure that you give credit to us as the designer if you make and share these designs on your blog or social sites. Please do not make and sell copies of our designs or sell them as kits. Please do not teach these designs as classes for profit. This is how we make our living and we ask that you respect our creativity and the time it takes to design, photograph and write these free tutorials. You may use a single photograph from each project online in blog round-ups or blog posts if you include a direct link back to our tutorial. Any use of these designs for retail sale for profit online in places like Etsy or eBay or in retail bricks and mortar, flea markets or outdoor fairs is not permitted. Thank you!

  • 10 Minute Craft: Queen Bee Earrings

    Queen Bee Earrings One

    Got ten minutes? Then you’ve got enough time to make these punny earrings and show ’em who’s Queen Bee. Heck, you can make up a whole hive’s worth! In fact, you can make these Queen Bee Earrings in just three easy steps, just stamp, ink, connect and wear! Even the busiest gal has time for that. And don’t be afraid, the new Soft Strike pewter stamping blanks from ImpressArt make it easy to make a great first impression. You got this!

    What you need:

    2 ImpressArt Stamping Blank Washer, 15/16-Inch, Pewter
    2 Fine Silver Plated Pewter Small Honey Bee Charms
    2 Beadalon 10-MM Jump Ring, Silver Plated
    2 Beadalon Dapped and Spring Ear Wire, Silver Plated
    ImpressArt Newsprint Stamps in Lowercase and Uppercase
    ImpressArt 2 by 2-Inch Steel Block
    Ergo-Angle Metal Stamping Hammer
    ImpressArt Stamp Straight Tape
    ImpressArt Bent Nose Pliers
    ImpressArt Chain Nose Pliers
    Cotton swab
    Paper towel

    Steps 1-4

    Step one: Stamp ‘Q u e e n’ on each blank. Start at the bottom center with the letter ‘e’ and work up each side, spacing your letters evenly as in photo. Step two: Use cotton swab to dab ink into letters. Wipe excess off of surface with paper towel, leaving ink in the stamped areas. Step three: Connect the washer, charm and ear wire in that order to a 10mm jump ring using the bent and chain nose pliers. You may need to gently turn the loop at the bottom of your ear wire so they hang forward. Step four: Wear them with pride because you made them!

    “You can call me Queen Bee,
    and baby I’ll rule, I’ll rule,
    let me live that fantasy.”
    Lorde

    Queen Bee Earrings Three

    These Queen Bee Earrings would make a lovely Mother’s Day gift too, I’m just sayin’.

    Cheers,
    Madge

    *DIY Project Policy: Our tutorials are meant for your creative inspiration. Feel free to make and gift or wear these designs. Please make sure that you give credit to us as the designer if you make and share these designs on your blog or social sites. Please do not make and sell copies of our designs or sell them as kits. Please do not teach these designs as classes for profit. This is how we make our living and we ask that you respect our creativity and the time it takes to design, photograph and write these free tutorials. You may use a single photograph from each project online in blog round-ups or blog posts ONLY if you include a direct link back to our tutorial. Any use of these designs for retail sale for profit online in places like Etsy or eBay or in retail bricks and mortar, flea markets or outdoor fairs is not permitted. Thank you!

    (FTC DISCLOSURE: *This post contains affiliate links, if you click on a link and make a purchase we get a small percentage of the sale. The blogger is employed by ImpressArt, but this is her personal blog. All opinions are 100% her own!)

  • Metal Stamped Cupcake Necklace

    Cupcake two

    We’re big fans of cupcakes, because, well, cupcakes. Need we explain further? This cloud blank from ImpressArt has a lot of potential beyond being a cloud! It makes the perfect frosting for a metal stamped cupcake or the ice cream topper on a waffle cone or maybe a fun hairdo! Some of our best designs come from ‘seeing’ things differently. You could rivet these components together, but we love the kinetic movement achieved by layering them. Try making the sprinkles different colors with enamel paints or color the icing with patinas. we like it just as it is, simply striking. Pardon the pun. If you’d like to make a Metal Stamped Cupcake Necklace of your own, grab the instructions!

    You will need (These are affiliate links, if you click on a link and make a purchase, we get a small percentage of the sale):
    ImpressArt, Circle, 1/2″, Aluminum Stamping Blanks- 24 pc.
    ImpressArt- Pewter Stamping Blanks, Cloud
    Copper 24 Gauge Sheet – 6″ x 6″
    4 Beadalon Jump Ring 6mm Silver, Plated, 50-Piece
    Ball Chain with Connector
    Folk Art Enamel Acrylic Paint, Licorice
    ImpressArt- 6mm Sprinkle Pattern Metal Stamp
    ImpressArt 6mm, Vertical Lines Metal Stamp
    ImpressArt Basic Metal Stamp Set, Uppercase, 1.5mm
    ImpressArt Stamping Hammer, 1-Pound, Brass Metal
    ImpressArt 4 by 4-Inch Steel Block, Large
    Beadalon Leather Pad For Block and Anvil
    2 pairs ImpressArt Jewelry Making Tools – Pliers and Stamping Hammers – Perfect for custom designed metal and bead jewelry
    Metal Cutting Shears
    Beadsmith Metal Hole Punch Pliers for Sheet Metal, 1.5mm
    Eurotool Metalwork Deluxe Dapping Set Block With 24 Punches
    Stanley 69-122 6-1/16-Inch Wood Handle Scratch Awl
    ImpressArt Stamp Straight Tape
    Non-permanent marker
    Cotton swab
    Paper towel or soft cloth

    Cupcake 1-4

    Step one: Tape blank to bench block. Use sprinkles stamp to add texture to surface of blank. Step two: The bottom part of your cupcake is layered behind the cloud blank. Use the blank as a guide and draw the cupcake liner form. Step three: Cut the sheet metal with your sheers. You need it to hide behind the front blank, so after you cut the sheet metal, you may need to cut it a little more to fit. Step four: Use the line stamp to create the liner texture, this will overlap a bit and that’s okay! You’ll need to hit this pretty hard to make even impressions so don’t be shy!

    cupcake 5-8

    Step five: Layer the cloud blank over the cut metal, mark the hole placement. Step six: Use the hole punch pliers to punch the holes. Step seven: stamp YUM into the blank, add a period with the awl. Step eight: Use a cotton swab to apply the paint to the stamped areas on the small blank, wipe off excess with a paper towel or soft cloth.

    cupcake 9-12

    Step nine: Place the stamped small blank into the dapping block, it should just fit inside of the cup. Strike tool with hammer, moving tool around as you strike to create a domed shape.  Step ten: When you the blank is evenly dapped, remove it from the dapping block. Step eleven: It should be nicely domed like in the photo. Step twelve: Use the hole punch pliers to pierce a hole in the top of the blank.

    cupcake 13-16

    Step thirteen: Connect the blanks as shown. Attach a third jump ring to bring the first two rings together. Step fourteen: Attach a fourth jump ring to the stamped blank and through the third jump ring on the bottom two blanks. Step fifteen: Attach the pendant to the ball chain. Step sixteen: Enjoy you calorie free Metal Stamped Cupcake Necklace whenever you like!

    DIY Cupcake Pendant One

    If you like our tutorials, we’d love it if you help support us by shopping our links above! That’s how we are able to keep sharing these DIY projects with you!

    Cheers,
    Margot and Avalon

  • 16 Stunning Hand Stamped Jewelry Projects

    Hand Stamped Jewelry Projects Round Up

    Do you love metal stamping? We do too! We’ve gathered up 16 Stunning Hand Stamped Jewelry Projects from some of our favorite DIY Bloggers for your creative inspiration. Get the tutorials on their blogs and while you’re there check out the rest of their divine DIY ideas. It’s amazing how many beautiful things you can make once you master a few basic techniques. There’s a little bit of everything here from earrings to bracelets to pendants, so there’s surely a few projects here that will jump start your imagination.

    Hand Stamped Happy Girl Earrings 2

    Feel like a happy girl in these earrings from icanmakemetalstampedjewelry.

    Flower Earrings Black

    Layer up some fun with these floral earrings from icanmakemetalstampedjewelry.

    Rising-Tide-Text-DD

    Learn how to make a cuff bracelet with this video tutorial from DIY Doyenne.

    Faux-Locket-Story-Book-Necklace-2

    Stamp your story in this clever pendant from Happy Hour Projects.

    Change-is-Good-Butterfly-Stamped-Bracelet-1

    Remind yourself that change is good with this riveted bracelet from Happy Hour Projects.

    the vintage prairie dream pendant

    Dream a little dream with The Vintage Prairie.

    Be-Wild-Stamped-Bracelet-2.1

    Be wild with Happy Hour Projects.

    gradgift3

    Make a pretty keepsake for a graduate with One Artsy Mama.

    Necklace-1-600x800

    Make mom a sparkling stamped pendant with Happy Hour Projects.

    Fab Photo 3

    Smile for the camera with icanmakemetalstampedjewelry.

    Easy-DIY-Valentines-Bracelet2

    Show someone you love them beyond measure with this mixed media bracelet from DIY Doyenne.

    Embossed-and-Stamped-Leather-Bracelet-1

    Feel brave with Happy Hour Projects.

    cupcakes9

    One Artsy Mama had us at Cupcakes and Caffeine.

    She Shines

    She shines in layered earrings from icanmakemetalstampedjewelry.

    Floral-Scene-Stamped-Bracelet-1

    Stamp happy with Happy Hour Projects.

    DIY-Easy-Hand-Stamped-Bracelet-e1421765720848

    Stamp up something fabulous with DIY Doyenne.

    Want to get started making metal stamped jewelry? Here’s a post with everything you need to make hand stamped jewelry projects of your own!

    Cheers,
    Margot and Avalon

    2015 July 4 Sitewide Sale LeisureArts.com

  • Basic Metal Stamping 1 2 3

    Metal Stamping 1 2 3

    (Disclosure: This post contains affiliate links, if you click on a link and make a purchase, we get a small percentage of the sale.)

    Metal stamping 1 2 3, it’s really that easy. Here’s what you need to get started!

    Brass Stamping Hammer
    (I prefer a brass hammer to steel, brass is softer and disperses or transfers the energy of the hit into the blank preventing skipping or ghost impressions)

    Metal Stamps

    Steel Block

    Stamp Straight Tape

    Acrylic Enamel Paint

    Metal Stamping Blanks (Try aluminum when you start out, it’s softer and easier to stamp than base metal and it’s less expensive.)

    And here are the basic steps:

    Step One:

    Plan out your word, line up your stamps and make sure that the word will fit on the blank. Tape the blank to the bench block and start in the center working out from there.

    Step Two:

    Hold your stamp so it is in full contact with the surface of the blank.  Make sure it’s straight, not tilted!  Keep your fingers away from the top of the stamp.  Give your stamp one good hit, don’t stamp more than once to avoid skipping or double impressions.  Stamp your word, keep the stamps lined up to the top of the tape.  You can angle the alignment of your stamps for a more whimsical effect. If you are worried about spacing, draw marks on the tape to line up your letters or even mark directly on your metal blank with a pencil.

    Step Three:

    Add color with a permanent marker, wipe clean with a dry cloth before the marker sets.

    OR

    Use acrylic paint instead, giving it a few seconds to set before wiping the surface.

    And that’s Metal Stamping 1 2 3. You got this!

    Follow us on Bloglovin’:

    Follow on Bloglovin

  • 12 Terrific Metal Stamped Earring Projects

    12 Terrific Metal Stamped Earring Projects

    This week, it’s all about earrings!  We’ve got a fabulous line up of 12 Terrific DIY Metal Stamped Earring Projects for your creative inspiration.  Earrings are one of our favorite projects here because they’re one size fits all and they’re the easiest way to dress up an outfit in a flash.  We’re dreaming up next week’s DIY, so stay tuned!  Until then, enjoy the links.

    earrrings3

    Share your two cents without saying a word with these stamped copper and penny earrings for ImpressArt.

    floral-earrings-detail

    Use design stamps to create a simply stunning pair of textured earrings with a floral theme from Jeff Fulkerson for PJ Tool Jewelry!

    IMG_0009

    Show your love for all things metal stamping with this pretty pair of embellished earrings from Theresa Cifali for ImpressArt.

    color-love-2

    Make a pretty pair of hammered and stamped heart earrings with Margot Potter for ImpressArt

    Mixed-Up-Love-1

    Here are more hand stamped heart earrings to love from Lori Anderson of Pretty Things Blog.

    2-peace-earrings

    Stamp and paint some pretty purple peace earrings with Tammy Powley of Jewelry Making at About.com!

    May Flowers One Banner copy

    In case you missed these, we showed you how to dap, stamp and texture the perfect pair of earrings for spring last week.

    DIY-Stamped-Copper-Wire-Earrings

    Try these stamped copper wire earrings on for size with Margot Potter for ImpressArt!

    stamped earrings

    Not into DIY?  You can buy these hand stamped Dandelion Wish earrings from Tiny Tokens Designs on Etsy!

    Crafty Chick Beauty 2

    Show your crafty street cred with these DIY Crafty Chick earrings from Margot Potter for ImpressArt.

    Jingle-Bell-Earrings

    Get a jump on the holidays with these clever Jingle Bell Earrings from Margot Potter for ImpressArt!

    Copper Three

    And last, but not least, copper washers, flowers and tiny bottle caps make for a whimsical pair of hand stamped poppy earrings!

    12 Terrific Metal Stamped Earring projects for your craftertainment.  Let us know which ones you’ll be making in the comments!

    Cheers,
    Margot and Avalon

  • DIY Wonder Woman Cuffs

    Wonder Woman Cuffs copy

    I may  not be Wonder Woman, but there are days when I feel like I could surely use some super powers. How about you? If you’re standing strong in the face of adversity or just navigating the challenges of day to day life, a little bit of super hero inspiration may be just the thing you need to stay the course. In this case, I was inspired to whip up some Wonder Woman cuffs I can use to deflect whatever life tosses my way. Now if I can whip up a golden lasso of truth, saucy bustier and an invisible plane, we’ll really be talking!

    Here’s what you need to make some Wonder Woman Cuffs of your own! Kapow!

    Materials

    2 1.5″x6″ aluminum cuff bracelet blanks
    2 dimensional metal star charms
    2 silver tone 1/8 Inch Hollow Rivets 1/16 Inch Diameter
    ImpressArt- 3mm Fun Star Design Stamp
    ImpressArt 1lb. brass stamping hammer
    ImpressArt metal stamping block
    Folk Art enamel acrylic paint licorice
    Beadsmith EZ-Rivet 1/16″ Piercing and Setting Tool
    Bracelet bender
    Ruler
    Beadalon flush cutter
    Cotton swab
    Paper towel or soft cloth

    Amazon.com Widgets

    Steps 1-3

    Step one: Use the star stamp to stamp stars around the edges of the bracelet blank. Use the round end of your brass hammer to add texture to the edges as shown. Step two: Use a ruler to mark the center point of your blank. Step three: Snip the tops off of the star charms with flush cutters. (You can sand these edges with a heavy grit sand paper or jeweler’s file if you like.)

    Steps 4-6

    Step four: Use the piercing side of the riveting tool to make a hole in the marked center of your bracelet blanks and your star charms.  Step five: Place rivet into the holes on the star and the blank, the rounded side faces up, the star should be facing with the raised areas towards the bracelet. Use the riveting side of the riveting tool to screw the rivet down securing the star and blank together. Step six: Insert one side of your bracelet into the bracelet bending pliers as shown.

    Steps 7-9

    Step seven: Bend the bracelet over the arch of the bracelet bending pliers as shown, this will bend one half of your bracelet. Step eight: Flip the bracelet over and repeat. Now you have a bracelet! Step nine: Dab the enamel paint into the stamped stars with a cotton swab or your finger tips. Let this sit for about 30 seconds, then wipe the ink from the surface, leaving some in the stars to help define them.

    That’s it! You’re a crafty super hero! Aw, yiss.

    Wonder Woman Cuffs DIY

    These Wonder Woman Cuffs make me feel like I can take on the world. How about you, wonder woman?

    Cheers,
    Margot and Avalon

    *DIY Project Policy: Our tutorials are meant for your creative inspiration. Feel free to make and gift or wear these designs. Please make sure that you give credit to us as the designer if you make and share these designs on your blog or social sites. Please do not make and sell copies of our designs or sell them as kits. Please do not teach these designs as classes for profit. This is how we make our living and we ask that you respect our creativity and the time it takes to design, photograph and write these free tutorials. You may use a single photograph from each project online in blog round-ups or blog posts ONLY if you include a direct link back to our tutorial. Any use of these designs for retail sale for profit online in places like Etsy or eBay or in retail bricks and mortar, flea markets or outdoor fairs is not permitted. Thank you!

    (FTC DISCLOSURE: *This post contains affiliate links, if you click on a link and make a purchase we get a small percentage of the sale. The blogger is employed by ImpressArt, but this is her personal blog. All opinions are 100% her own!)

  • 11 DIY Metal Stamped Necklaces

    11 DIY Metal Stamped Necklaces 2

    Stamp it, bead it, wrap it, wear it! Whatever your style there’s a little something for everyone in this week’s round-up of 11 stunning DIY Metal Stamped Necklaces.  We love them all!  How about you?  Get the tutorials for these in the links below.  Make sure you show all of these talented bloggers a little love.

    Lucky Charm Close Up Text copy

    Stamp and bead a little lucky charm. Make this, it’s easy!

    IMG_1031

    Stamped jewelry gets some clever DIY packaging with I Spy DIY!

    KONICA MINOLTA DIGITAL CAMERA

    Stamp, texture and form a simply charming necklace with Studio Dax!

    Tutorial-Banner

    Make a Disney inspired commemorative necklace with Magical Day Weddings.

    des240model_2013

    Get ready for summer with this layered Gypsy necklace from Beaducation.

    necklace

    Stamp up a lovely layered necklace with Bubbly Nature Creations.

    avas-day-bridal-set

    Make gorgeous bridesmaid necklaces with Rings ‘n Things.

    Howtohandstampjewelrynecklace

    Show mom some love with this stamped and beaded Mother’s Necklace from Crazy Little Projects.

    Eye-Candy-Necklace-Final

    Make and wear a fabulous stamped and beaded eye candy necklace!

    des290_2013

    Stamp and rivet a rainy day homage with Beaducation!

    Lucky-Penny-2.1

    Turn that lucky penny into a pretty dapped and stamped necklace with Happy Hour Projects!

    There you have it, folks, 11 FABULOUS DIY Metal Stamped Necklaces.  Enjoy!

    Cheers,
    Margot and Avalon

  • Embracing Imperfection in Metal Stamping

    Embracing Imperfection in Metal Stamping

    I was hosting metal stamping make and takes at a big trade show last month when a woman walked up to the podium.  I could tell she was a perfectionist, she was very concerned with getting it right.  It took her far longer than most to stamp the three tiny pieces of metal with one letter.  She was becoming increasingly flustered.

    “How do I make this perfect?” She asked.

    “You don’t.” I answered, pausing.  “If you want perfect, get a cast metal or laser inscribed piece of jewelry.  This is metal stamping, it’s done my hand, it’s meant to have some imperfection.”

    “I want it to be perfect.” She pouted.

    I couldn’t help her.  This was something in her head that I simply couldn’t fix.  Some people are not capable of embracing imperfection in metal stamping or life in general. Which is funny, considering most things are imperfect.  I find imperfection beautiful.  Flaws, scars, asymmetry and inconsistencies fascinate me.  I am not afraid of imperfection, I embrace it.  Yet, I have to admit that sometimes even I look at my metal stamped pieces so intensely, that I begin to fall into the ‘it’s not perfect’ trap.

    Then I let that go.  Walk away, come back with fresh eyes and most of the time those tiny flaws have disappeared.  There are a few things you can do to approach this.  One approach is to intentionally skew the placement of your letters.  If you make them cattywompus on purpose, then ‘perfect’ loses meaning.  Plus, angling your letters adds a lovely touch of whimsy.  Here’s an example of a cattywompus design.:

    Angled Letters

    (You can get the instructions to make these earrings on the ImpressArt website.)

    If that isn’t your style, there are ways to line up your letters, plan your spacing and get more consistent results.  Using tape to hold the blank and placing the top of the tape just below where you want to stamp offers a guideline, marking the tape with equally spaced lines helps with spacing, making sure the words you want to stamp fit the width and height of the piece prevents running out of room, marking letter placement with a pencil offers a removable guideline, starting in the center and working to each side keeps your words centered.  I like these tips and tricks from I Always Choose the Thimble on stamping and kerning, which utilizes techniques from typesetting.  Here is a piece I stamped marking the tape and sliding the blank down to the top of the tape:

    sparkle bracelet

    It’s easier to stamp straight lines than along curves, but with a little practice and making sure the stamps are curved you can achieve lovely results.  Here’s a curved design, using the petals helped with the placement, it was easier to center the stamps:

    Be Brave Smaller

    As you can see, even my best efforts are not perfect and I am fine with that.  When you’re first starting out with stamping, using thin rectangular blanks is much easier whether you’re stamping horizontally or vertically.  There isn’t much room for error and that’s a good thing!  Practicing on thin metal strips is another way to work on your technique.  With metal stamping, practice doesn’t make perfect, but it definitely makes you more consistent.

    My advice, embracing imperfection in metal stamping is the key to enjoying it! Nothing will make you crazier than trying to force perfection on something that isn’t designed for it.  After all, that imperfection is how you know it’s been hand made.

    Cheers,
    Madge

    (Disclosure: Affiliate link below, if you buy this kit, I get a small percentage of the sale.)

    Want to get started metal stamping?  Here’s a great starter kit from ImpressArt and PJ Tool Jewelry:

  • DIY Lucky Charm Metal Stamped Necklace

    Lucky Charm Close Up Text copy

    Happy St. Patrick’s Day!  We’ve got a DIY Lucky Charm Metal Stamped Necklace that you can make and wear anytime you need to feel lucky.  You’ll learn how to make the charm and how to create a coiled and beaded chain in this easy tutorial.  Get kisses, not pinches, when you sport this on the town.

    Here’s what you need:
    ImpressArt SoftStrike Pewter 15/16″ Circle Blank
    4mm Swarovski Crystals in Shades of Green
    4mm Oval Freshwater Pearls
    Daisy Spacer Metal Bead, 4mm
    Shamrock Charm Bead
    4 Beadalon Jump Rings 6mm Silver Plated
    Beadalon 10-MM Jump Ring
    Beadalon Ball Pin Medium Head Pins
    German Style Wire, Round, Silver Plated, 24 gauge
    Folk Art Enamel 2-Ounce Acrylic Paint, Licorice
    Folk Art Enamel 2-Ounce Acrylic Paint, Evergreen
    Beadalon Chain
    Toggle Clasp
    ImpressArt- 6mm, Four Leaf Clover Metal Stamp
    ImpressArt Basic Metal Stamp Set, Uppercase, 3mm
    Ergo-Angle Metal Stamping Hammer
    ImpressArt 2 by 2-Inch Steel Block
    ImpressArt Stamp Straight Tape
    Round Nose Pliers
    ImpressArt Bent Nose Pliers
    ImpressArt Chain Nose Pliers
    ImpressArt Flush Cutters

    Step One

    Step one: Stamp the clover in center of blank.  Stamp around the edges, spacing the letters out and turning the block to face you as you stamp. Start in the center, working your way up both sides to spell Lucky Charm.

    Step two

    Step two: Use your fingertip or a cotton swab to wipe a small amount of paint into the clover.  Let sit for 30 seconds, wipe off surface leaving paint in stamped area.  Try to avoid getting green paint in the letters.

    Step Three copy

    Step Three: Use your fingertip or a cotton swab to rub black enamel paint into letters.  Allow to sit for 30 seconds and wipe paint off of surface.

    Step Four A

    Step Four: Use beads and a pearl to make beaded charms.

    Step Five

    Step Five: Make your first coiled bead in your beaded chain.  You’ll need to make wrapped coils on both ends.  If you don’t know how to make coils, here’s a video tutorial.

    Step Six

    Step Six: This is what the coiled bead should look like!

    Step Seven

    Step seven: To make the second coiled bead, make a finished coil on one end.  Start your loop on the other end, thread it into one side of the first coiled bead, finish wrapping to connect them.  Keep going, alternating between crystals and pearls on both sides for a total of four pearls and four crystals.

    Step Eight

    Step Eight:  This is your finished chain. The pendant will hang between the two pearls in the front.

    Step Nine

    Step Nine: Connect the beaded chain to two chain lengths using jump rings.  Finish the chain with a clasp.  The toggle bar should be attached directly to the final chain link, you can open and close it with your pliers. The circle end is attached with a jump ring.

    Step Ten

    Step Ten: This is the front half of your necklace.  Attach the stamped charm with a 10mm jump ring and the dangles all hang in between the first crystal and second pearl on the left side of the design.  That’s it!  Simply charming, yes?

    Lucky Charm Necklace Full View

    We hope you enjoy making and wearing this Lucky Charm Metal Stamped Necklace as much as we do!  Happy St. Patty’s Day from our home to yours.

    Cheers,
    Margot and Avalon

    *DIY Project Policy: Our tutorials are meant for your creative inspiration. Feel free to make and gift or wear these designs. Please make sure that you give credit to us as the designer if you make and share these designs on your blog or social sites. Please do not make and sell copies of our designs or sell them as kits. Please do not teach these designs as classes for profit. This is how we make our living and we ask that you respect our creativity and the time it takes to design, photograph and write these free tutorials. You may use a single photograph from each project online if you include a direct link back to our tutorial. Any use of these designs for retail sale for profit online in places like Etsy or eBay or in retail bricks and mortar, flea markets or outdoor fairs is not permitted. Thank you!