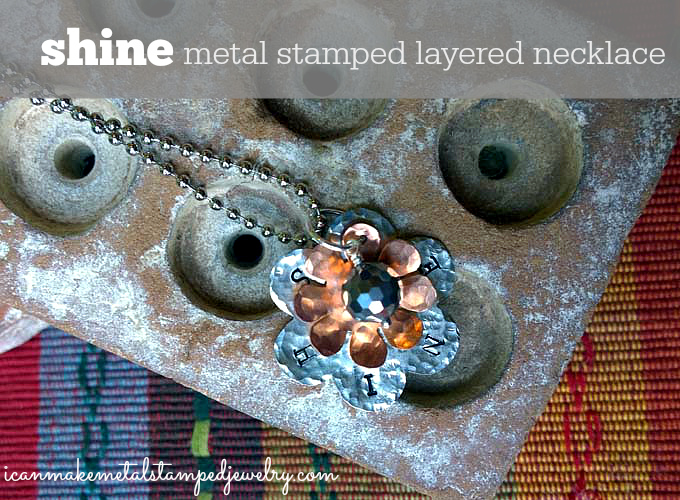
This Shine DIY Metal Stamped Layered Necklace is simple, striking, and layered with a lot of shine and sparkle. If you’re making this, you’ll be hammering, stamping, dapping and creating a coiled dangle, lots to learn and love! When you finish, you’ve got a little bauble that reminds you to shine your little light in the darkness. How cool is that?
You will need:
Folk Art Enamel Acrylic Paint, Licorice
ImpressArt, 8 Petal Flower, Copper, 15/16″ Stamping Blank
ImpressArt, 6 Petal Flower, Nickel Silver, 1″ Stamping Blank
Preciosa Czech Fire 8mm Polished Glass Bead, Faceted Round, Full Coating Silver, 75-Pack
Beadalon 10-MM Jump Ring, Nickel Free Silver Plate
Head Pins Ball Ends Ball Tips
Head Pins Ball Ends Ball Tips
Jewelry Ball Chain Necklaces with Lobster Clasp, 18-Inch, Bright Silver
ImpressArt Uppercase Alphabet Stamps ‘Newsprint’ 1/8 Inch (3mm) – 1 Set
ImpressArt 1 Pound Metal Stamping Hammer
ImpressArt 2 by 2-Inch Steel Block
Metal 2 Hole Punch
ImpressArt Stamp Straight Tape
ImpressArt Chasing Hammer
Round Nose Pliers
Bent Chain Nose Pliers
Flush Cutters
Dapping Block Set
Cotton swab
Paper towel
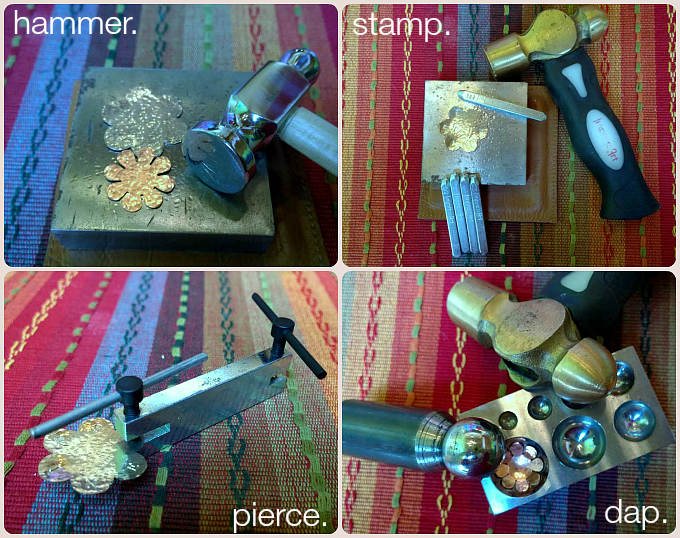
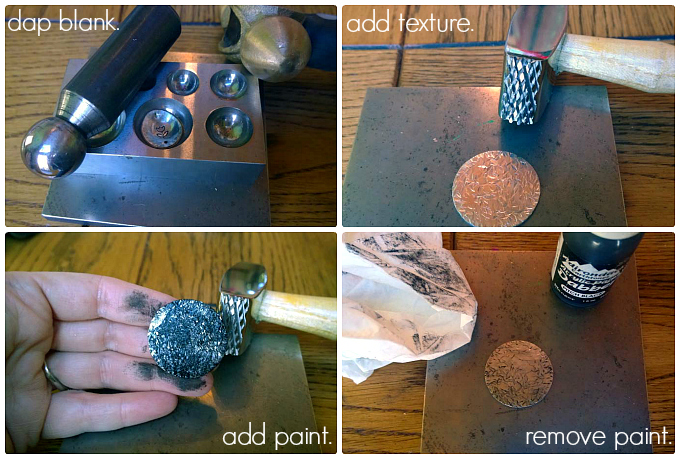
Step one: Use the round end of your chasing hammer to strike the blanks repeatedly creating hammered texture. Step two: Stamp S H I N E on your larger blank, one letter per petal. This leaves one petal unstamped. Step three: Use two-hole punch to pierce a hole in the unstamped petal of your flower. Add a hole to one petal of the copper flower. To darken the letters, use black enamel paint. Use a cotton swab to wipe the paint into the letters. Wipe off excess with a paper towel. Step four: Place copper flower in dapping block and use corresponding punch and your brass hammer to curve the shape as in photo. Hammer flat end of punch while moving round end in form on each hit to get a rounded shape.
Step five: Make the coiled dangle. Insert head pin into bead. Grasp wire at top of bead with round nose pliers. Bend wire to a 90 degree angle. Step six: Move pliers 1/2 turn. Grasp wire and bend over top of pliers forming loop. Grasp wire tail with chain nose pliers and wrap tightly from bottom of loop to top of bead. Step seven: Nip off wire tail with wire cutters. Tuck remaining tail into bottom of coil with chain nose pliers. Step eight: Use chain and bent nose pliers to open jump ring. Thread large pendant, small pendant and bead on jump ring in that order. Close jump ring securely with tension.

You’ll love the movement of this necklace when you wear it. The hammered metal and faceted bead give it lots of sparkle!
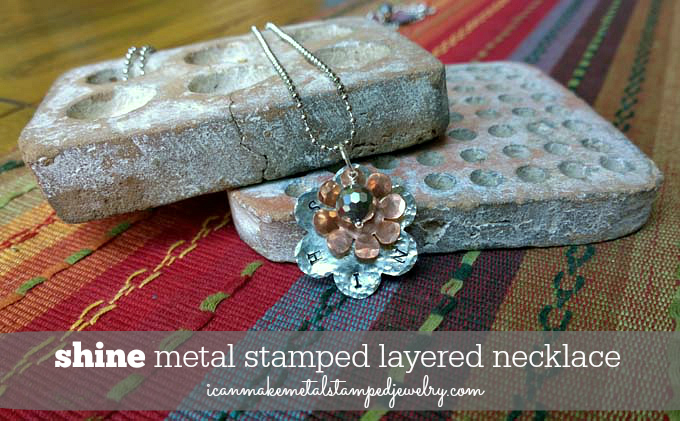
That’s how you make our Shine DIY Metal Stamped Layered Necklace. Fun, fast and fabulous. You can change the words, fonts, colors of metals and beads to make this uniquely your own. That’s the fun of metal stamping, you get to share your story. What story are you going to share?
Happy stamping,
Margot and Avalon
*DIY Project Policy: Our tutorials are meant for your creative inspiration. Feel free to make and gift or wear these designs. Please make sure that you give credit to us as the designer if you make and share these designs on your blog or social sites. Please do not make and sell copies of our designs or sell them as kits. Please do not teach these designs as classes for profit. This is how we make our living and we ask that you respect our creativity and the time it takes to design, photograph and write these free tutorials. You may use a single photograph from each project online if you include a direct link back to our tutorial. Any use of these designs for retail sale for profit online in places like Etsy or eBay or in retail bricks and mortar, flea markets or outdoor fairs is not permitted. Thank you!