We’ve been planning our holiday gifts at Casa de Potter. With a little trial and error, I came up with two festive hand stamped ornament ideas. Ornaments make present toppers and gifts. Get the tutorials to make your own DIY Christmas Ornaments below. Let’s hand make the season merry and bright!
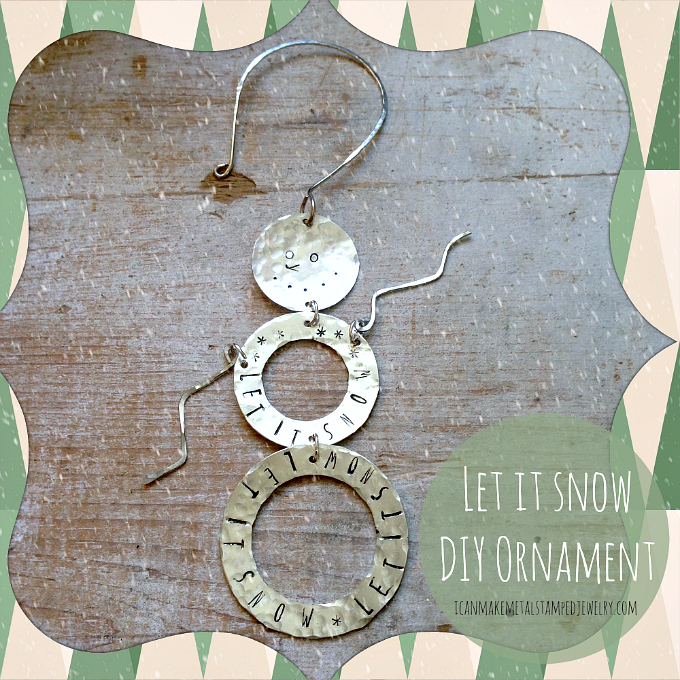
Let it Snow Ornament
You will need:
ImpressArt, Circle, Nickel Silver, 7/8″ Circle
ImpressArt, Washer Stamping Blank, Nickel Silver, 1″ circle
ImpressArt, Nickel Silver Washer 1.25″ circle
4 Silver-plated Brass, 6mm Round Jump Rings
German Style Round Wire Silver Plated, 20 Gauge
ImpressArt Lollipop Uppercase Alphabet Metal Stamps Set
Asterisk Stamp
Lowercase Handwritten Alphabet Letters 3mm
Wood Handle Scratch Awl
Folk Art Enamel Acrylic Paint, Licorice
ImpressArt Stamping Hammer, 1-Pound, Brass Metal
ImpressArt Face Chasing Hammer, 1-Inch
ImpressArt 4 by 4-Inch Steel Block, Large
Stamping Block Pad
Eurotool EuroPunch 1.25mm Round Hole Punch Pliers for Sheet Metal
1.5″ dowel
Cotton Swab
Soft Cloth or Paper Towel
Amazon.com Widgets
Amazon.com Widgets
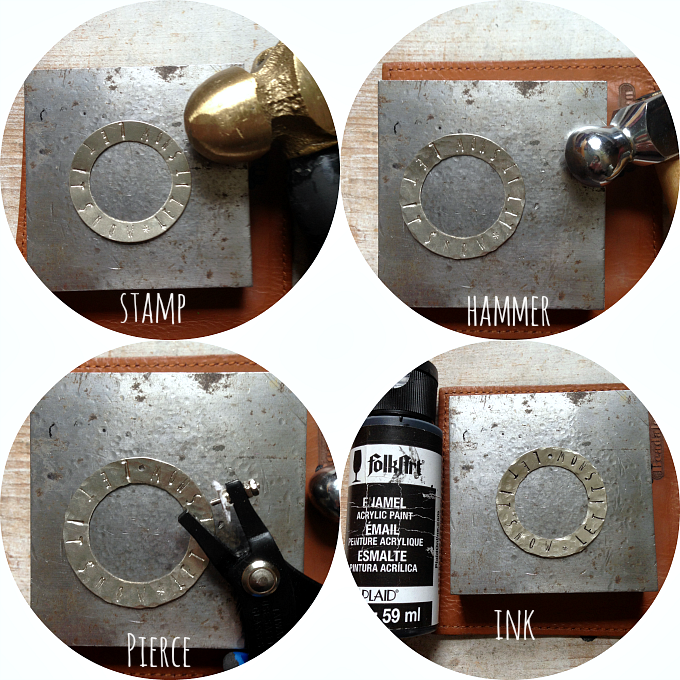
Stamp the words LET IT SNOW LET IT SNOW around the edges of the largest open circle shape in an arc. It’s easier to keep the letters straight if you turn the blank so it is facing you as you stamp each letter. Add some snowflake style accents using the asterisk stamp.
Use round end of ball peen hammer to add texture to blank.
Pierce hole in top of blank.
Use paint to give the stamped areas definition. Dab on with a cotton swab and wipe off with a soft cloth.
Repeat this process to make the center blank stamping LET IT SNOW one time. The center blank needs a hole in the top and bottom center.
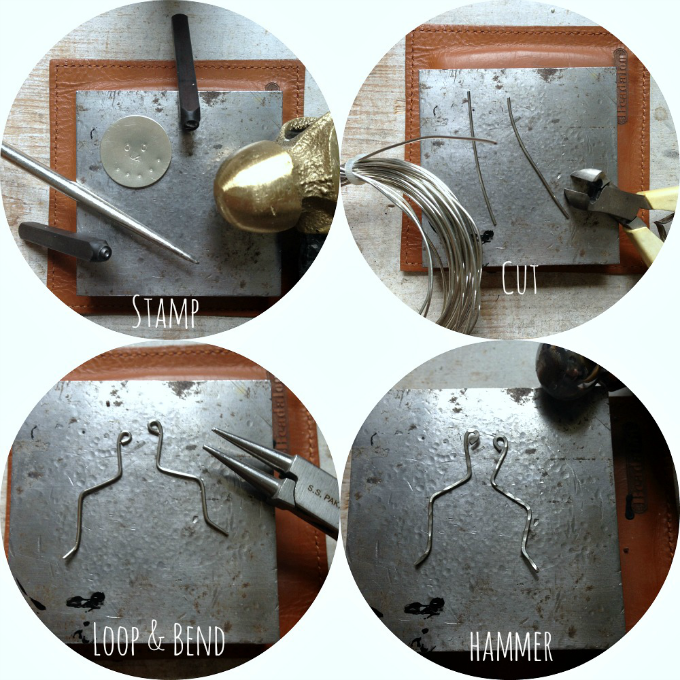
Stamp the snow man’s face. Start with two ‘o’s for eyes, a y for the nose use an awl to make the dots for the mouth.
Use wire to create arms. Cut 2 2″ wire sections.
Bend a loop in one end of each wire. Bend wire as shown.
Use chasing hammer to flatten and texture wire.
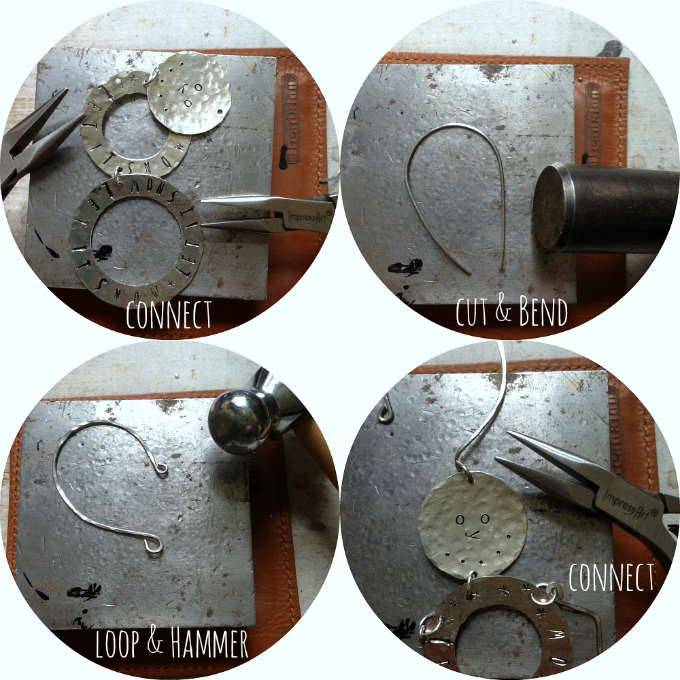
Use the hole punch tool to add a hole to the top and bottom center of the solid blank. Connect these all together with the jump rings.
You can use a pre-made hook or make your own. Just bend a 3-4″ section of wire around a larger dowel.
Use round nose plies to add a loop to both ends. Hammer this to work harden the wire and add texture.
Connect the hook to the top of the snowman, you should bend the loop so the hook hangs sideways and the ornament will face forward when hanging on the tree.

Twinkle Ornament
This one is a little simpler, just two shapes layered on top of each other. Easy peasy, you got this!
You will need:
3″ Aluminum stamping blank
ImpressArt, Square Washer Stamping Blanks, Brass, 1 1/8″
Beadalon German Style Round Wire Nickel-Free Silver Plated, 20 Gauge
10-MM Jump Ring, Nickel Free Silver Plate
Asterisk Stamp
ImpressArt Lollipop Uppercase Alphabet Metal Stamps Set
Folk Art Enamel Acrylic Paint, Licorice
ImpressArt Stamping Hammer, 1-Pound, Brass Metal
ImpressArt Face Chasing Hammer, 1-Inch
ImpressArt 4 by 4-Inch Steel Block, Large
Eurotool EuroPunch 1.25mm Round Hole Punch Pliers for Sheet Metal
1.5″ dowel
Cotton Swab
Soft Cloth or Paper Towel
Amazon.com Widgets
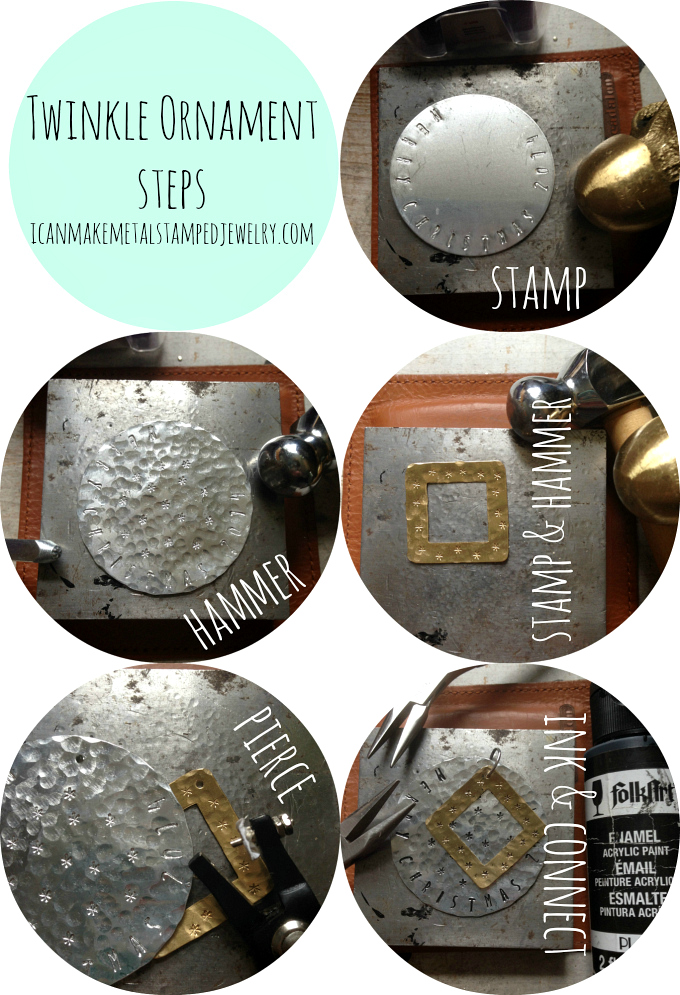
Stamp MERRY CHRISTMAS 2014 around the edge of the blank.
Use the asterisk stamp to add accents in the center of the blank, add texture with ball peen hammer.
Stamp the asterisk around the edge of the brass blank, varying placement. Texture with ball peen hammer.
Use the hole punch to pierce the top center of both blanks.
Add paint to give the stamped areas definition, dab on, wipe off. Connect them together with a large jump ring.
Use a pre-made hook or make your own as before.
That’s it! Heartfelt and handmade DIY Christmas Ornaments.
Cheers,
Margot and Avalon
Leave a Reply